Popular Woodworking 2006-04 № 154, страница 73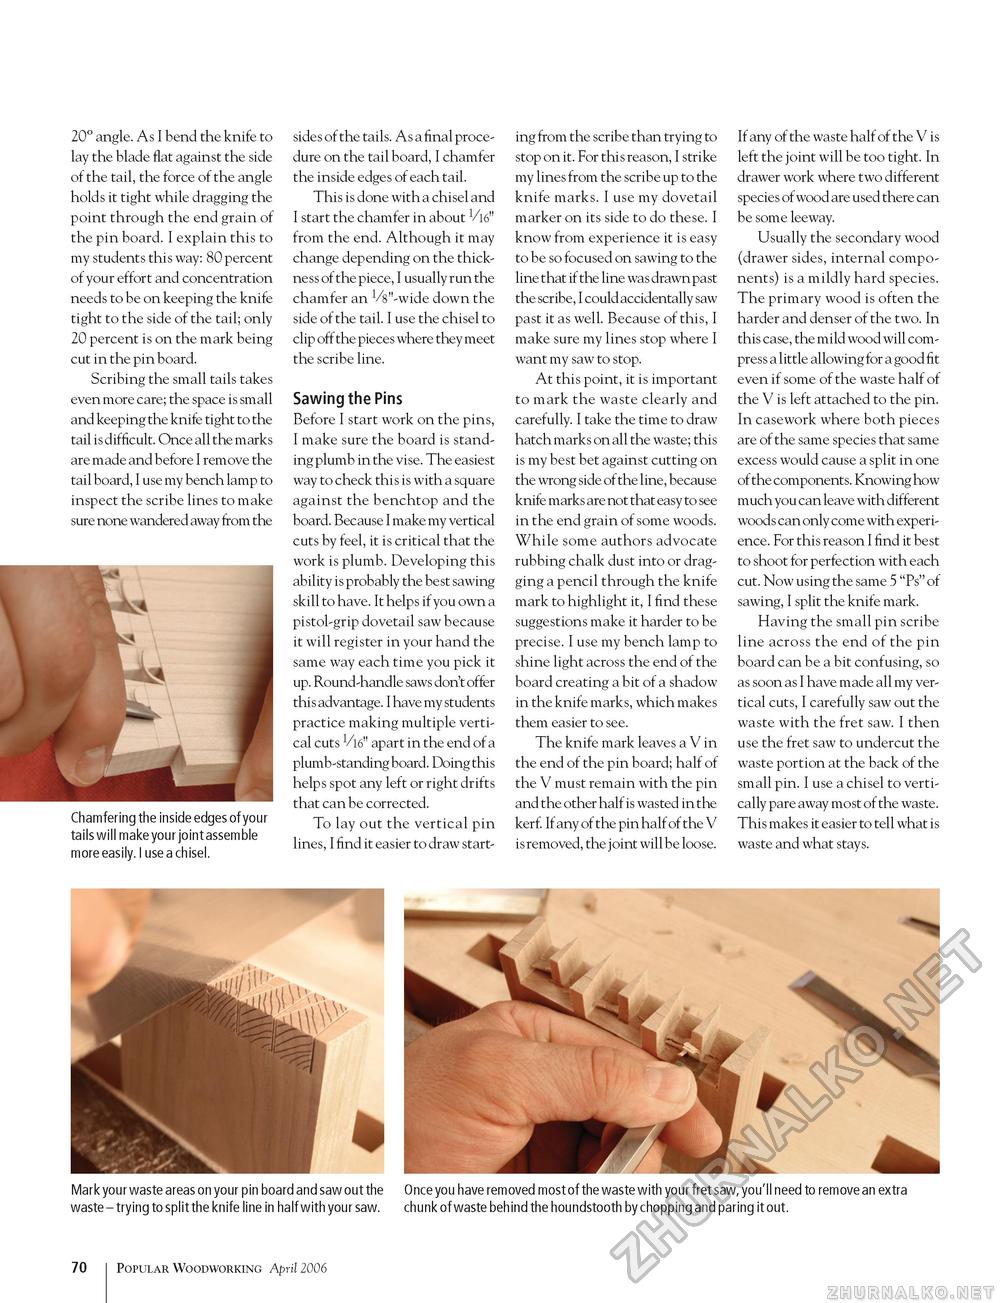
20° angle. As I bend the knife to lay the blade flat against the side of the tail, the force of the angle holds it tight while dragging the point through the end grain of the pin board. I explain this to my students this way: 80 percent of your effort and concentration needs to be on keeping the knife tight to the side of the tail; only 20 percent is on the mark being cut in the pin board. Scribing the small tails takes even more care; the space is small and keeping the knife tight to the tail is difficult. Once all the marks are made and before I remove the tail board, I use my bench lamp to inspect the scribe lines to make sure none wandered away from the Chamfering the inside edges of your tails will make your joint assemble more easily. I use a chisel. sides of the tails. As a final procedure on the tail board, I chamfer the inside edges of each tail. This is done with a chisel and I start the chamfer in about V16" from the end. Although it may change depending on the thickness of the piece, I usually run the chamfer an V8"-wide down the side of the tail. I use the chisel to clip off the pieces where they meet the scribe line. Sawing the Pins Before I start work on the pins, I make sure the board is standing plumb in the vise. The easiest way to check this is with a square against the benchtop and the board. Because I make my vertical cuts by feel, it is critical that the work is plumb. Developing this ability is probably the best sawing skill to have. It helps if you own a pistol-grip dovetail saw because it will register in your hand the same way each time you pick it up. Round-handle saws don't offer this advantage. I have my students practice making multiple vertical cuts VW' apart in the end of a plumb-standing board. Doing this helps spot any left or right drifts that can be corrected. To lay out the vertical pin lines, I find it easier to draw start ing from the scribe than trying to stop on it. For this reason, I strike my lines from the scribe up to the knife marks. I use my dovetail marker on its side to do these. I know from experience it is easy to be so focused on sawing to the line that if the line was drawn past the scribe, I could accidentally saw past it as well. Because of this, I make sure my lines stop where I want my saw to stop. At this point, it is important to mark the waste clearly and carefully. I take the time to draw hatch marks on all the waste; this is my best bet against cutting on the wrong side of the line, because knife marks are not that easy to see in the end grain of some woods. While some authors advocate rubbing chalk dust into or dragging a pencil through the knife mark to highlight it, I find these suggestions make it harder to be precise. I use my bench lamp to shine light across the end of the board creating a bit of a shadow in the knife marks, which makes them easier to see. The knife mark leaves a V in the end of the pin board; half of the V must remain with the pin and the other half is wasted in the kerf. If any of the pin half of the V is removed, the joint will be loose. If any of the waste half of the V is left the joint will be too tight. In drawer work where two different species of wood are used there can be some leeway. Usually the secondary wood (drawer sides, internal components) is a mildly hard species. The primary wood is often the harder and denser of the two. In this case, the mild wood will compress a little allowing for a good fit even if some of the waste half of the V is left attached to the pin. In casework where both pieces are of the same species that same excess would cause a split in one of the components. Knowing how much you can leave with different woods can only come with experience. For this reason I find it best to shoot for perfection with each cut. Now using the same 5 "Ps" of sawing, I split the knife mark. Having the small pin scribe line across the end of the pin board can be a bit confusing, so as soon as I have made all my vertical cuts, I carefully saw out the waste with the fret saw. I then use the fret saw to undercut the waste portion at the back of the small pin. I use a chisel to vertically pare away most of the waste. This makes it easier to tell what is waste and what stays. Mark your waste areas on your pin board and saw out the waste - trying to split the knife line in half with your saw. Once you have removed most of the waste with your fret saw, you'll need to remove an extra chunk of waste behind the houndstooth by chopping and paring it out. 70 Popular Woodworking April 2006 |


