Popular Woodworking 2007-04 № 161, страница 57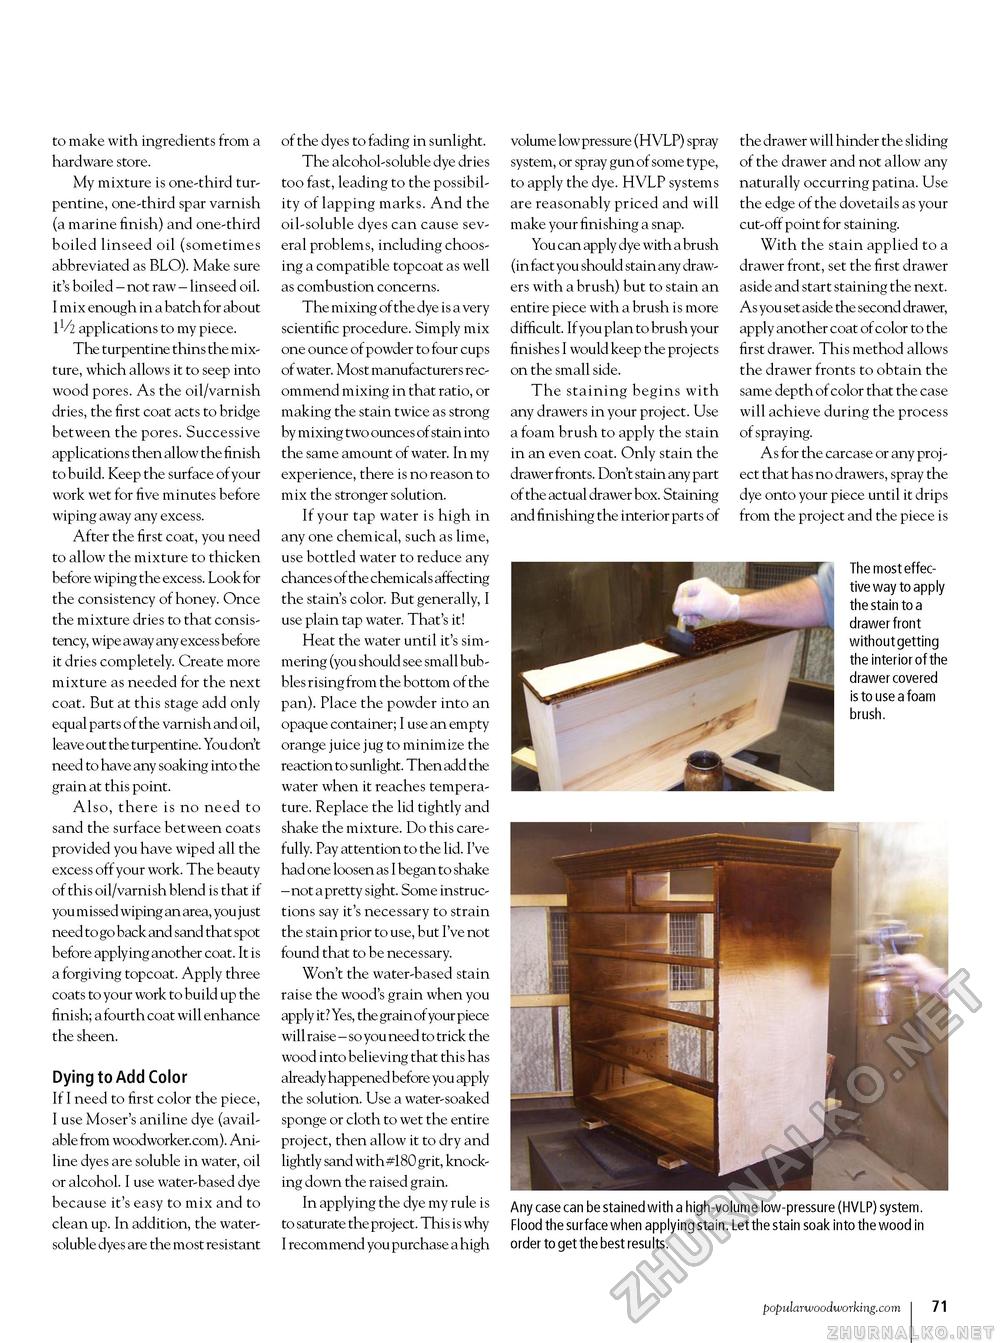
to make with ingredients from a hardware store. My mixture is one-third turpentine, one-third spar varnish (a marine finish) and one-third boiled linseed oil (sometimes abbreviated as BLO). Make sure it's boiled - not raw - linseed oil. I mix enough in a batch for about 1V2 applications to my piece. The turpentine thins the mixture, which allows it to seep into wood pores. As the oil/varnish dries, the first coat acts to bridge between the pores. Successive applications then allow the finish to build. Keep the surface of your work wet for five minutes before wiping away any excess. After the first coat, you need to allow the mixture to thicken before wiping the excess. Look for the consistency of honey. Once the mixture dries to that consistency, wipe away any excess before it dries completely. Create more mixture as needed for the next coat. But at this stage add only equal parts of the varnish and oil, leave out the turpentine. You don't need to have any soaking into the grain at this point. Also, there is no need to sand the surface between coats provided you have wiped all the excess off your work. The beauty of this oil/varnish blend is that if you missed wiping an area, you just need to go back and sand that spot before applying another coat. It is a forgiving topcoat. Apply three coats to your work to build up the finish; a fourth coat will enhance the sheen. Dying to Add Color If I need to first color the piece, I use Moser's aniline dye (available from woodworker.com). Aniline dyes are soluble in water, oil or alcohol. I use water-based dye because it's easy to mix and to clean up. In addition, the water-soluble dyes are the most resistant of the dyes to fading in sunlight. The alcohol-soluble dye dries too fast, leading to the possibility of lapping marks. And the oil-soluble dyes can cause several problems, including choosing a compatible topcoat as well as combustion concerns. The mixing of the dye is a very scientific procedure. Simply mix one ounce of powder to four cups of water. Most manufacturers recommend mixing in that ratio, or making the stain twice as strong by mixing two ounces of stain into the same amount of water. In my experience, there is no reason to mix the stronger solution. If your tap water is high in any one chemical, such as lime, use bottled water to reduce any chances of the chemicals affecting the stain's color. But generally, I use plain tap water. That's it! Heat the water until it's simmering (you should see small bubbles rising from the bottom of the pan). Place the powder into an opaque container; I use an empty orange juice jug to minimize the reaction to sunlight. Then add the water when it reaches temperature. Replace the lid tightly and shake the mixture. Do this carefully. Pay attention to the lid. I've had one loosen as I began to shake - not a pretty sight. Some instructions say it's necessary to strain the stain prior to use, but I've not found that to be necessary. Won't the water-based stain raise the wood's grain when you apply it? Yes, the grain ofyour piece will raise - so you need to trick the wood into believing that this has already happened before you apply the solution. Use a water-soaked sponge or cloth to wet the entire project, then allow it to dry and lightly sand with #180 grit, knocking down the raised grain. In applying the dye my rule is to saturate the project. This is why I recommend you purchase a high volume low pressure (HVLP) spray system, or spray gun of some type, to apply the dye. HVLP systems are reasonably priced and will make your finishing a snap. You can apply dye with a brush (in fact you should stain any drawers with a brush) but to stain an entire piece with a brush is more difficult. If you plan to brush your finishes I would keep the projects on the small side. The staining begins with any drawers in your project. Use a foam brush to apply the stain in an even coat. Only stain the drawer fronts. Don't stain any part of the actual drawer box. Staining and finishing the interior parts of the drawer will hinder the sliding of the drawer and not allow any naturally occurring patina. Use the edge of the dovetails as your cut-off point for staining. With the stain applied to a drawer front, set the first drawer aside and start staining the next. As you set aside the second drawer, apply another coat of color to the first drawer. This method allows the drawer fronts to obtain the same depth of color that the case will achieve during the process of spraying. As for the carcase or any proj -ect that has no drawers, spray the dye onto your piece until it drips from the project and the piece is The most effective way to apply the stain to a drawer front without getting the interior of the drawer covered is to use a foam brush. Any case can be stained with a high-volume low-pressure (HVLP) system. Flood the surface when applying stain. Let the stain soak into the wood in order to get the best results. popularwoodworking.com I 71 |


