Popular Woodworking 2007-04 № 161, страница 70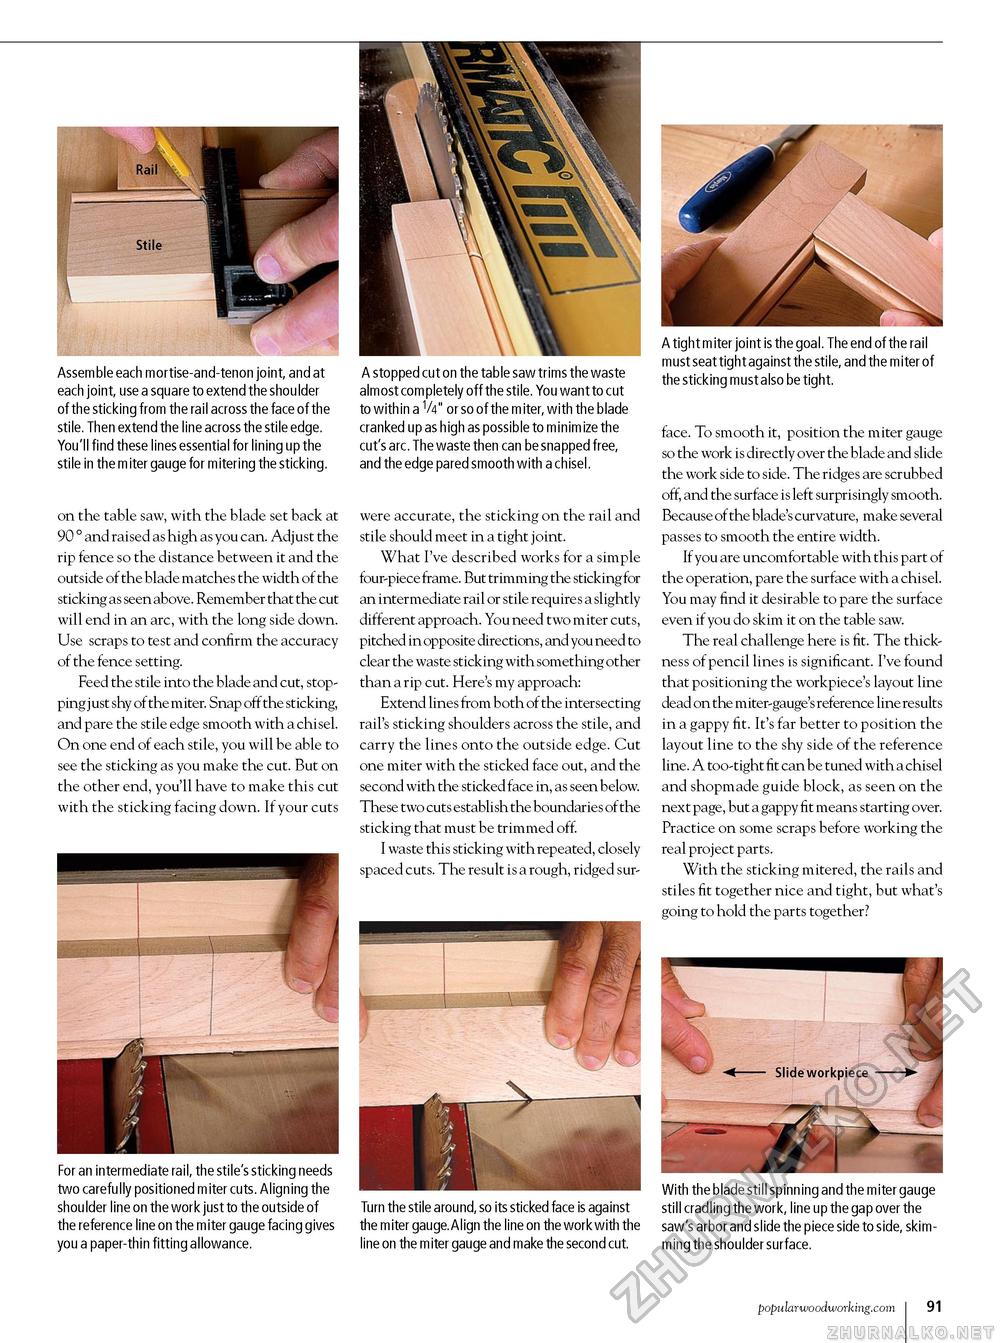
Assemble each mortise-and-tenon joint, and at each joint, use a square to extend the shoulder of the sticking from the rail across the face of the stile. Then extend the line across the stile edge. You'll find these lines essential for lining up the stile in the m iter gauge for mitering the sticking. on the table saw, with the blade set back at 90 ° and raised as high as you can. Adjust the rip fence so the distance between it and the outside of the blade matches the width of the sticking as seen above. Remember that the cut will end in an arc, with the long side down. Use scraps to test and confirm the accuracy of the fence setting. Feed the stile into the blade and cut, stopping just shy of the miter. Snap off the sticking, and pare the stile edge smooth with a chisel. On one end of each stile, you will be able to see the sticking as you make the cut. But on the other end, you'll have to make this cut with the sticking facing down. If your cuts For an intermediate rail, the stile's sticking needs two carefully positioned miter cuts. Aligning the shoulder line on the work just to the outside of the reference line on the miter gauge facing gives you a paper-thin fitting allowance. A stopped cut on the table saw trims the waste almost completely off the stile. You want to cut to within a V4" or so of the m iter, with the blade cranked up as high as possible to minim ize the cut's arc. The waste then can be snapped free, and the edge pared smooth with a chisel. were accurate, the sticking on the rail and stile should meet in a tight joint. What I've described works for a simple four-piece frame. But trimming the sticking for an intermediate rail or stile requires a slightly different approach. You need two miter cuts, pitched in opposite directions, and you need to clear the waste sticking with something other than a rip cut. Here's my approach: Extend lines from both of the intersecting rail's sticking shoulders across the stile, and carry the lines onto the outside edge. Cut one miter with the sticked face out, and the second with the sticked face in, as seen below. These two cuts establish the boundaries of the sticking that must be trimmed off. I waste this sticking with repeated, closely spaced cuts. The result is a rough, ridged sur- Turn the stile around, so its sticked face is against the miter gauge. Align the line on the work with the line on the miter gauge and make the second cut. A tight m iter joint is the goal. The end of the rail must seat tight against the stile, and the miter of the sticking must also be tight. face. To smooth it, position the miter gauge so the work is directly over the blade and slide the work side to side. The ridges are scrubbed off, and the surface is left surprisingly smooth. Because of the blade's curvature, make several passes to smooth the entire width. If you are uncomfortable with this part of the operation, pare the surface with a chisel. You may find it desirable to pare the surface even if you do skim it on the table saw. The real challenge here is fit. The thickness of pencil lines is significant. I've found that positioning the workpiece's layout line dead on the miter-gauge's reference line results in a gappy fit. It's far better to position the layout line to the shy side of the reference line. A too-tight fit can be tuned with a chisel and shopmade guide block, as seen on the next page, but a gappy fit means starting over. Practice on some scraps before working the real project parts. With the sticking mitered, the rails and stiles fit together nice and tight, but what's going to hold the parts together? With the blade still spinning and the miter gauge still cradling the work, line up the gap over the saw's arbor and slide the piece side to side, skimming the shoulder surface. popularwoodworking.com I 91 |


