Popular Woodworking 2007-06 № 162, страница 19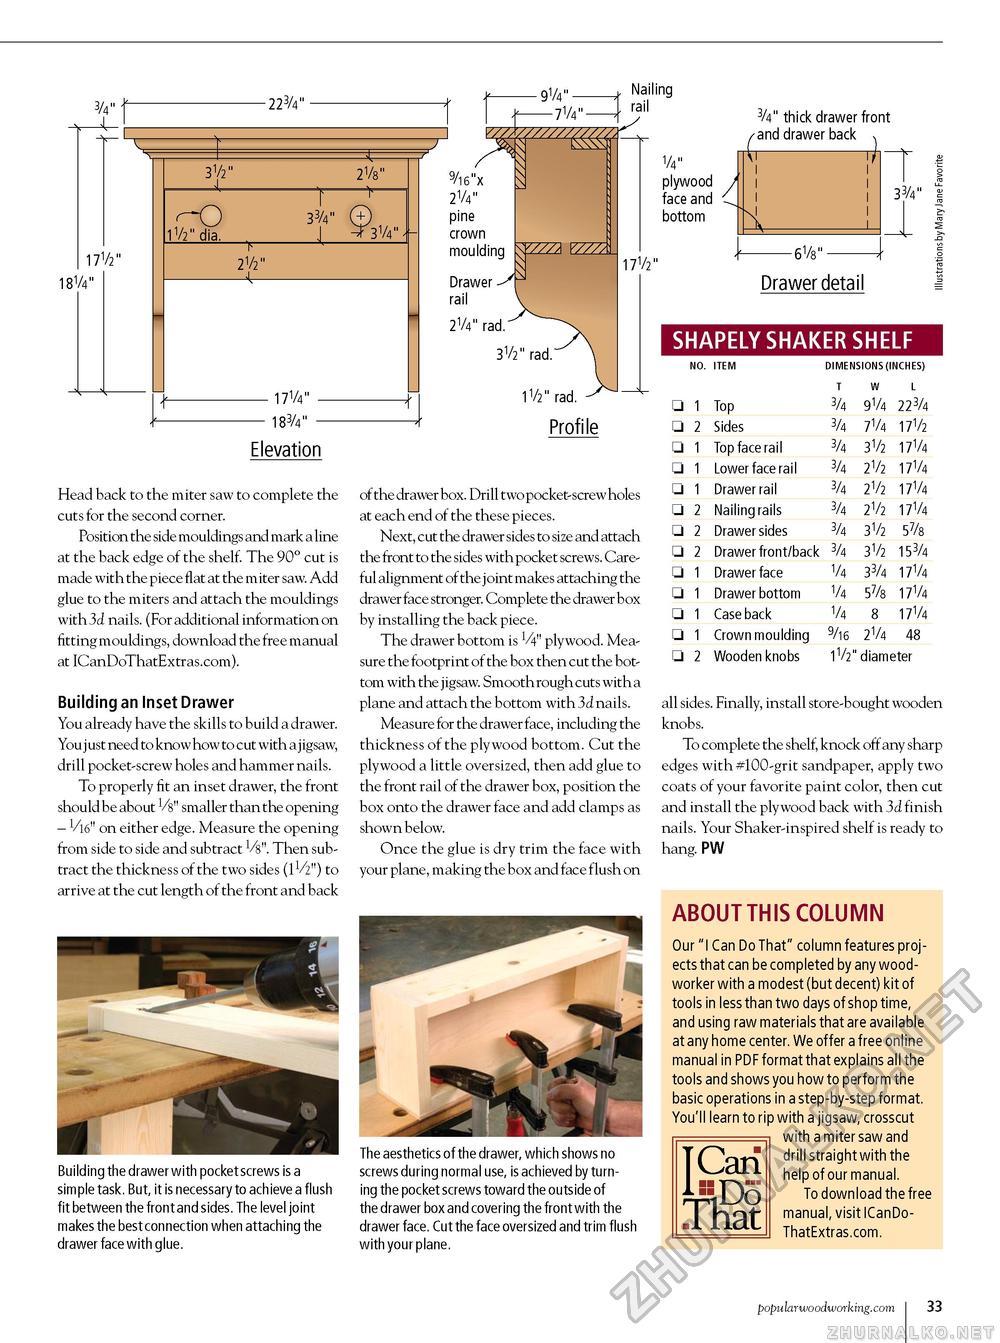
3/4" - 223/4" .91/4"- t: 17V2" 18V4" V771. 312" 218"
— 171 4" - — 183/4" - Elevation Head back to the miter saw to complete the cuts for the second corner. Position the side mouldings and mark a line at the back edge of the shelf. The 90° cut is made with the piece flat at the miter saw. Add glue to the miters and attach the mouldings with 3d nails. (For additional information on fitting mouldings, download the free manual at ICanDoThatExtras.com). Building an inset Drawer You already have the skills to build a drawer. You j ust need to know how to cut with a j igsaw, drill pocket-screw holes and hammer nails. To properly fit an inset drawer, the front should be about Vs" smaller than the opening - W on either edge. Measure the opening from side to side and subtract V&". Then subtract the thickness of the two sides (IV2") to arrive at the cut length of the front and back V/////A 9/16"x fc 2V4" pine crown moulding Drawer S rail 2V4" rad. 3V2" rad 71 4" mt Nailing rail 1V2" rad. Profile of the drawer box. Drill two pocket-screw holes at each end of the these pieces. Next, cut the drawer sides to size and attach the front to the sides with pocket screws. Careful alignment of the j oint makes attaching the drawer face stronger. Complete the drawer box by installing the back piece. The drawer bottom is V4" plywood. Measure the footprint of the box then cut the bottom with the j igsaw. Smooth rough cuts with a plane and attach the bottom with 3d nails. Measure for the drawer face, including the thickness of the plywood bottom. Cut the plywood a little oversized, then add glue to the front rail of the drawer box, position the box onto the drawer face and add clamps as shown below. Once the glue is dry trim the face with your plane, making the box and face flush on Building the drawer with pocket screws is a simple task. But, it is necessary to ach ieve a flush fit between the front and sides. The level joint makes the best connection when attaching the drawer face with glue. The aesthetics of the drawer, which shows no screws during normal use, is achieved by turning the pocket screws toward the outside of the drawer box and covering the front with the drawer face. Cut the face oversized and trim flush with your plane. V4" plywood face and bottom 17V2" 3/4" thick drawer front 33/4" Drawer detail shapely shaker shelf
all sides. Finally, install store-bought wooden knobs. To complete the shelf, knock off any sharp edges with #100-grit sandpaper, apply two coats of your favorite paint color, then cut and install the plywood back with 3d finish nails. Your Shaker-inspired shelf is ready to hang. pW about THiS column Our "I Can Do That" column features projects that can be completed by any woodworker with a modest (but decent) kit of tools in less than two days of shop time, and using raw materials that are available at any home center. We offer a free online manual in PDF format that explains all the tools and shows you how to perform the basic operations in a step-by-step format. You'll learn to rip with a jigsaw, crosscut with a miter saw and T/^o-p. drill straight with the I help of our manual. ^ J_)q To download the free I hot* manual, visit ICanDo-L LLCIL ThatExtras.com. popularwoodworking.com 23 |
||||||||||||||||||||||||||||||||||||||||||||||||||||||||||||||||||||||||||||||||||||||||||


