Popular Woodworking 2007-08 № 163, страница 13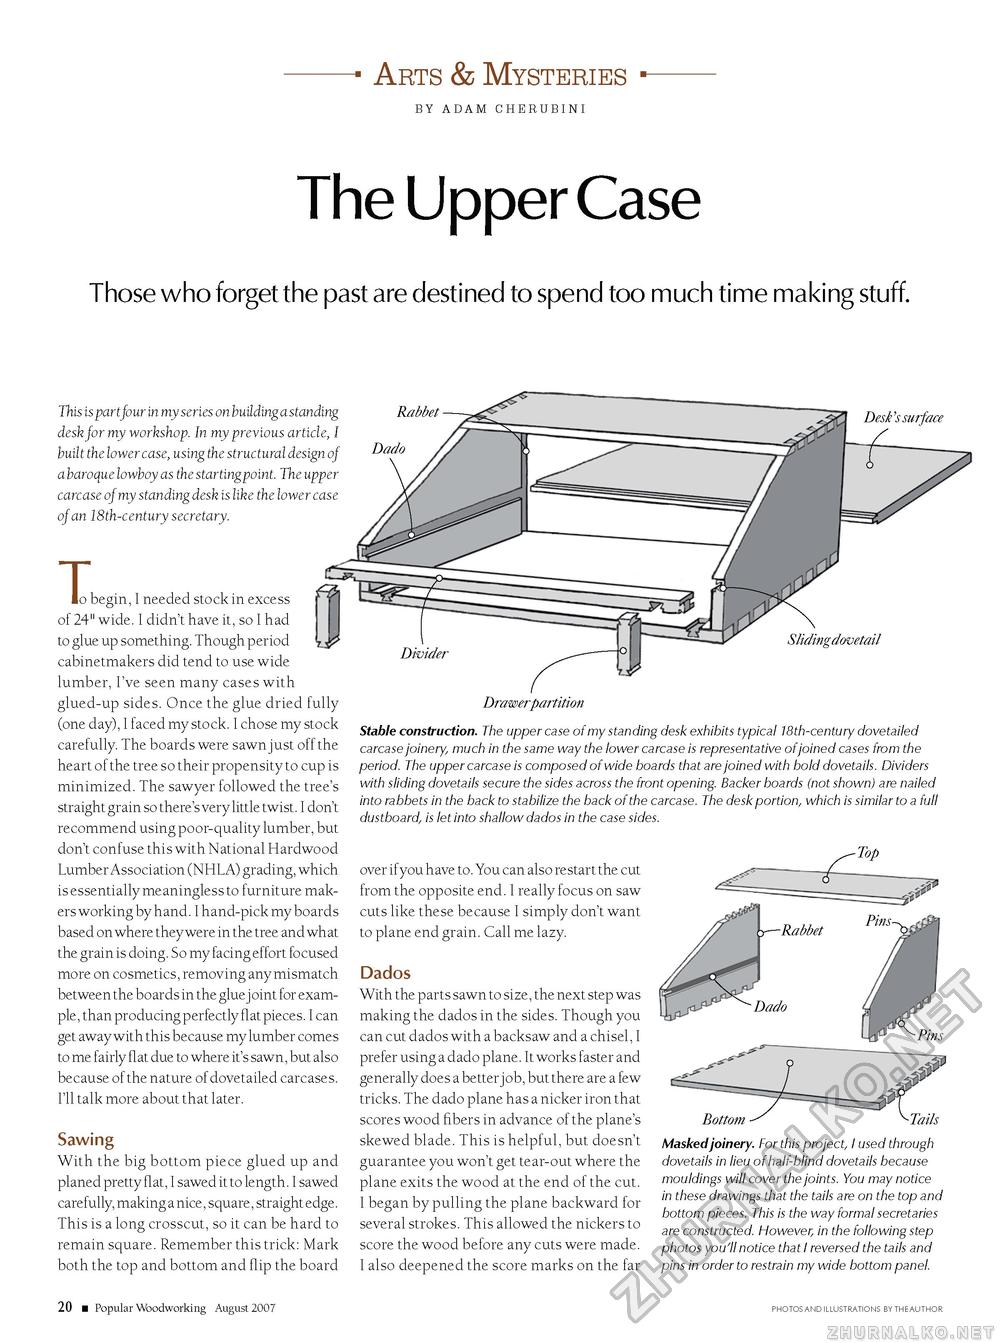
Arts & Mysteries by adam cherubini The Upper Case Those who forget the past are destined to spend too much time making stuff. This is part four in my series on building a standing desk for my workshop. In my previous article, I built the lower case, using the structural design of a baroque lowboy as the startingpoint. The upper carcase of my standing desk is like the lower case of an 18th-century secretary. T o b o begin, I needed stock in excess of 24" wide. I didn't have it, so I had to glue up something. Though period cabinetmakers did tend to use wide lumber, I've seen many cases with glued-up sides. Once the glue dried fully (one day), I faced my stock. I chose my stock carefully. The boards were sawn just off the heart of the tree so their propensity to cup is minimized. The sawyer followed the tree's straight grain so there's very little twist. I don't recommend using poor-quality lumber, but don't confuse this with National Hardwood Lumber Association (NHLA) grading, which is essentially meaningless to furniture makers working by hand. I hand-pick my boards based on where they were in the tree and what the grain is doing. So my facing effort focused more on cosmetics, removing any mismatch between the boards in the glue j oint for example, than producing perfectly flat pieces. I can get away with this because my lumber comes to me fairly flat due to where it's sawn, but also because of the nature of dovetailed carcases. I'll talk more about that later. Sawing With the big bottom piece glued up and planed pretty flat, I sawed it to length. I sawed carefully, making a nice, square, straight edge. This is a long crosscut, so it can be hard to remain square. Remember this trick: Mark both the top and bottom and flip the board Rabbet Dado Desk's surface Slidinggdovetail Drawer partition Stable construction. The upper case of my standing desk exhibits typical 18th-century dovetailed carcase joinery, much in the same way the lower carcase is representative of joined cases from the period. The upper carcase is composed of wide boards that are joined with bold dovetails. Dividers with sliding dovetails secure the sides across the front opening. Backer boards (not shown) are nailed into rabbets in the back to stabilize the back of the carcase. The desk portion, which is similar to a full dustboard, is let into shallow dados in the case sides. over ifyou have to. You can also restart the cut from the opposite end. I really focus on saw cuts like these because I simply don't want to plane end grain. Call me lazy. Dados With the parts sawn to size, the next step was making the dados in the sides. Though you can cut dados with a backsaw and a chisel, I prefer using a dado plane. It works faster and generally does a better job, but there are a few tricks. The dado plane has a nicker iron that scores wood fibers in advance of the plane's skewed blade. This is helpful, but doesn't guarantee you won't get tear-out where the plane exits the wood at the end of the cut. I began by pulling the plane backward for several strokes. This allowed the nickers to score the wood before any cuts were made. I also deepened the score marks on the far Bottom Tails Masked joinery. For this project, I used through dovetails in lieu of half-blind dovetails because mouldings will cover the joints. You may notice in these drawings that the tails are on the top and bottom pieces. This is the way formal secretaries are constructed. However, in the following step photos you'll notice that I reversed the tails and pins in order to restrain my wide bottom panel. 20 ■ Popular Woodworking August 2007 PHOTOS AND ILLUSTRATIONS BY THE AUTHOR |


