Popular Woodworking 2008-08 № 170, страница 11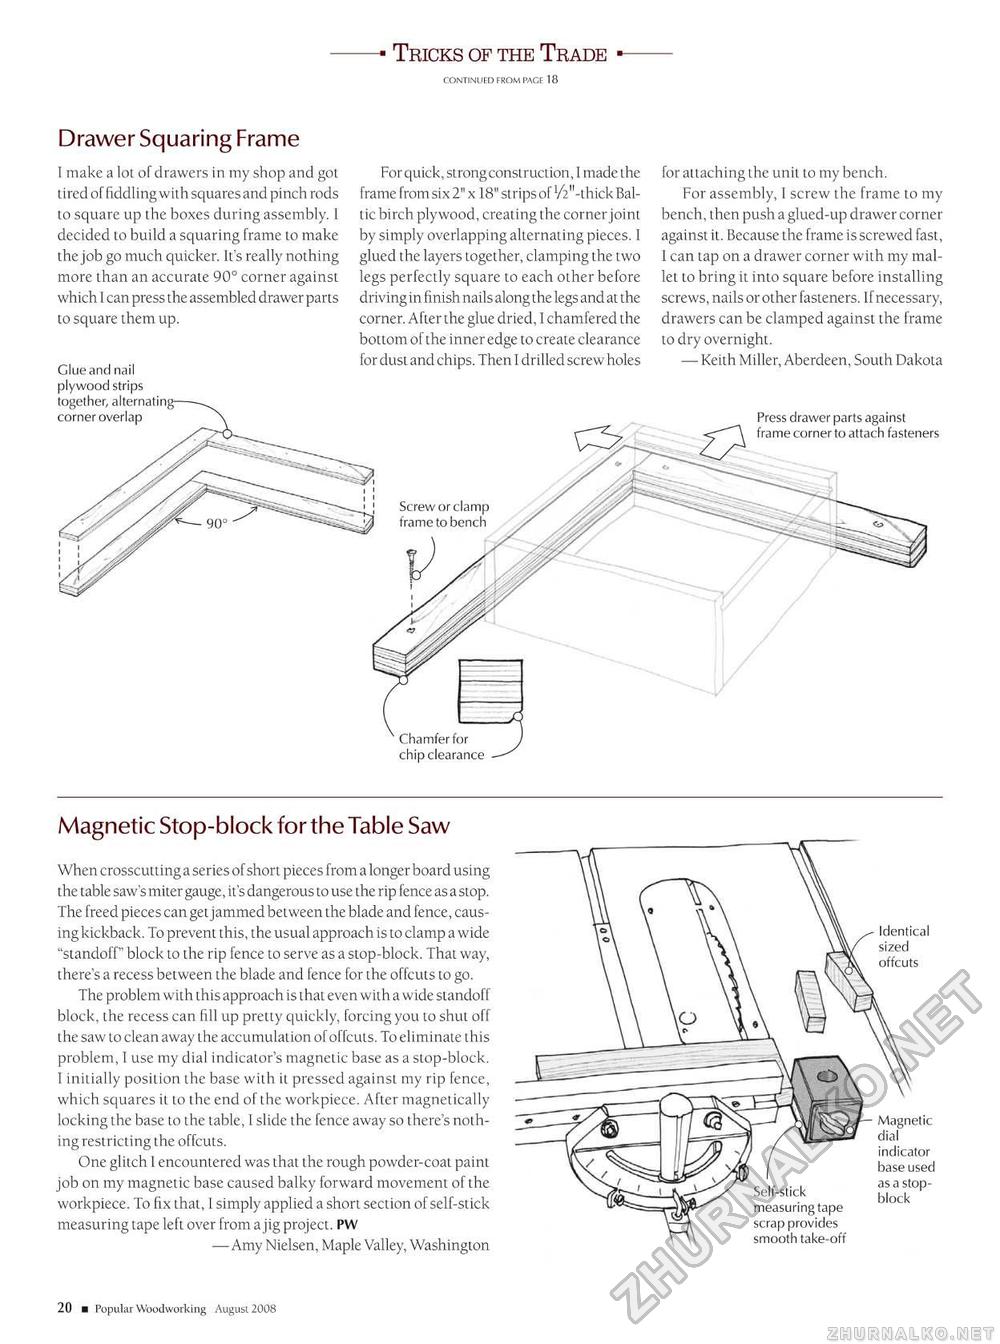
—■ Tricks of the Trade ■— Drawer Squaring Frame Chamfer for chip clearance - Screw or clamp frame to bench I make a lot of drawers in my shop and got tired of fiddling with squares and pinch rods to square up the boxes during assembly. I decided to build a squaring frame to make the job go much quicker. It's really nothing more than an accurate 90° corner against which 1 can press the assembled drawer parts to square them up. For quick, strong construction, I made the frame from six 2" x 18" strips of Vr'-thickBaltic birch plywood, creating the corner joint by simply overlapping alternating pieces. I glued the layers together, clamping the two legs perfectly square to each other before driving in finish nails along the legs and at the corner. After the glue dried, I chamfered the bottom of the inner edge to create clearance for dust and chips. Then I drilled screw holes for attaching the unit to my bench. For assembly, 1 screw the frame to my bench, then push a glued-up drawer corner against it. Because the frame is screwed fast, I can tap on a drawer corner with my mallet to bring it into square before installing screws, nails or other fasteners. If necessary, drawers can be clamped against the frame to dry overnight. — Keith Miller, Aberdeen, South Dakota Press drawer parts against frame corner to attach fasteners Magnetic Stop-block for the Table Saw When crosscutting a series of short pieces from a longer board using the table saw's miter gauge, it's dangerous to use the rip fence as a stop. The freed pieces can get jammed between the blade and fence, causing kickback. To prevent this, the usual approach is to clamp a wide "standoff" block to the rip fence to serve as a stop-block. That way, there's a recess between the blade and fence for the offcuts to go. The problem with this approach is that even with a wide standoff block, the recess can fill up pretty quickly, forcing you to shut off the saw to clean away the accumulation of offcuts. To eliminate this problem, I use my dial indicator's magnetic base as a stop-block. I initially position the base with it pressed against my rip fence, which squares it to the end of the workpiece. After magnetically locking the base to the table, I slide the fence away so there's nothing restricting the offcuts. One glitch I encountered was that the rough powder-coat paint job on my magnetic base caused balky forward movement of the workpiece. To fix that, I simply applied a short section of self-stick measuring tape left over from a jig project. PW —Amy Nielsen, Maple Valley, Washington Self-stick measuring tape scrap provides smooth take-off 20 ■ Popular Woodworking August 2008 |


