Popular Woodworking 2008-11 № 172, страница 36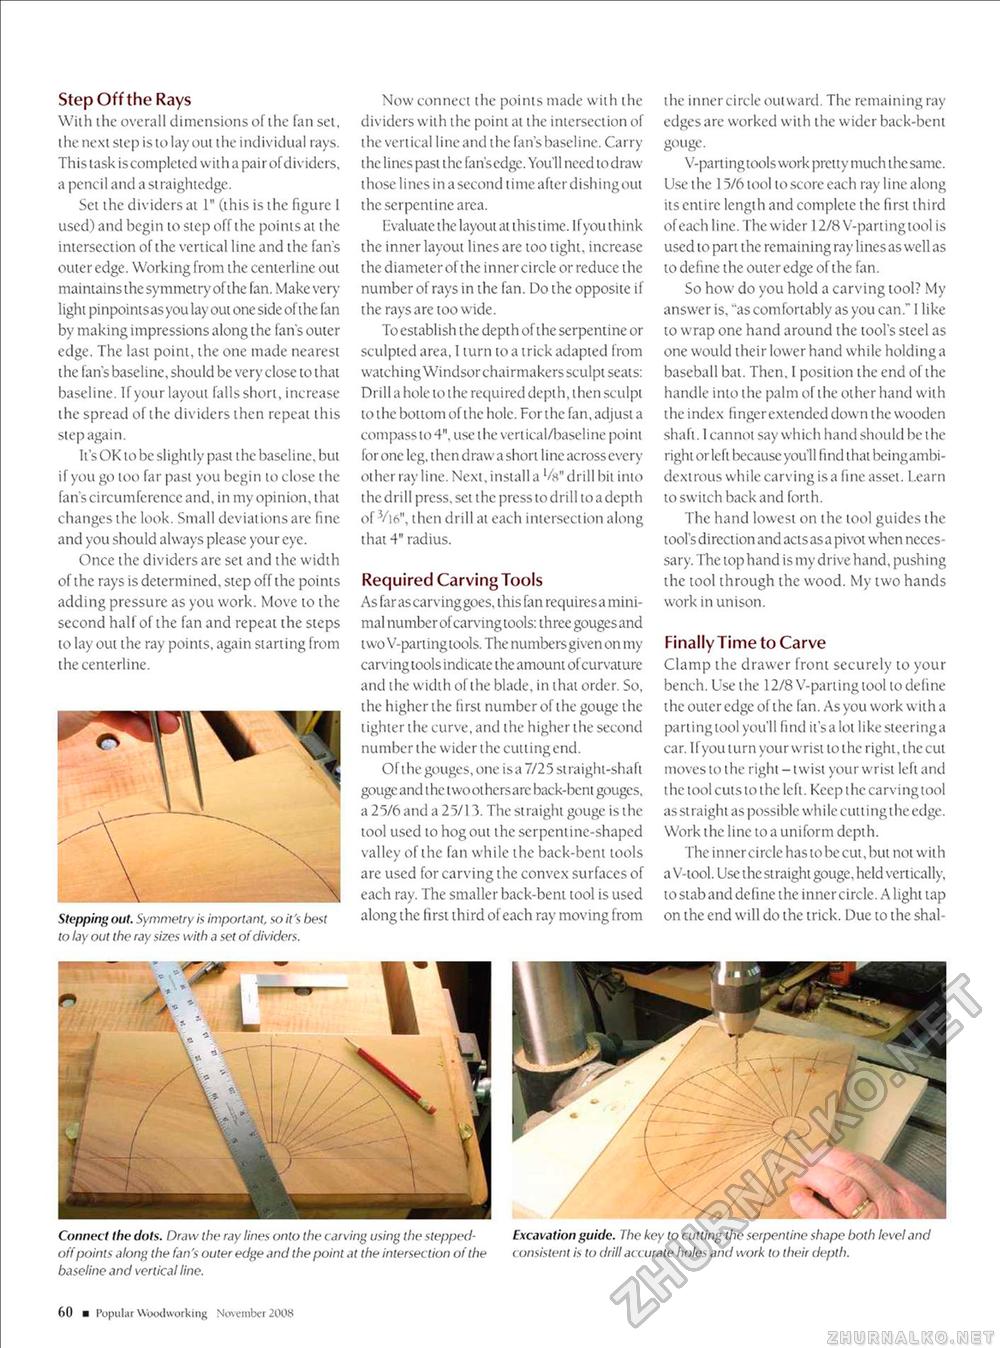
Step Off the Rays With ihe overall dimensions of the fan set, the next step is to lay out the individual rays. This task iscompleted with a pair of dividers, a pencil and a straightedge. Set the dividers at 1" (this is the figure 1 used) and begin to step off the points at the intersection of the vertical line and the fan's outer edge. Working from the centerline out maintains the symmetry of the fan. Make very light pinpointsasyou layout one side of the fan by making impressions along the fan's outer edge. The last point, the one made nearest the fan's baseline, should be very close to that baseline. If your layout falls short, increase the spread of the dividers then repeal this step again. It's OK to be si ight ly past i he baseli nc, but if you go too far past you begin to close the fan's circumference and, in my opinion, that changes the look. Small deviations are fine and you should always please your eye. Once the dividers are set and the width of the rays is determined, step off the points adding pressure as you work. Move to the second half of the fan and repeat the steps to lay out the ray points, again starling from the centerline. Stepping out. Symmetry is important, so it's best to lay out the ray sizes with a set of dividers. Now connect the points made with the dividers with the point ai the intersection of the vertical line and the fan's baseline. Carry the lines past the fan'sedge. You'll need todraw those lines in a second time after dishingout the serpentine area. Evaluate the layout at ihistime. Ifyou think the inner layout lines are too tight, increase the diameter of the inner circle or reduce the number of rays in the fan. Do the opposite if the rays are too wide. To establish the depth of the serpentine or sculpted area, I turn to a trick adapted from watching Windsor chairmakers sculpt seats: Drill a hole lo the required depth, then sculpt to the bottom of the hole. For the fan, adjust a compass to 4", use i he veriical/baseline point for one leg, t hen draw a short 1 i nc across every other ray line. Next, install a l/a" drill bit into t he drill press, set the press to drill to a depth of Vi6", then drill at each intersection along that 4" radius. Required Carving Tools As far as carving goes, this fan requiresa minimal number of carving tools: three gouges and two V-parting tools. The numbers given on my carving tools indicate the amount of curvature and the width of the blade, in that order. So, the higherthe first number of the gouge the lighter the curve, and the higher the second number the wider the cutting end. Of the gouges, one isa 7/25 straight-shaft gougcand i he twoolhersare back-bent gouges, a 25/6 and a 25/13. The straight gouge is the tool used to hog out the serpentine-shaped valley of the fan while the back-bent tools are used for carving the convex surfaces of each ray. The smaller back-bent tool is used along the first third of each ray moving from the innercircle outward. The remaining ray edges are worked with the wider back-bent gouge. V-partingtoolswork pretty much the same. Use the 15/6 tool to score each ray line along its entire length and complete the first third of each line. The wider 12/8 V-parting tool is used to part the remaining raylinesas well as to define the outer edge of the fan. So how do you hold a carving tool? My answer is, "as comfortably as you can." I like to wrap one hand around the tool's steel as one would their lower hand while holding a baseball bat. Then. I position the end ol the handle into the palm of the other hand with the index linger extended down the wooden shaft. I cannot say which hand should be the right or left because you'll find that beingambi-dexirous while carving isa fine asset. Learn to switch back and forth. The hand lowest on the tool guides the tool's direction and actsasa pivot when ncces sary. The top hand is my drive hand, pushing the tool through the wood. My two hands work in unison. Finally Time to Carve Clamp the drawer front securely 10 your bench. Use the 12/8 V-parting tool todefine the outer edge of the fan. As you work with a parting tool you'll find it'sa lot like sieeringa car. Ifyou turn your wrist to ihe right, the cut moves to the right - twist your wrist left and i he tool cuts to t he left. Keep i he carving tool as straight as possible while culling the edge. Work the line to a uniform depth. The innercircle has 10 be cut, but not with a V-tool. Use the straight gouge, held vertically, to stab and define the innercircle. A light tap on the end will do the trick. Due to the shal- Connect the dots. Draw the ray lines onto the carving using the stepped-off points along the fan's outer edge and the point at the intersection of the baseline and vertical line. Excavation guide. The key to cutting the serpentine shape both level and ( (insistent is to drill accurate holes and work to their depth. 60 ■ Popul ar Woodworking November 2008 |


