Popular Woodworking 2008-11 № 172, страница 35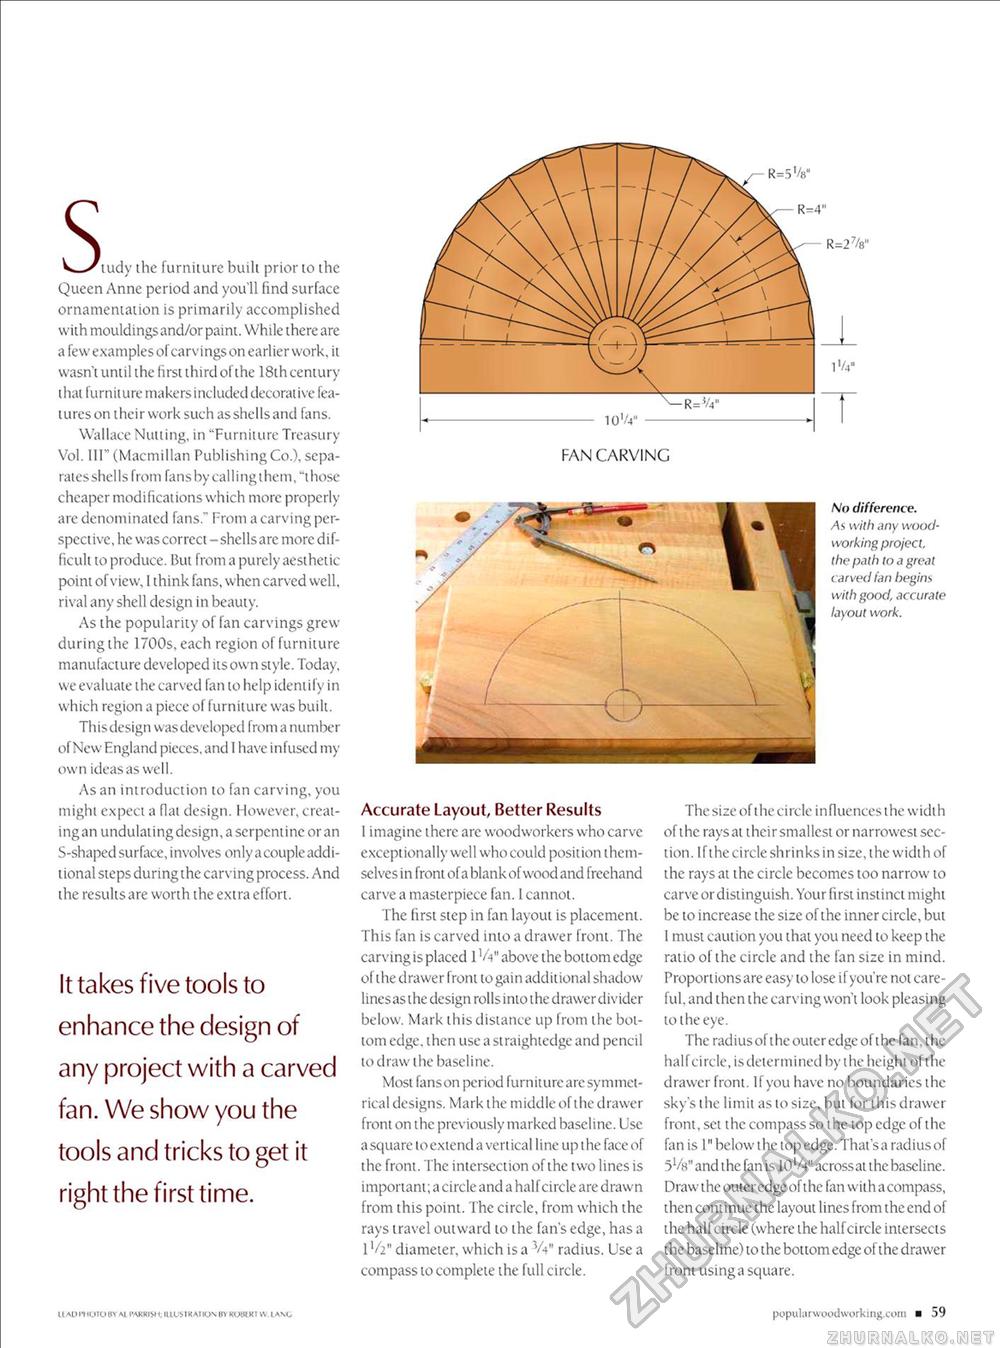
/ R=2V
FAN CARVING FAN CARVING No difference. i As with any wood working project, the path to a great carved fan begins with good, accurate layout work. sV—^ludy the furniture built prior to the Queen Anne period and you'll find surface ornamentation is primarily accomplished with mouldingsand/or paint. While there are a few examples of carvings on earlier work, it wasn't until the tirsi third of the 18th century thai furniture makers included decorative features on theirwork such as shells and fans. Wallace Nutting, in "Furniture Treasury Vol. Ill" (Macmillan Publishing Co.), separates shells from fans by calling them, "those cheaper modifications which more properly are denominated fans." From a carving perspective, he was correct - shells arc more difficult to produce. But from a purely aesthetic point of view, 1 think fans, when carved well, rival any shell design in beauty. As the popularity of fan carvings grew during the 1700s, each region of furniture manufacture developed its own style. Today, we evaluate the carved fan to help identify in which region a piece of furniture was built. Thisdesign was developed from a number of New England pieces, and 1 have infused my own ideas as well. As an introduction to fan carving, you might expect a flat design. However, creating an undulating design, a serpentine or an S-shaped surface, involves only a couple additional steps during the carvingprocess. And the results are worth the extra effort. It takes five tools to enhance the design of any project with a carved fan. We show you the tools and tricks to get it right the first time. Accurate Layout, Better Results 1 imagine there are woodworkers who carve exceptionally well who could position themselves in front of a blank of wood and freehand carve a masterpiece fan. 1 cannot. The first step in fan layout is placement. This fan is carved into a drawer front. The carving is placed 1 '/V above the bottom edge ol the drawer front to gain additional shadow linesas the design rolls into the drawer divider below. Mark this distance up from the bottom edge, then use a straightedge and pencil to draw the baseline. Most fanson period furniture arc symmetrical designs. Mark the middle of the drawer front on the previously marked baseline. Use a square to extend a vertical line up the face of the front. The intersection of the two lines is important; a circle and a half circle are drawn from this point. The circle, from which the rays travel outward to the fan's edge, has a 11/2" diameter, which is a VV' radius. Use a compass to complete the full circle. The size of the circle influences the width of the rays at theirsmallcst or narrowest section. If the circle shrinks in size, the width of the rays at the circle becomes too narrow to carve or distinguish. Your first instinct might be to increase the size of the inner circle, but I must caution you that you need to keep the ratio of the circle and the fan size in mind. Proportions are easy to lose if you're not careful, and then the carving won't look pleasing to the eye. The rad ius of the outer edge of t he fan, t he half circle, is determined by the height of the drawer front. If you have no boundaries the sky's the limit as to size, but for this drawer front, set the compass so the top edge of the fan is 1" below the top edge. That'sa radius of dVs" and the fan is lOV-j" acrossat the baseline. Draw the outeredge of the fan with a compass, then continue the layout lines from the end of the half circle (where the half circle intersects the baseline) to the bottom edge of the drawer front using a square. ItADIHOIOBY M I'AKKIM I. IUU5IKAIION BY KOBIKIVI (ANO popularwoodworking.com ■ 59 |
||||||||||||


