Popular Woodworking 2008-12 № 173, страница 34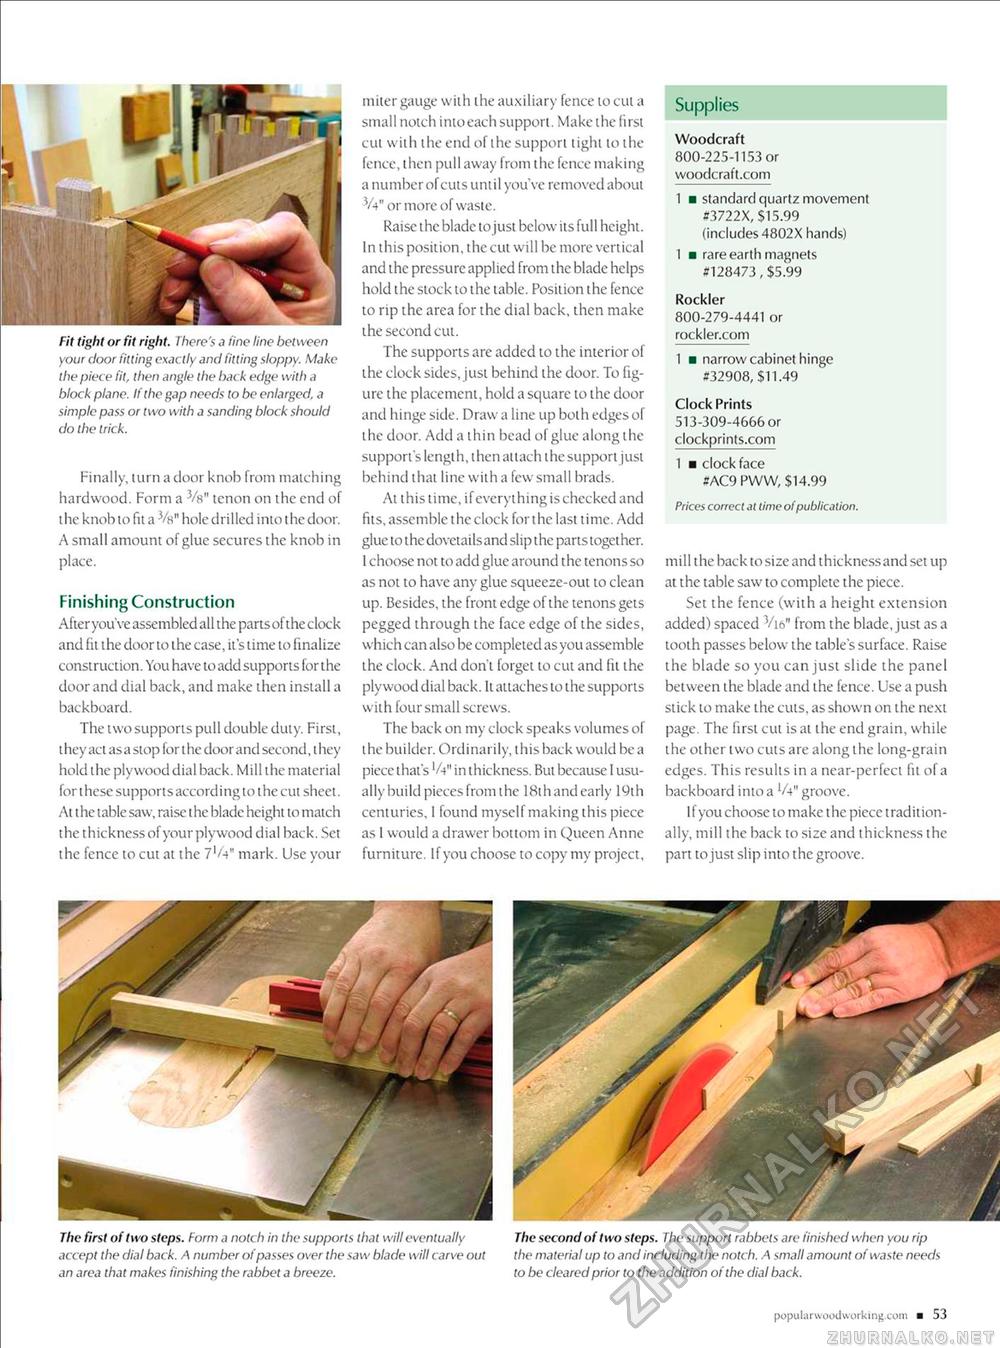
Fit tight or fit right. There's a fine line between your door fitting exactly and fitting sloppy. Make the piece fit, then angle the back edge with a block plane. If the gap needs to be enlarged, a simple pass or two with a sanding block should do the trick. Finally, turn a door knob from matching hardwood. Form a Vs" tenon on the end of t he knob to fit a Va" hole drilled into the door. A small amount of glue secures the knob in place. Finishing Construction After you've assembled all the parts of the clock and lit the door to the case, it's time to finalize construction. You have to add supports for the door and dial back, and make then install a backboard. The two supports pull double duty. First, t hey act as a stop lor t he door and second, t hey hold the plywood dial back. Mill the material for these supports according to the cut sheet. At t he table saw, raise t he blade height to match the thickness of your plywood dial back. Set the fence to cut at the mark. Use your miter gauge with the auxiliary fence to cut a small notch intoeach support. Make the first cut with the end of the support tight lo the fence, then pull away from the fence making a number of cuts until you've removed about V4" or more of waste. Raise the blade to just below its full heighl. In this position, the cut will be more vertical and ihe pressure applied from the blade helps hold ihe stock 10 the table. Position the fence 10 rip the area for the dial back, then make ihe second cut. The supports are added 10 ihe interior of the clock sides, just behind the door. To figure the placement, hold a square to the door and hinge side. Draw a line up bolh edges of the door. Add a thin bead of glue along the support's length, then attach the support just behind that line with a few small brads. At this time, if everything is checked and fits, assemble the clock forthe last time. Add glue to the dovetails and slip the parts together. I choose not to add glue around the tenons so as not to have any glue squeeze-out to clean up. Besides, the front edge of the tenons gets pegged through the face edge of ihe sides, which can also be completed as you assemble ihe clock. And don't forget to cut and lit the plywood dial back, li attaches to the supports with four small screws. The back on my clock speaks volumes of the builder. Ordinarily, this back would bea piece that's in thickness. But because I usually build pieces from the 18th and early 19th centuries, 1 found myself making this piece as 1 would a drawer bottom in Queen Anne furniture. If you choose to copy my project. Supplies Woodcraft 800-225-1153 or woodcraft.com 1 ■ standard quartz movement #3722X, $15.99 (includes 4802X hands) 1 ■ rare earth magnets £128473, $5.99 Rockier 800-279-4441 or rockler.com 1 ■ narrow cabinet hinge #32908, $11.49 Clock Prints 513-309-4666 or clockprints.com 1 ■ clock face #AC9 PWW, $14.99 Prices correct at time of publication. mill t he back to size and t hickness and set up at the table saw to complete the piece. Set the fence (with a height extension added) spaced Vi6" from the blade, just as a tooth passes below the table's surface. Raise the blade so you can just slide the panel between the blade and the fence. Use a push slick lo make ihe cuis, as shown on the next page. The first cut is at ihe end grain, while the other two cuts are along the long-grain edges. This results in a near-perfect fil of a backboard into a V4" groove. If you choose to make the piece traditionally, mill the back to size and thickness the part to just slip into the groove. The first of two steps. Form a notch in the supports that will eventually accept the dial back. A number of passes over the saw blade will carve out an area that makes finishing the rabbet a breeze. The second of two steps. The support rabbets are finished when you rip the material up to and including the notch. A small amount of waste needs to be cleared prior to the addition of the dial back. popularwoodvvorking.com ■ 53 |


