Popular Woodworking 2008-12 № 173, страница 43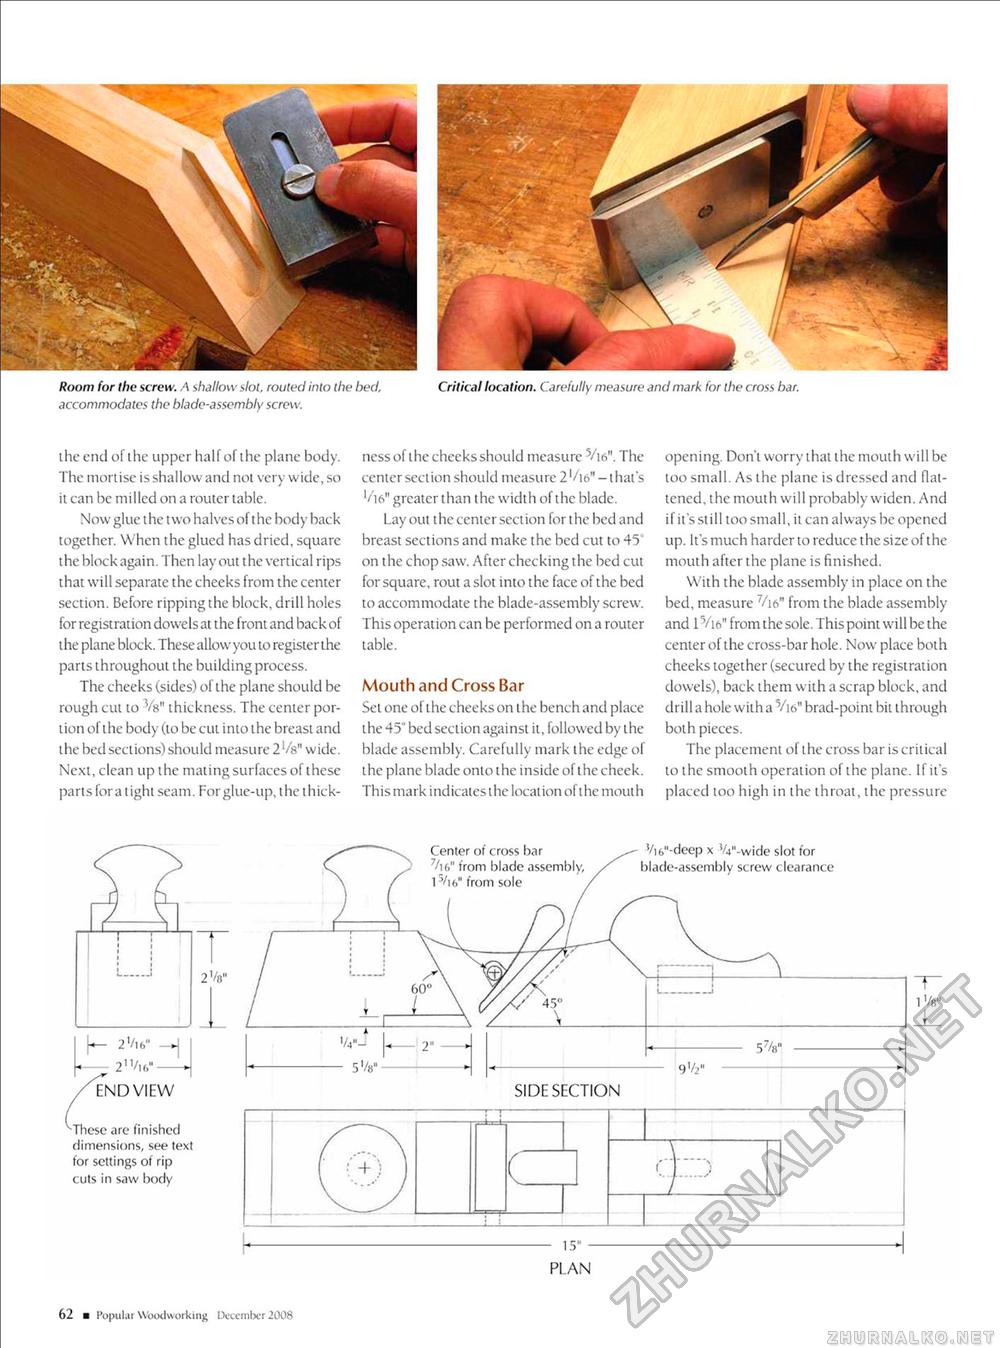
Room for the screw. A shallow slot, routed into the bed. Critical location. Carefully measure and mark for the cross bar. accommodates the blade-assembly screw. the end of the upper half of the plane body. The mortise is shallow and not very wide, so j ' it can be milled on a router table. Now glue t he t wo halves of t he body back together. When the glued has dried, square t he block again. Then lay out t he vertical rips that will separate the cheeks from the center section. Before ripping the block, drill holes for registration dowels at the front and backof the plane block. These allow you to register the parts throughout the building process. The cheeks (sides) of the plane should be rough cut to V3" thickness. The center portion of the body (to be cut into the breast and the bed sections) should measure 2 '/s" wide. Next, clean up the mating surfaces of these parts for a tight seam. For glue-up, the thick ness of the cheeks should measure v:te". The center sect ion should measure 2'/to" -1 hat's V'i6" greater than the width of the blade. Lay out t he center sect ion for i he bed and breast sections and make the bed cut to 45 on t he chop saw. After checking the bed cut for square, rout a slot into the face of the bed to accommodate the blade-assembly screw. This operation can be performed on a router table. Mouth and Cross Bar Set one of the cheeks on the bench and place the 45" bed section against it, followed by the blade assembly. Carefully mark the edge of the plane blade onto the inside of the cheek. This mark indicates the location of the mout h opening. Don't worry that the mouth will be too small. As the plane is dressed and flattened, the mouth will probably widen. And ifit'sstill too small, it can always be opened up. It's much harder to reduce the size of the mouth after the plane is finished. With the blade assembly in place on the bed, measure 7/i6" from the blade assembly and 1V16" from the sole. This point will be the center of the cross-bar hole. Now place both cheeks together (secured by the registration dowels), back them with a scrap block, and drill a hole with a V16" brad-point bit through both pieces. The placement of the cross bar is critical to the smooth operation of the plane. If it's placed too high in the throat, the pressure Vi6"-deep x V4"-wide slot for blade-assembly screw clearance vThese are finished dimensions, see text for settings of rip cuts in saw body 62 ■ Popul ar Woodworking December 2008 |


