Popular Woodworking 2008-12 № 173, страница 44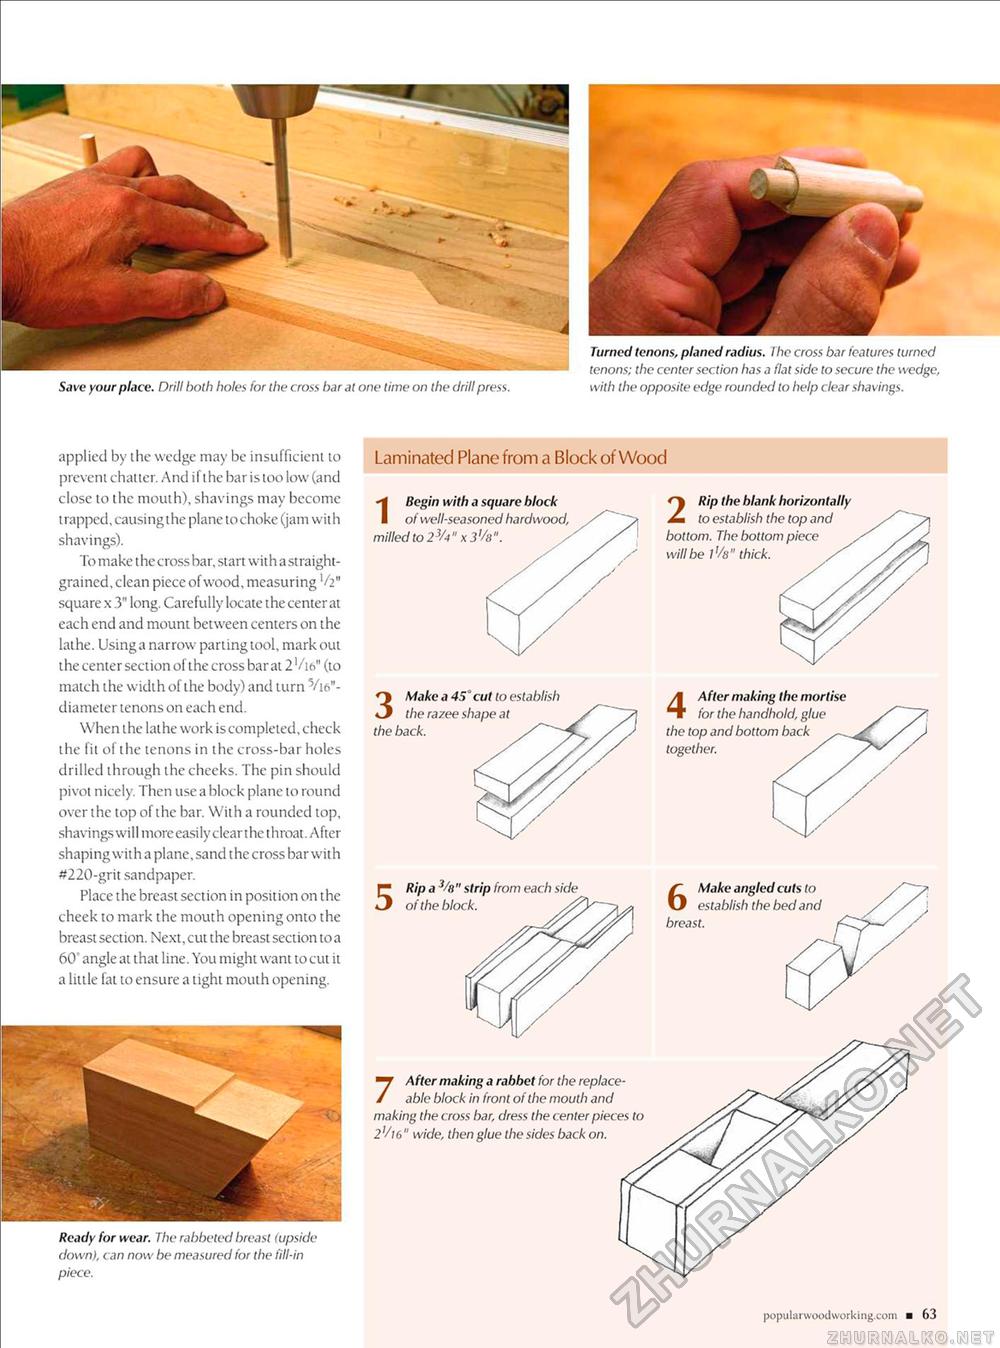
Save your place. Drill both holes for the cross bar at one time on the drill press. Turned tenons, planed radius. I he cross bar features turned tenons; the center section has a flat side to secure the wedge, with the opposite edge rounded to help clear shavings. Laminated Plane from a Block of Wood applied by the wedge may be insufficient to prevent chatter. And if the bar is too low (and close to the mouth), shavings may become trapped, causing the plane tochoke (jam with shavings). To make t he cross bar, start with a straight-grained, clean piece of wood, measuring V2" square x.3" long. Carefully locate the center at each end and mount between centers on the lathe. Using a narrow parting tool, mark out the center section ol the cross bar at 2'/16" (to match the width of the body) and turn Y16"-diameter tenons on each end. When the lathe work is completed, check the fit of the tenons in the cross-bar holes drilled through the cheeks. The pin should pivot nicely. Then use a block plane to round over t he top of t he bar. With a rounded top, shavings will moreeasily clear the throat. After shaping with a plane, sand the cross bar with #220-grit sandpaper. Place the breast section in position on the cheek to mark the mouth opening onto the breast section. Next, cut the breast section to a 60' angle at that line. You might want to cut it a little fat to ensure a tight mouth opening. Ready for wear. The rabbeted breast (upside down), can now be measured for the fill-in piece. 1 Begin with a square block of well-seasoned hardwood, milled to 23/4" x3'/8". popularwoodvvorking.com ■ 63 5 Rip a '/«" strip from each side of the block. 7 After making a rabbet for the replaceable block in front of the mouth and making the cross bar, dress the center pieces to 2]/i6" wide, then glue the sides back on. 6 Make angled cuts to establish the bed and breast. 2 Rip the blank horizontally to establish the top and bottom. The bottom piece will be l'/y" thick. 3 Make a 45* cut to establish the razee the back. 4 After making the mortise for the handhold, glue the top and bottom back together. |


