Popular Woodworking 2009-02 № 174, страница 28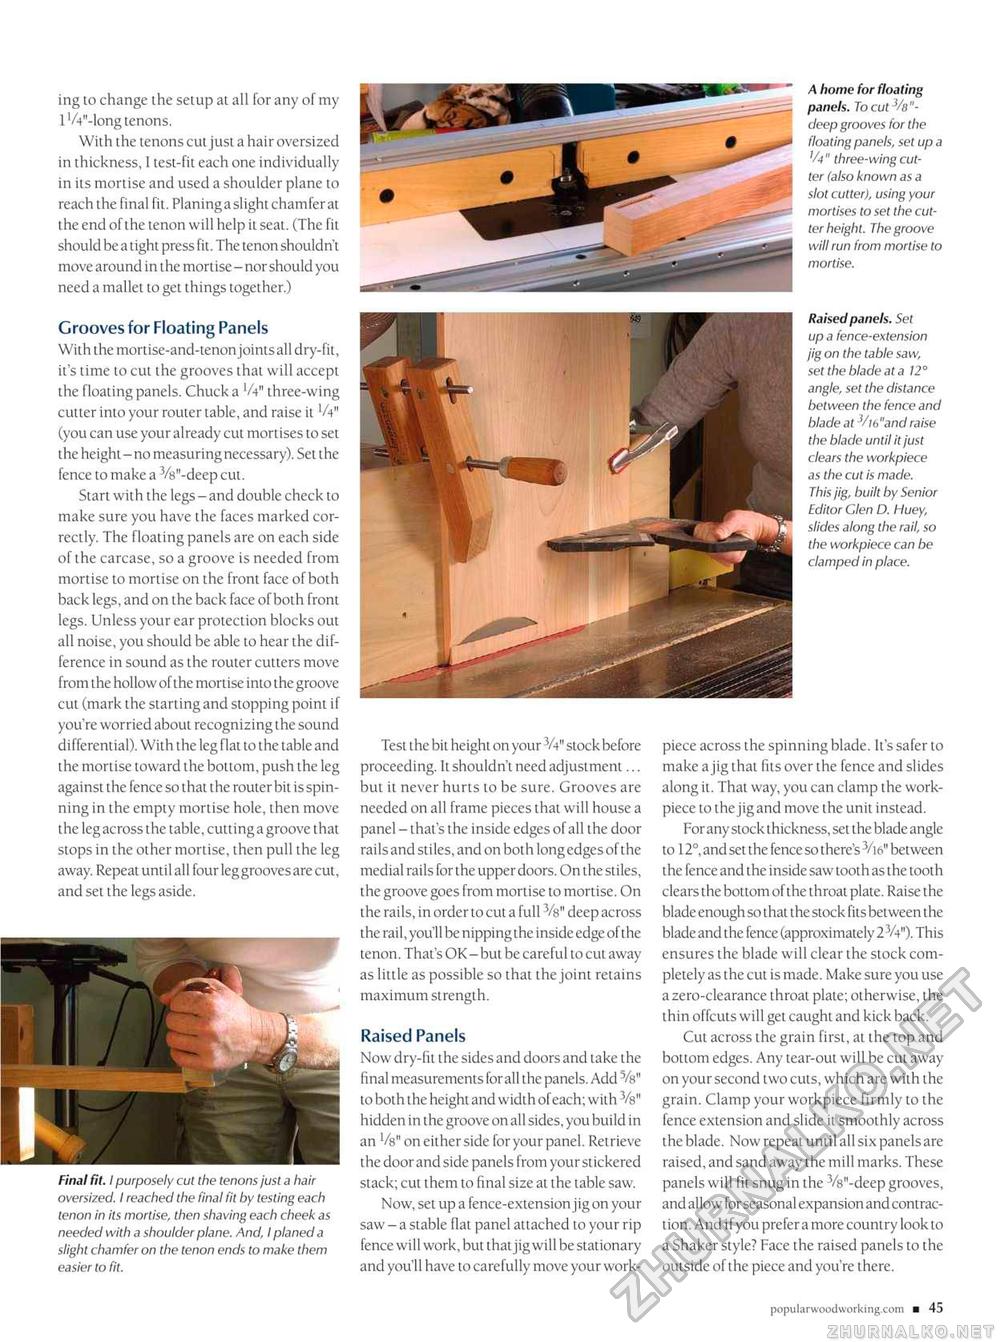
ing to change the setup at all for any of my lW'-long tenons. With the tenons cut just a hair oversized in thickness, I test-fit each one individually in its mortise and used a shoulder plane to reach the final fit. Planingaslight chamfer at the end of the tenon will help it seat. (The fit should be a tight press fit. The tenon shouldn't move around in the mortise - nor should you need a mallet to get things together.) Grooves for Floating Panels With the mortise-and-tenon joints all dry-fit, it's time to cut the grooves that will accept I the floating panels. Chuck a V4" three-wing I cutter into your router table, and raise it V4" I (you can use your already cut mortises to set I the height - no measuring necessary). Set the I fence to make a 3/8"-deep cut. Start with t he legs - and double check to I make sure you have the faces marked cor- I rectly. The floating panels are on each side I of the carcase, so a groove is needed from I mortise to mortise on the front face of bot h back legs, and on the back face of both front I legs. Unless your ear protection blocks out I all noise, you should be able to hear the dif- I ference in sound as the router cutters move I from the hollow of the mortise into the groove I cut (mark the starting and stopping point if you're worried about recognizing the sound piece across the spinning blade. It's safer to make a jig that fits over the fence and slides along it. That way, you can clamp the work-piece to the jig and move the unit instead. For any stock thickness, set the blade angle to 12°, and set the fence so there's 3/16" between the fence and the inside saw tooth as the tooth clears the bottom of the throat plate. Raise the blade enough so that the stock fits between the blade and the fence (approximately 23/4"). This ensures the blade will clear the stock completely as the cut is made. Make sure you use a zero-clearance throat plate; otherwise, the thin offcuts will get caught and kick back. Cut across the grain first, at the top and bottom edges. Any tear-out will be cut away on your second two cuts, which are with the grain. Clamp your workpiece firmly to the fence extension and slide it smoothly across the blade. Now repeat until all six panels are raised, and sand away the mill marks. These panels will fit snug in the 3/s"-deep grooves, and allow for seasonal expansion and contraction. And if you prefer a more country look to a Shaker style? Face the raised panels to the outside of the piece and you're there. A home for floating panels. To cut J/s"-deep grooves for the floating panels, set up a '/-)" three-wing cutter (also known as a slot cutter), using your mortises to set the cutter height. The groove will run from mortise to Raised panels. Set up a fence-extension jig on the table saw, set the blade at a 12° angle, set the distance between the fence and blade at3/I6"and raise the blade until it just clears the workpiece as the cut is made. This jig, built by Senior Editor Clen D. Huey, slides along the rail, so the workpiece can be clamped in place. differential). With the leg flat to the table and the mortise toward the bottom, push the leg against the fence so that the router bit is spinning in the empty mortise hole, then move the leg across the table, cutting a groove that stops in the other mortise, then pull the leg away. Repeat until all four leggrooves are cut, and set the legs aside. Final fit. I purposely cut the tenons just a hair oversized. I reached the final fit by testing each tenon in its mortise, then shaving each cheek as needed with a shoulder plane. And, I planed a slight chamfer on the tenon ends to make them easier to fit. Test the bit height on your V4" stock before proceeding. It shouldn't need adjustment... but it never hurts to be sure. Grooves are needed on all frame pieces that will house a panel - that's the inside edges of all the door rails and stiles, and on both longedges of the medial rails for the upper doors. On the stiles, the groove goes from mortise to mortise. On the rails, in order to cut a full 3/8" deep across the rail, you'll be nipping the inside edge of the tenon. That's OK - but be careful to cut away as little as possible so that the joint retains maximum strength. Raised Panels Now dry-fit the sides and doors and take the final measurements for all the panels. Add Vs" to both the height and width of each; with Vs" hidden in the groove on all sides, you build in an Vs" on either side for your panel. Retrieve the door and side panels from your stickered stack; cut them to final size at the table saw. Now, set up a fence-extension jig on your saw - a stable flat panel attached to your rip fence will work, but that jig will be stationary and you'll have to carefully move your work- populara-oodworking.com ■ 45 |


