Popular Woodworking 2009-02 № 174, страница 29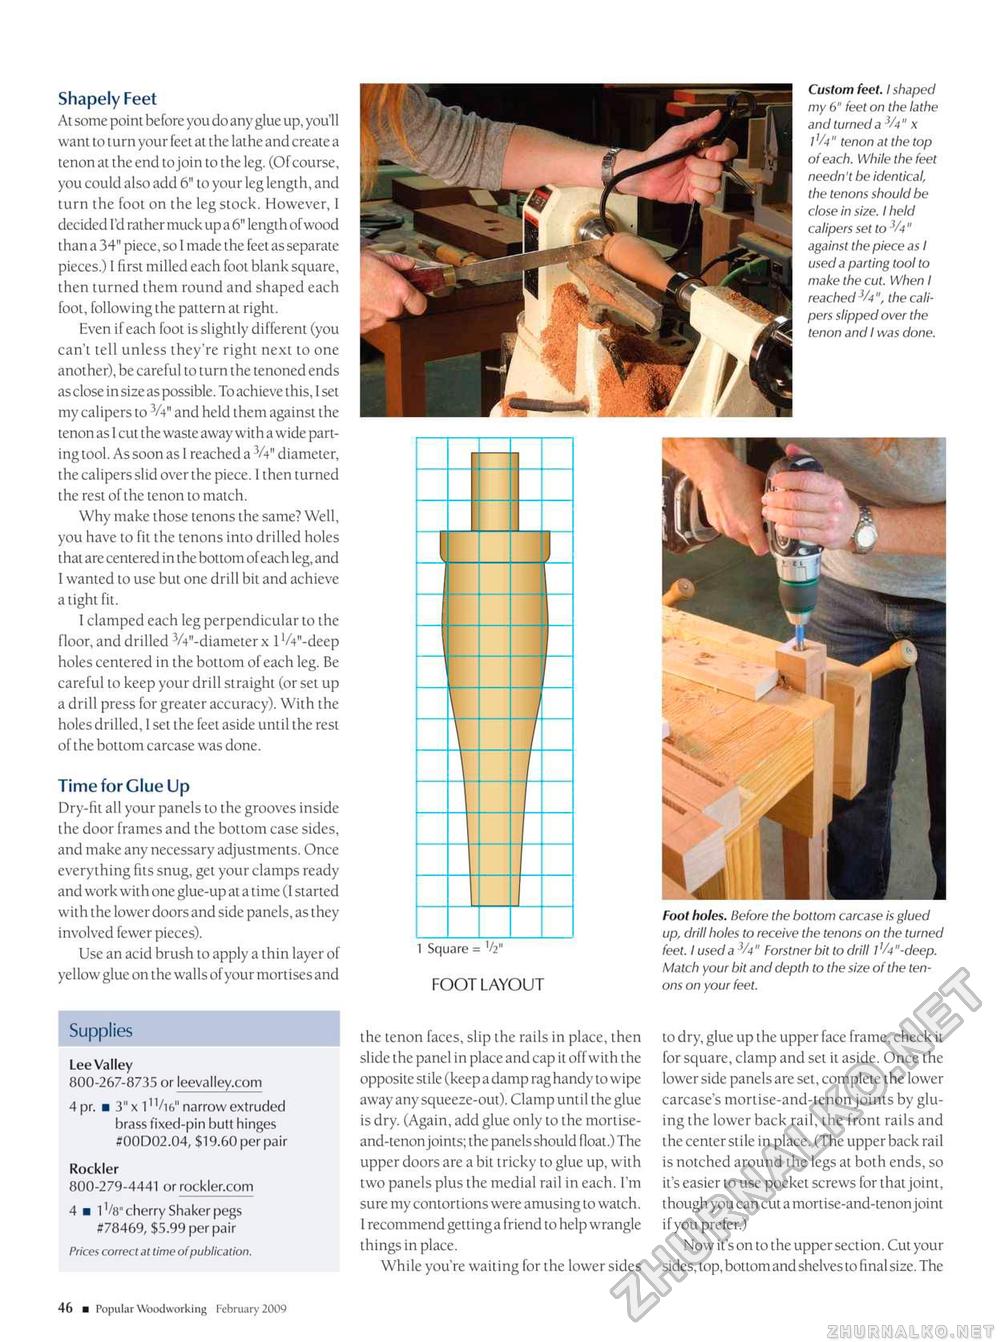
Shapely Feet At some point before you do any glue up, you'll want to turn your feet at the lathe and create a tenon at the end to join to the leg. (Ofcourse, you could also add 6" to your leg length, and turn the foot on the leg stock. However, 1 decided I'd rather muck up a 6" length of wood than a 34" piece, so 1 made the feet as separate pieces.) I first milled each foot blank square, then turned them round and shaped each foot, following the pattern at right. Even if each foot is slightly different (you can't tell unless they're right next to one another), be careful to turn the tenoned ends as close in size as possible. To achieve this, 1 set my calipers to 3A" and held them against the tenon as 1 cut the waste away with a wide parting tool. As soon as I reached a 3A" diameter, the calipers slid over the piece. 1 then turned the rest of the tenon to match. Why make those tenons the same? Well, you have to fit the tenons into drilled holes that are centered in the bottom of each leg, and I wanted to use but one drill bit and achieve a tight fit. I clamped each leg perpendicular to the floor, and drilled 3A"-diameterx l'A"-deep holes centered in the bottom of each leg. Be careful to keep your drill straight (or set up a drill press for greater accuracy). With the holes drilled, 1 set the feet aside until the rest of the bottom carcase was done. Time for Glue Up Dry-fit all your panels to the grooves inside the door frames and the bottom case sides, and make any necessary adjustments. Once everything fits snug, get your clamps ready and work with one glue-up at a time (1 started with the lower doors and side panels, as they involved fewer pieces). Use an acid brush to apply a thin layer of yellow glue on the walls of your mortises and Supplies Lee Valley 800-267-8735 or leevalley.com 4pr. ■ 3"x 11 Vig" narrow extruded brass fixed-pin butt hinges #00D02.04, $19.60 per pair Rockier 800-279-4441 or rockler.com 4 ■ iVa" cherry Shaker pegs #78469, $5.99 per pair Prices correct at time of publication. Custom feet. I shaped my 6" feet on the lathe and turned a 3A" x I 'A " tenon at the top of each. While the feet needn't be identical, the tenons should be close in size. I held calipers set to 3A" against the piece as I used a parting tool to make the cut. When I reached JA", the calipers slipped over the tenon and I was done. the tenon faces, slip the rails in place, then slide the panel in place and cap it off with the opposite stile (keep a damp rag handy to wipe away any squeeze-out). Clamp until the glue is dry. (Again, add glue only to the mortise-and-tenonjoints; the panelsshould float.) The upper doors are a bit tricky to glue up, with two panels plus the medial rail in each. I'm sure my contortions were amusing to watch. 1 recommend getting a friend to help wrangle things in place. While you're waiting for the lower sides to dry, glue up the upper face frame, check it for square, clamp and set it aside. Once the lower side panels are set, complete the lower carcase's mortise-and-tenon joints by gluing the lower back rail, the front rails and the center stile in place. (The upper back rail is notched around the legs at both ends, so it's easier to use pocket screws for that joint, though you can cut a mortise-and-tenon joint if you prefer.) Now it's on to the upper section. Cut your sides, top, bottom and shelves to final size. The FOOT LAYOUT Foot holes. Before the bottom carcase is glued up, drill holes to receive the tenons on the turned feet. I used a 3A" Forstner bit to drill 1'A "-deep. Match your bit and depth to the size of the tenons on your feet. 46 ■ Popular Woodworking February 2009 |


