Popular Woodworking 2009-04 № 175, страница 50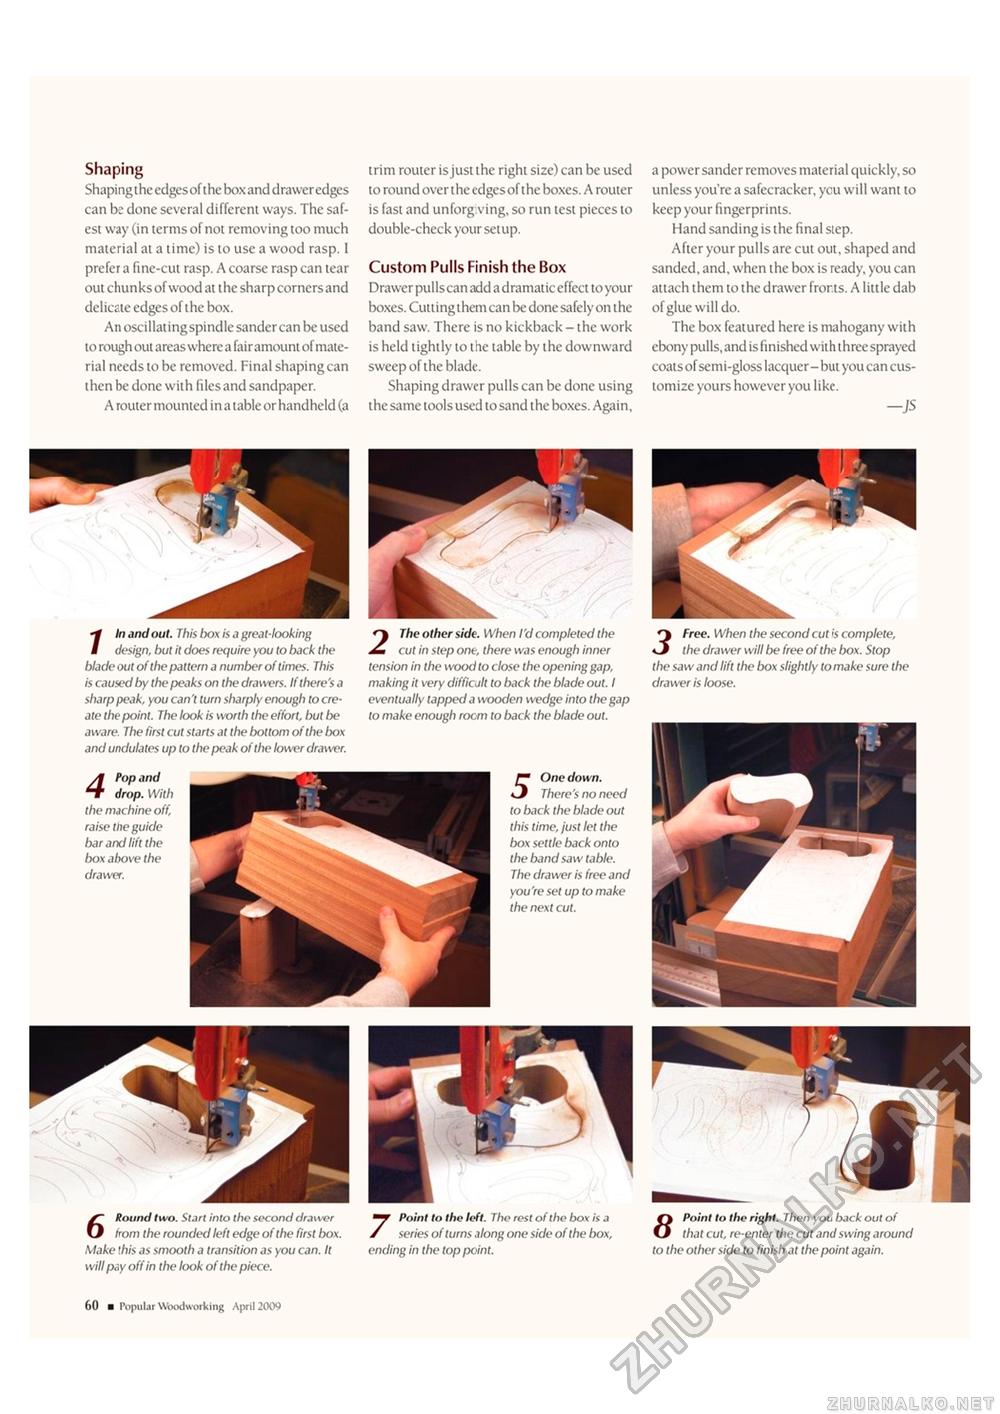
Shaping Shaping the edges ofthe box and drawer edges can be done several different ways. The safest way (in terms of not removing too much material at a time) is to use a wood rasp. I prefer a fine-cut rasp. A coarse rasp can tear out chunks of wood at the sharp corners and delicate edges of the box. An oscillating spindle sander can be used to rough out areas where a fairamount of material needs to be removed. Final shaping can then be done with files and sandpaper. A router mounted in a table or handheld (a trim router is just the right size) can be used to round over the edges of the boxes. A router is fast and unforgiving, so run test pieces to double-check your setup. Custom Pulls Finish the Box Drawer pulls can add a dramatic effect to your boxes. Cuttingthem can be done safely on the band saw. There is no kickback - the work is held tightly to the table by the downward sweep ofthe blade. Shaping drawer pulls can be done using the same tools used to sand the boxes. Again, a power sander removes material quickly, so unless you're a safecracker, ycu will want to keep your fingerprints. Hand sanding is the final step. After your pulls are cut out, shaped and sanded, and, when the box is ready, you can attach them to the drawer fronts. A little dab of glue will do. The box featured here is mahogany with ebony pulls, and is finished with three sprayed coats of semi-gloss lacquer - but you can customize yours however you like. -JS rln and out. This box is a great-looking design, hut it does require you to back the blade out of the pattern a number of times. This is caused by the peaks on the drawers. If there's a sharp peak, you can't turn sharply enough to create the point. The look is worth the effort, but be aware. The first cut starts at the bottom of the box and undulates up to the peak of the lower drawer. 2 The other side. When I'd completed the cut in step one, there was enough inner tension in the wood to close the opening gap, making it very difficult to back the blade out. I eventually tapped a wooden wedge into the gap to make enough room to back the blade out. O Free. When the second cut is complete, <J the drawer will be free of the box. Stop the saw and lift the box slightly to make sure the drawer is loose. 4 Pop and drop. With the machine off, raise the guide bar and lift the box above the drawer. 5 One down. There's no need to back the blade out this time, just let the box settle back onto the band saw table. The drawer is free and you're set up to make the next cut. 5 Round two. Start into the second drawer from the rounded left edge ofthe first box. Make this as smooth a transition as you can. It will pay off in the look of the piece. Point to the left. The rest of the box is a series of turns along one side ofthe box, 7 ending in the top point. n Point to the right. Then you back out of O that cut, re-enter the cut and swing around to the other side to finish at the point again. 10 ■ Popular Woodworking April 2009 |


