10 - Heavy Duty Lathe Stand, страница 15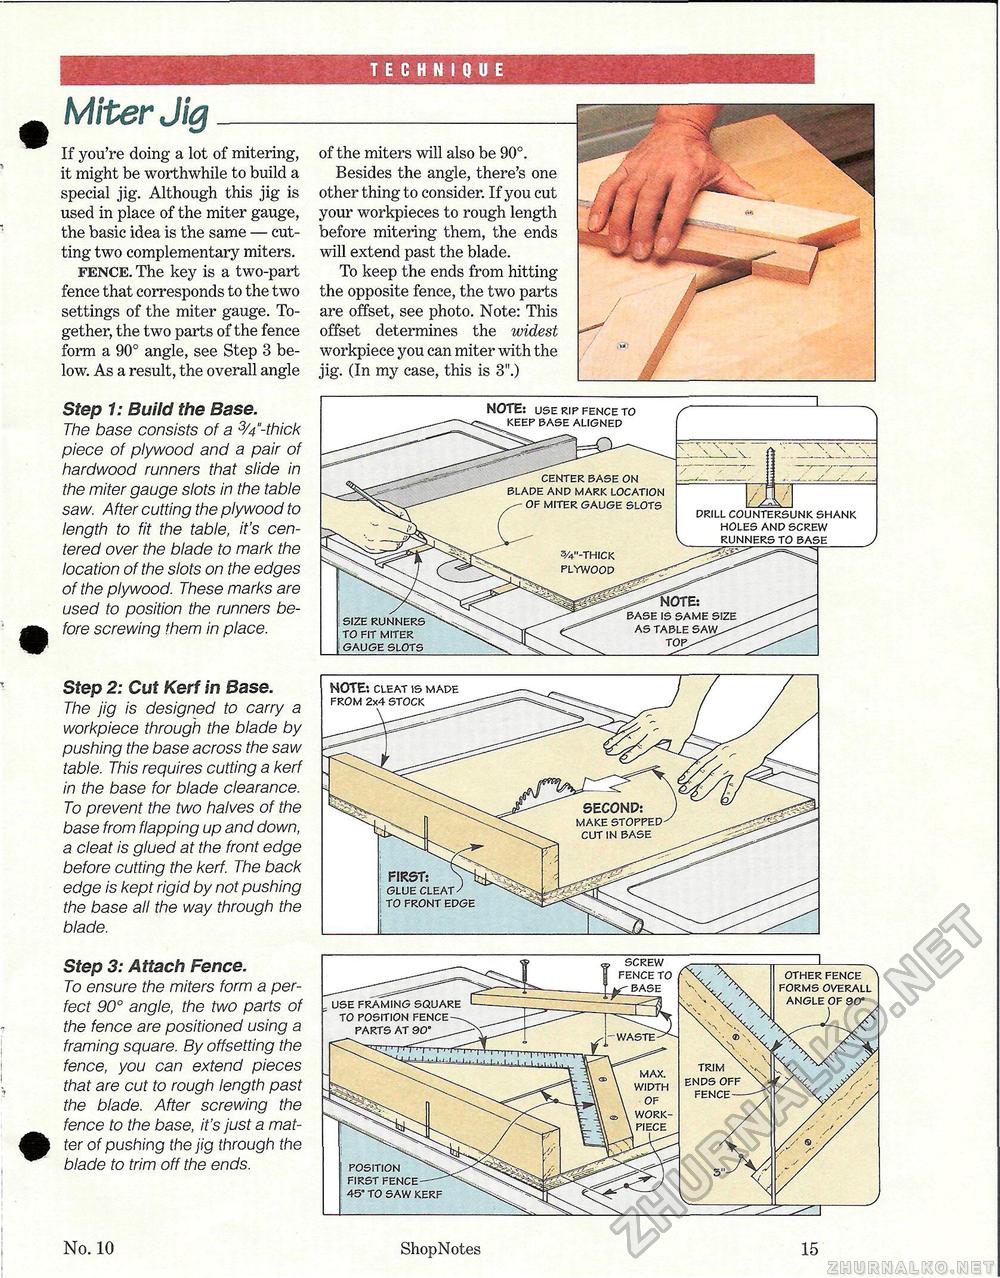
TECHNIQUE Step 1: Build the Base. The base consists of a 3/4"-thick piece of plywood and a pair of hardwood runners that slide in the miter gauge slots in the table saw. After cutting the plywood to length to fit the table, it's centered over the blade to mark the location of the slots on the edges of the plywood. These marks are used to position the runners before screwing them in place. Miter Jig If you're doing a lot of mitering, it might be worthwhile to build a special jig. Although this jig is used in place of the miter gauge, the basic idea is the same — cutting two complementary miters. fence. The key is a two-part fence that corresponds to the two settings of the miter gauge. Together, the two parts of the fence form a 90° angle, see Step 3 below. As a result, the overall angle of the miters will also be 90°. Besides the angle, there's one other thing to consider. If you cut your workpieces to rough length before mitering them, the ends will extend past the blade. To keep the ends from hitting the opposite fence, the two parts are offset, see photo. Note: This offset determines the widest workpiece you can miter with the jig. (In my case, this is 3".) Step 2: Cut Kerf in Base. The jig is designed to carry a workpiece through the blade by pushing the base across the saw table. This requires cutting a kerf in the base for blade clearance. To prevent the two halves of the base from flapping up and down, a cleat is glued at the front edge before cutting the kerf. The back edge is kept rigid by not pushing the base all the way through the blade. Step 3: Attach Fence. To ensure the miters form a perfect 90° angle, the two parts of the fence are positioned using a framing square. By offsetting the fence, you can extend pieces that are cut to rough length past the blade. After screwing the fence to the base, it's just a matter of pushing the jig through the blade to trim off the ends. No. 10 3/4"-THICK PLYWOOD ^^HOrB: BASE IS SAME SIZE AS TABLE SAW^-TOP^^ EH DRILL COUNTERSUNK SHANK HOLES AND SCREW V RUNNERS TO BASE J NOTE: USE RIP FENCE TO KEEP BASE ALIGNED SIZE RUNNERS TO FIT MITER GAUGE SLOTS CENTER BASE ON BLADE AND MARK LOCATION OF MITER GAUGE SLOTS NOTE: cleat is made FROM 2x4 STOCK FIRST: GLUE CLEAT TO FRONT EDGE ShopNotes 15 .. use fralymiw »r%i_ TO POSITION FENCE PARTS A' SCREW FENCE TO BASE OTHER FENCE FORMS OVERALL ANGLE OF 90° TRIM ENDS OFF FENCE MAX. WIDTH |


