15 - Sliding Table, страница 11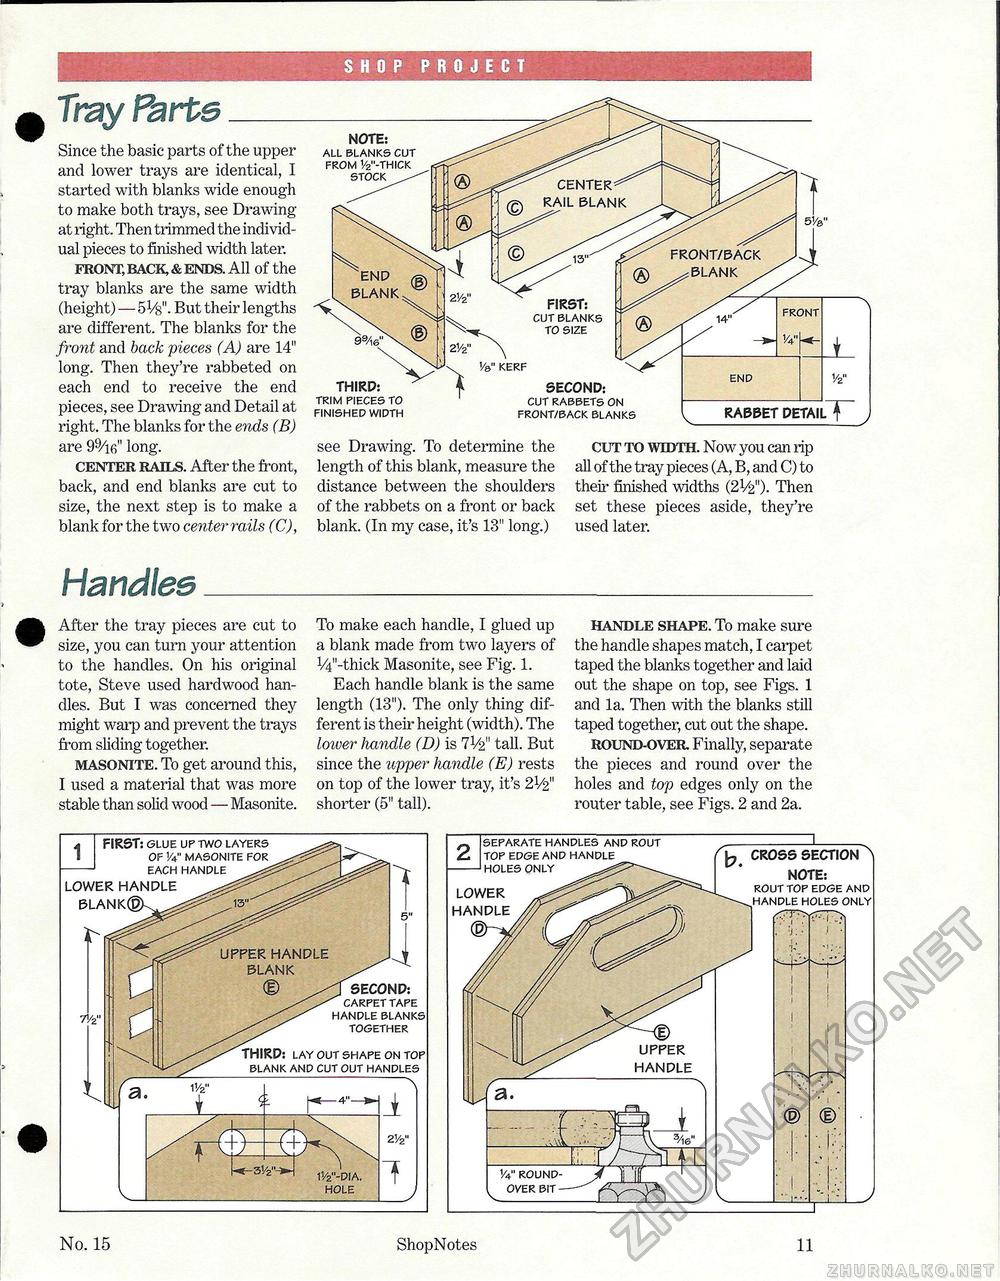
SHOP PROJECT Tray Parts_ Since the basic parts of the upper and lower trays are identical, I started with blanks wide enough to make both trays, see Drawing at right. Then trimmed the individual pieces to finished width later. front, back, & ends. All of the tray blanks are the same width (height) — qVs". But their lengths are different. The blanks for the fnmt and back pieces (A) are 14" long. Then they're rabbeted on each end to receive the end pieces, see Drawing and Detail at right. The blanks for the ends (B) are 99/ifi" long. center rails. After the front, back, and end blanks are cut to size, the next step is to make a blank for the two center rails (C), Handles_After the tray pieces are cut to size, you can turn your attention to the handles. On his original tote, Steve used hardwood handles. But I was concerned they might warp and prevent the trays from sliding together. masonite. To get around this, I used a material that was more stable than solid wood — Masonite. CENTER^ RAIL BLANK FRONT/BACK ^BLANK . NOTE: ALL BLANKS CUT FROM !/2"-THICK STOCK X END BLANK FIRST: CUT BLANKS TO SIZE FRONT Va" KERF END THIRD: TRIM PIECES TO FINISHED WIDTH SECOND: CUT RABBETS ON FRONT/BACK BLANKS RABBET DETAILT see Drawing. To determine the length of this blank, measure the distance between the shoulders of the rabbets on a front or back blank. (In my case, it's 13" long.) cut to width. Now you can rip all of the tray pieces (A, B, and C) to their finished widths (2Vfe"). Then set these pieces aside, they're used later. SECOND: CARPET TAPE HANDLE BLANKS TOGETHER THIRD: LAY OUT SHAPE ON TOP BLANK AND CUT OUT HANDLES 11/2"-D!A HOLE A FIRST: GLUE UP TWO LAYERS I OF V4" MASONITE FOR --EACH HANDLE LOWER HANDLE BLANK To make each handle, I glued up a blank made from two layers of 1/4"-thick Masonite, see Fig. 1. Each handle blank is the same length (13"). The only thing different is their height (width). The loiuer handle (D) is 7V2" tall. But since the upper handle (E) rests on top of the lower tray, it's 2V2" shorter (5" tall). handle shape. To make sure the handle shapes match, I carpet taped the blanks together and laid out the shape on top, see Figs. 1 and la. Then with the blanks still taped together, cut out the shape. round-over Finally, separate the pieces and round over the holes and top edges only on the router table, see Figs. 2 and 2a. ShopNotes 11 LOWER HANDLE SEPARATE HANDLES AND ROUT TOP EDGE AND HANDLE HOLES ONLY UPPER HANDLE CROSS SECTION ^ NOTE: ROUT TOP EDGE AND HOLES ONLY No. 15 |


