40 - Vacuum Clamping System, страница 7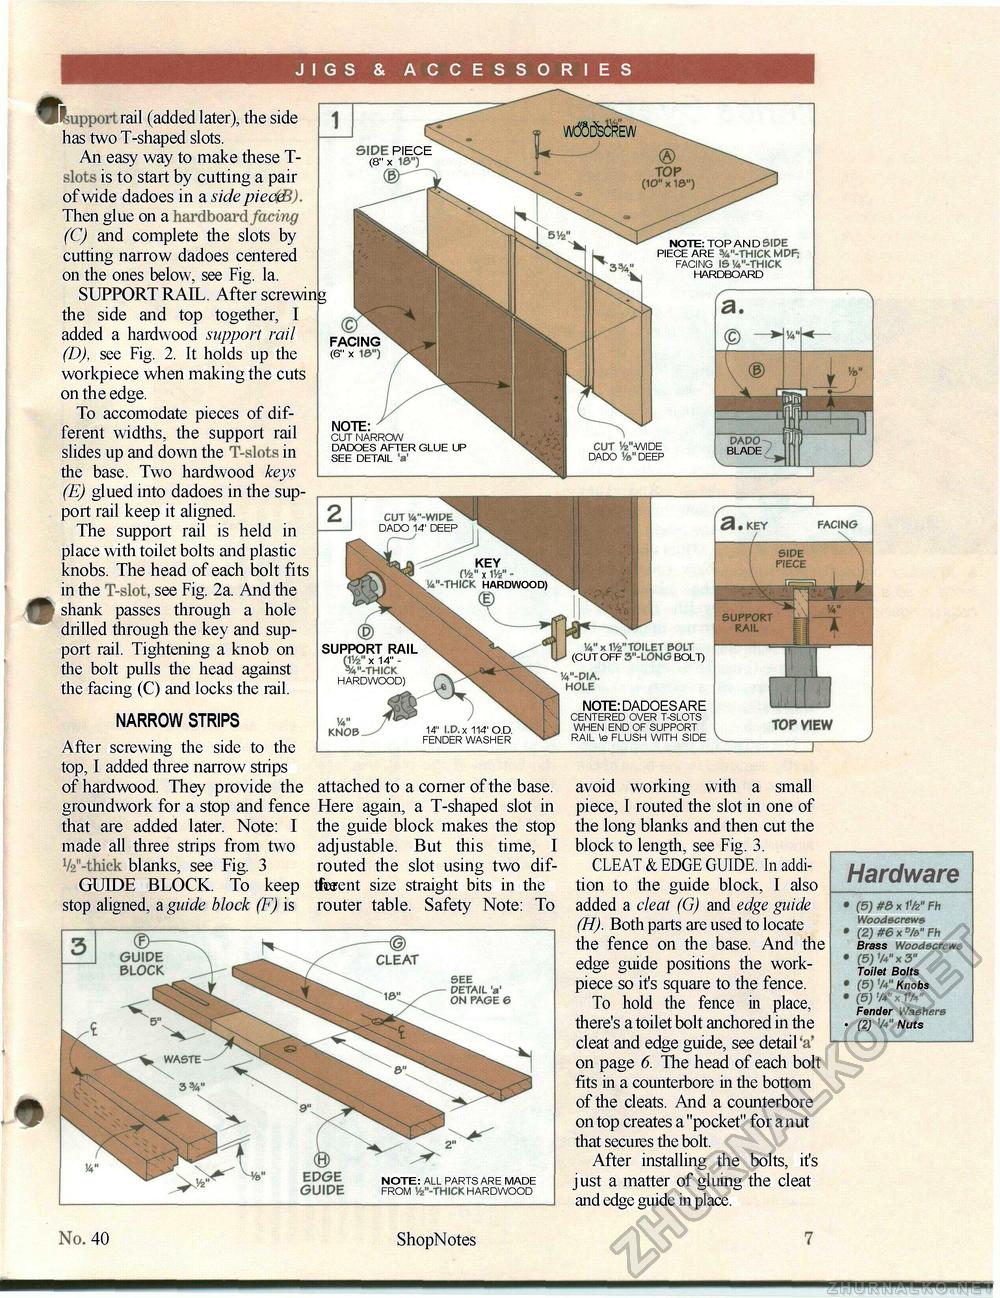
JIGS & ACCESSORIES lloippoi-t rail (added later), the side has two T-shaped slots. An easy way to make these T-slots is to start by cutting a pair of wide dadoes in a side pieddl). Then glue on a hardboard facing (C) and complete the slots by cutting narrow dadoes centered on the ones below, see Fig. la. SUPPORT RAIL. After screwin the side and top together, I added a hardwood support rail (D), see Fig. 2. It holds up the workpiece when making the cuts on the edge. To accomodate pieces of different widths, the support rail slides up and down the T-slots in the base. Two hardwood keys (E) glued into dadoes in the support rail keep it aligned. The support rail is held in place with toilet bolts and plastic knobs. The head of each bolt fits in the T-slot, see Fig. 2a. And the shank passes through a hole drilled through the key and support rail. Tightening a knob on the bolt pulls the head against the facing (C) and locks the rail. NARROW STRIPS After screwing the side to the top, I added three narrow strips of hardwood. They provide the attached to a corner of the base. groundwork for a stop and fence Here again, a T-shaped slot in that are added later. Note: I made all three strips from two V2"-thick blanks, see Fig. 3 GUIDE BLOCK. To keep stop aligned, a guide block (F) is the guide block makes the stop adjustable. But this time, I routed the slot using two dif-tfearent size straight bits in the router table. Safety Note: To avoid working with a small piece, I routed the slot in one of the long blanks and then cut the block to length, see Fig. 3. CLEAT & EDGE GUIDE. In addition to the guide block, I also added a cleat (G) and edge guide (H). Both parts are used to locate the fence on the base. And the edge guide positions the work-piece so it's square to the fence. To hold the fence in place, there's a toilet bolt anchored in the cleat and edge guide, see detail'a' on page 6. The head of each bolt fits in a counterbore in the bottom of the cleats. And a counterbore on top creates a "pocket" for a nut that secures the bolt. After installing the bolts, it's just a matter of gluing the cleat and edge guide in place. Hardware (5) #& x I'/z" Fh Woodscrews (Z) #6 x B/e" Fh Brass Woodscrewe (5) 'M" x 3" Toilet Bolts (5)'W Knobs (5) '/4"x VM" Fender Washers (2) 'A" Nuts 40 ShopNotes 7 |


