40 - Vacuum Clamping System, страница 10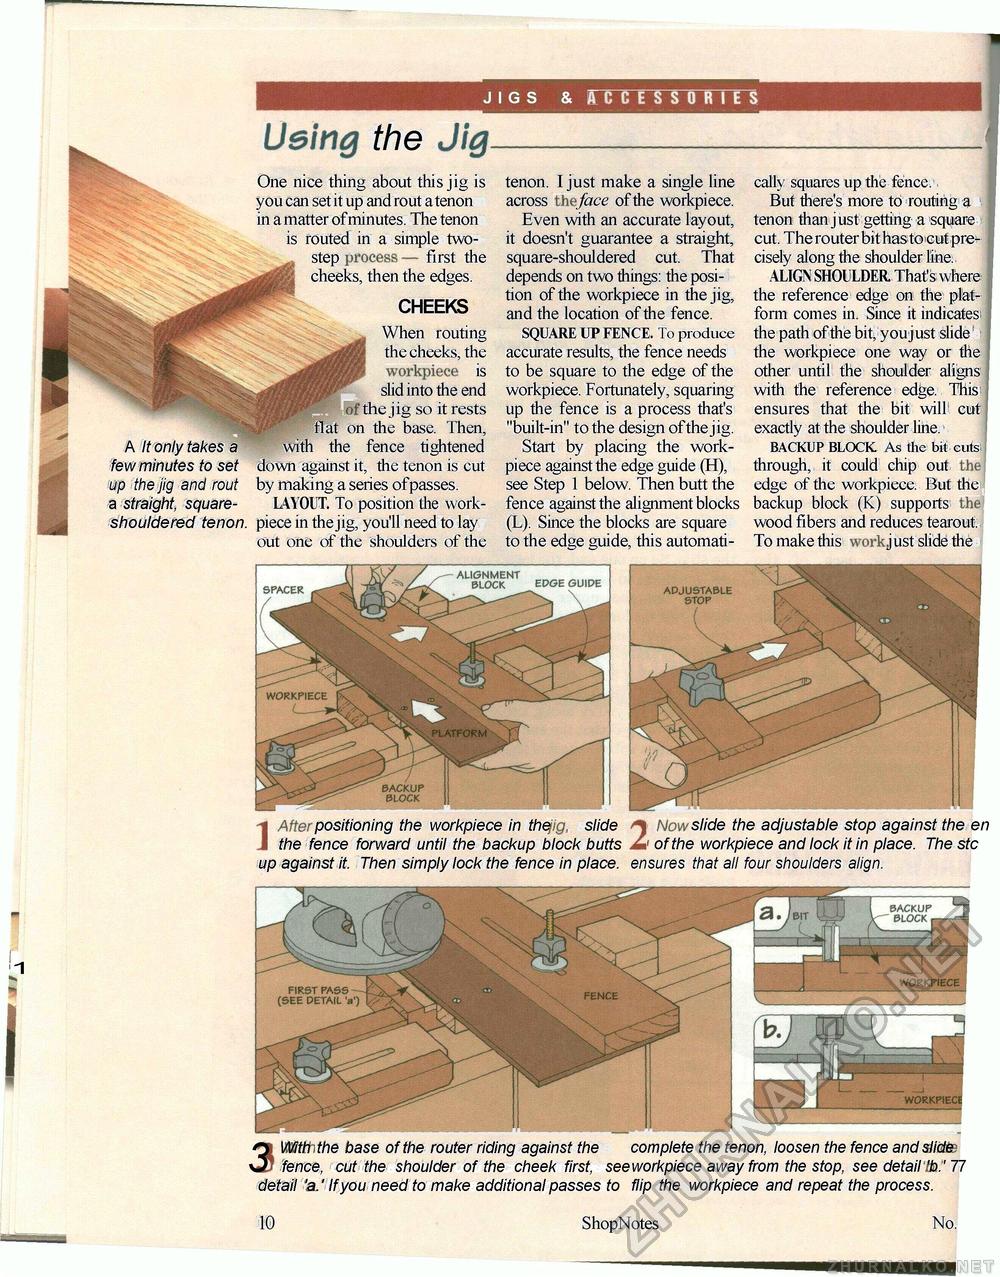
JIGS CCESSORIES Ueingj the Jig- One nice thing about this jig is you can set it up and rout a tenon in a matter of minutes. The tenon is routed in a simple two-step process — first the cheeks, then the edges. CHEEKS When routing the cheeks, the workpiece is slid into the end of the jig so it rests flat on the base. Then, with the fence tightened down against it, the tenon is cut by making a series of passes. LAYOUT. To position the work-shouldered tenon. piece in the jig, you'll need to lay out one of the shoulders of the A It only takes a few minutes to set up the jig and rout square- tenon. I just make a single line across the face of the workpiece. Even with an accurate layout, it doesn't guarantee a straight, square-shouldered cut. That depends on two things: the position of the workpiece in the jig, and the location of the fence. SQUARE UP FENCE. To produce accurate results, the fence needs to be square to the edge of the workpiece. Fortunately, squaring up the fence is a process that's "built-in" to the design ofthe jig. Start by placing the work-piece against the edge guide (H), see Step 1 below. Then butt the fence against the alignment blocks (L). Since the blocks are square to the edge guide, this automati cally squares up the fence. But there's more to routing a tenon than just getting a square cut. The router bit has to cut precisely along the shoulder line. ALIGN SHOULDER. That's where the reference edge on the platform comes in. Since it indicates the path of the bit, you just slide the workpiece one way or the other until the shoulder aligns with the reference edge. This ensures that the bit will cut exactly at the shoulder line. BACKUP BLOCK As the bit cuts through, it could chip out the edge of the workpiece. But the backup block (K) supports the wood fibers and reduces tearout. To make this work just slide the ] After positioning the workpiece in the/ig, slide ^ Now slide the adjustable stop against the en the fence forward until the backup block butts JL< ofthe workpiece and lock it in place. The stc up against it. Then simply lock the fence in place. ensures that all four shoulders align. 1 3\Mtttithe base ofthe router riding against the complete the tenon, loosen the fence and sllatee fence, cut the shoulder of the cheek first, see workpiece away from the stop, see detail tb:' 77 detail 'a.' If you need to make additional passes to flip the workpiece and repeat the process. & 10 ShopNotes No. |


