40 - Vacuum Clamping System, страница 9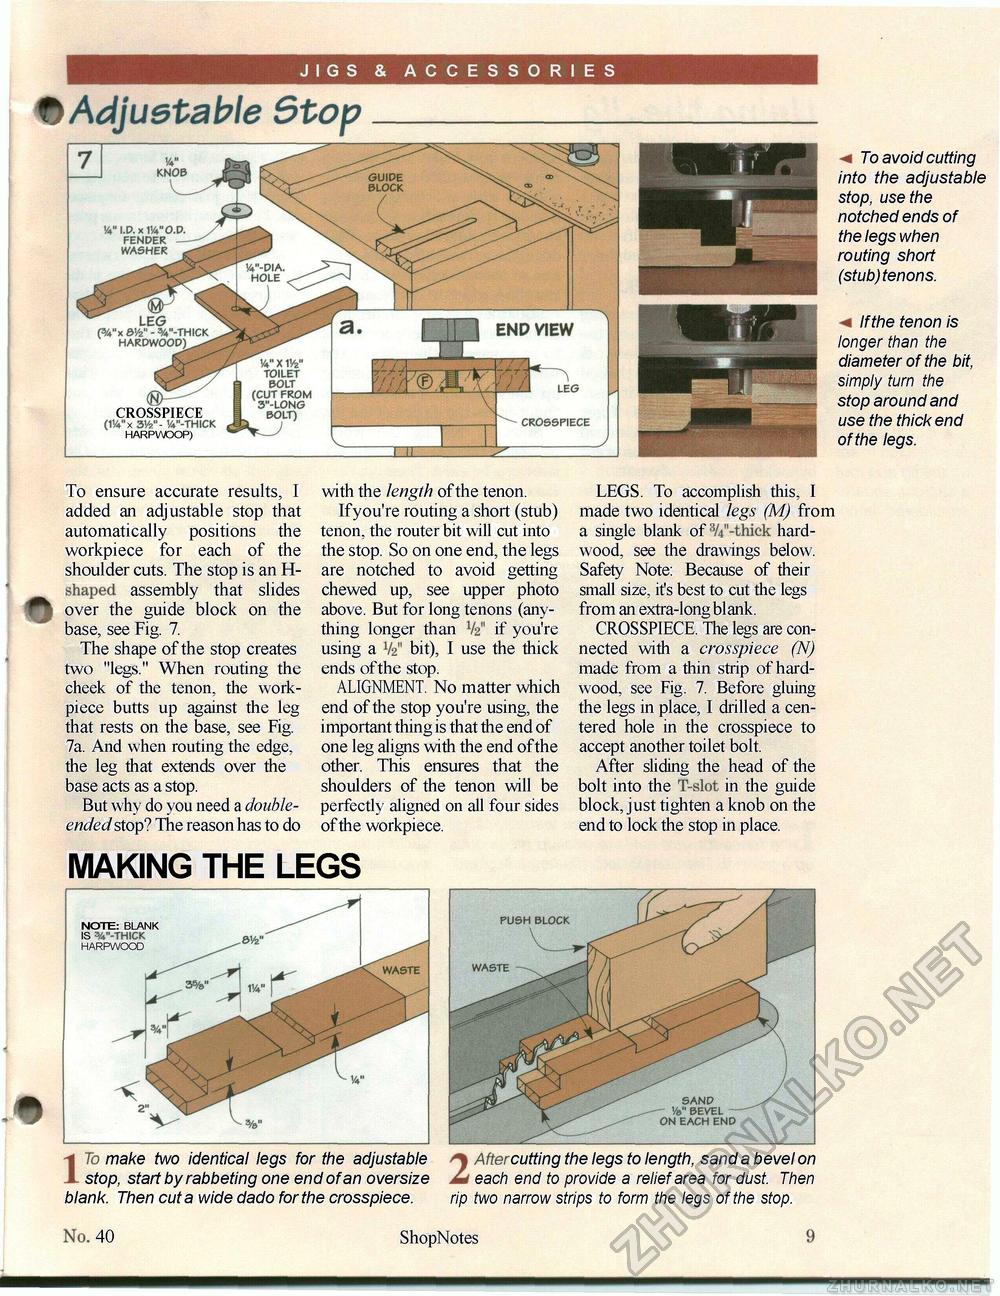
JIGS & ACCESSORIES fiAdjuetable Stop To avoid cutting into the adjustable stop, use the notched ends of the legs when routing short (stub)tenons. ^ If the tenon is longer than the diameter of the bit, simply turn the stop around and use the thick end of the legs. To ensure accurate results, I added an adjustable stop that automatically positions the workpiece for each of the shoulder cuts. The stop is an H-shaped assembly that slides over the guide block on the base, see Fig. 7. The shape of the stop creates two "legs." When routing the cheek of the tenon, the work-piece butts up against the leg that rests on the base, see Fig. 7a. And when routing the edge, the leg that extends over the base acts as a stop. But why do you need a double-ended stop? The reason has to do with the length of the tenon. If you're routing a short (stub) tenon, the router bit will cut into the stop. So on one end, the legs are notched to avoid getting chewed up, see upper photo above. But for long tenons (anything longer than V2" if you're using a V2'1 bit), I use the thick ends of the stop. ALIGNMENT. No matter which end of the stop you're using, the important thing is that the end of one leg aligns with the end of the other. This ensures that the shoulders of the tenon will be perfectly aligned on all four sides of the workpiece. LEGS. To accomplish this, I made two identical legs (M) from a single blank of 3/4"-thick hardwood, see the drawings below. Safety Note: Because of their small size, it's best to cut the legs from an extra-long blank. CROSSPIECE. The legs are connected with a crosspiece (N) made from a thin strip of hardwood, see Fig. 7. Before gluing the legs in place, I drilled a centered hole in the crosspiece to accept another toilet bolt. After sliding the head of the bolt into the T-slot in the guide block, just tighten a knob on the end to lock the stop in place. MAKING THE LEGS Imake two identical legs for the adjustable stop, start by rabbeting one end of an oversize blank. Then cut a wide dado for the crosspiece. 2Afiei cutting the legs to length, sand a bevel on each end to provide a relief area for dust. Then rip two narrow strips to form the legs of the stop. 40 ShopNotes 11 |


