40 - Vacuum Clamping System, страница 11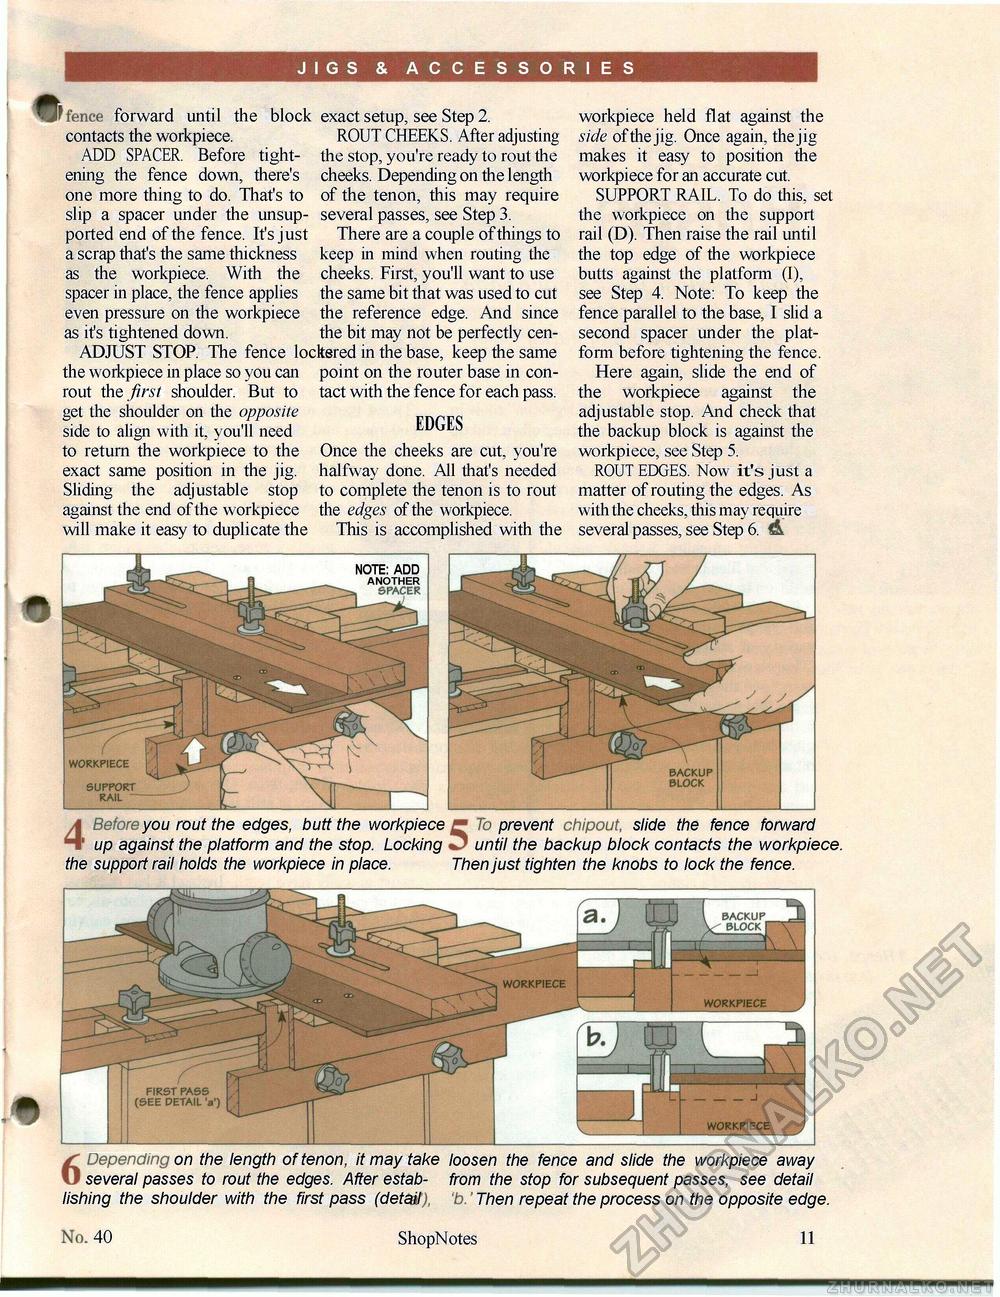
JIGS & ACCESSORIES forward until the contacts the workpiece. ADD SPACER. Before tightening the fence down, there's one more thing to do. That's to slip a spacer under the unsupported end of the fence. It's just a scrap that's the same thickness as the workpiece. With the spacer in place, the fence applies even pressure on the workpiece as it's tightened down. block exact setup, see Step 2. ROUT CHEEKS. After adjusting the stop, you're ready to rout the cheeks. Depending on the length of the tenon, this may require several passes, see Step 3. There are a couple of things to keep in mind when routing the cheeks. First, you'll want to use the same bit that was used to cut the reference edge. And since the bit may not be perfectly cen- ADJUST STOP. The fence locksred in the base, keep the same the workpiece in place so you can point on the router base in con- rout the first shoulder. But to get the shoulder on the opposite side to align with it, you'll need to return the workpiece to the exact same position in the jig. Sliding the adjustable stop against the end of the workpiece will make it easy to duplicate the tact with the fence for each pass. EDGES Once the cheeks are cut, you're halfway done. All that's needed to complete the tenon is to rout the edges of the workpiece. This is accomplished with the workpiece held flat against the side of the jig. Once again, the jig makes it easy to position the workpiece for an accurate cut. SUPPORT RAIL. To do this, set the workpiece on the support rail (D). Then raise the rail until the top edge of the workpiece butts against the platform (I), see Step 4. Note: To keep the fence parallel to the base, I slid a second spacer under the platform before tightening the fence. Here again, slide the end of the workpiece against the adjustable stop. And check that the backup block is against the workpiece, see Step 5. ROUT EDGES. Now it's just a matter of routing the edges. As with the cheeks, this may require several passes, see Step 6. A Before you rout the edges, butt the workpiece H" up against the platform and the stop. Locking the support rail holds the workpiece in place. 5 prevent chipout. slide the fence forward until the backup block contacts the workpiece. Then just tighten the knobs to lock the fence. 6 Depending on the length of tenon, it may take loosen the fence and slide the workpiece away several passes to rout the edges. After estab- from the stop for subsequent passes, see detail lishing the shoulder with the first pass (detait), 'b.' Then repeat the process on the opposite edge. 40 ShopNotes 11 |


