41 - Fold-Down Drafting Table, страница 27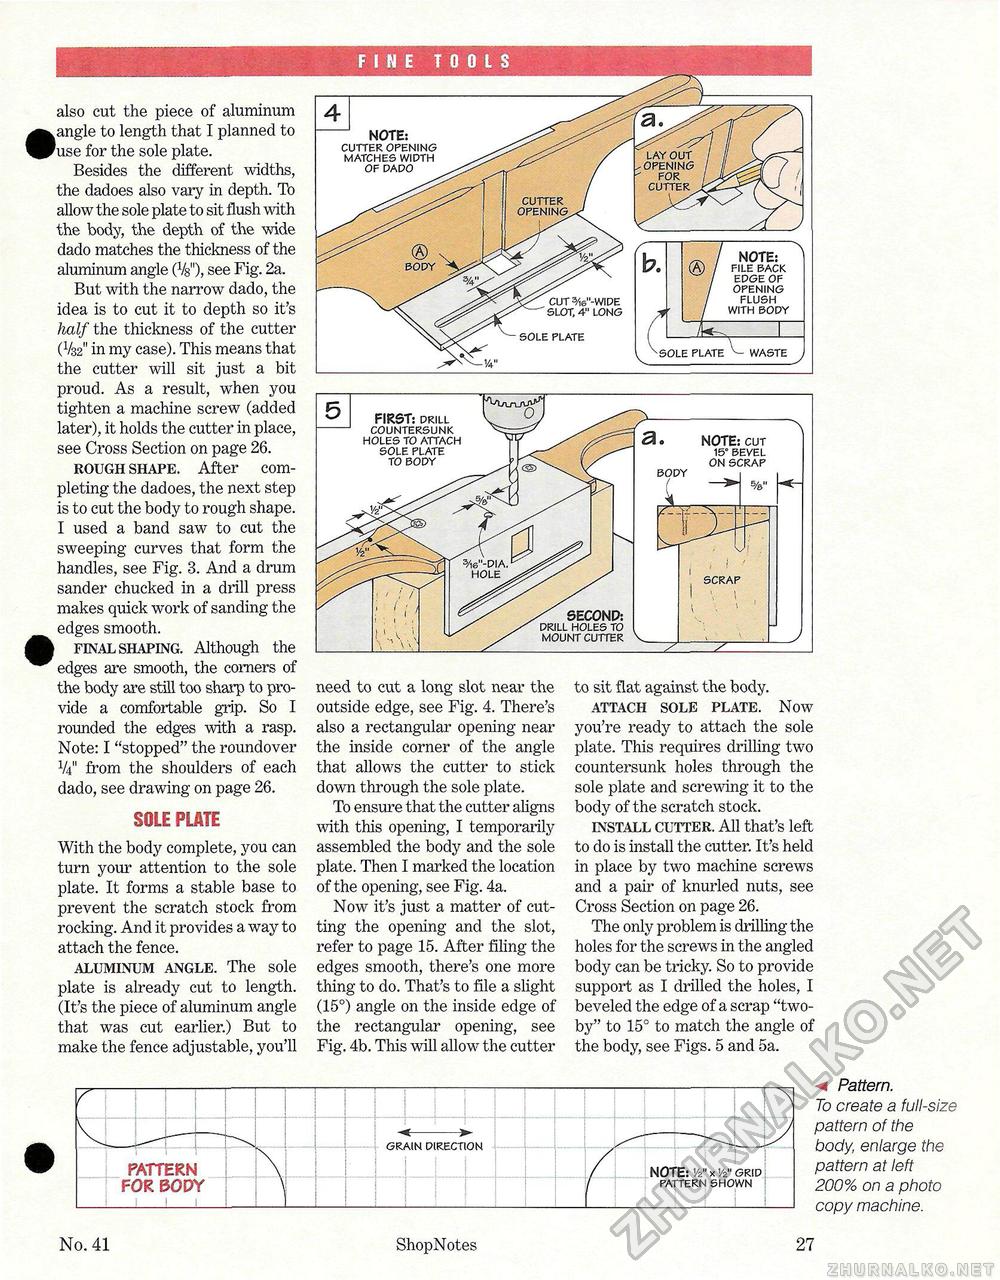
also cut the piece of aluminum .angle to length that I planned to 'use for the sole plate. Besides the different widths, the dadoes also vary in depth. To allow the sole plate to sit flush with the body, the depth of the wide dado matches the thickness of the aluminum angle (Vs"), see Fig. 2a. But with the narrow dado, the idea is to cut it to depth so it's half the thickness of the cutter (V32" in my case). This means that the cutter will sit just a bit proud. As a result, when you tighten a machine screw (added later), it holds the cutter in place, see Cross Section on page 26. rough shape. After completing the dadoes, the next step is to cut the body to rough shape. I used a band saw to cut the sweeping curves that form the handles, see Fig. 3. And a drum sander chucked in a drill press makes quick work of sanding the edges smooth. final shaping. Although the edges are smooth, the corners of the body are still too sharp to provide a comfortable grip. So I rounded the edges with a rasp. Note: I "stopped" the roundover V4" from the shoulders of each dado, see drawing on page 26. SOLE PLATE With the body complete, you can turn your attention to the sole plate. It forms a stable base to prevent the scratch stock from rocking. And it provides a way to attach the fence. aluminum angle. The sole plate is already cut to length. (It's the piece of aluminum angle that was cut earlier.) But to make the fence adjustable, you'll need to cut a long slot near the outside edge, see Fig. 4. There's also a rectangular opening near the inside corner of the angle that allows the cutter to stick down through the sole plate. To ensure that the cutter aligns with this opening, I temporarily assembled the body and the sole plate. Then I marked the location of the opening, see Fig. 4a. Now it's just a matter of cutting the opening and the slot, refer to page 15. After filing the edges smooth, there's one more thing to do. That's to file a slight (15°) angle on the inside edge of the rectangular opening, see Fig. 4b. This will allow the cutter to sit flat against the body. attach sole plate. Now you're ready to attach the sole plate. This requires drilling two countersunk holes through the sole plate and screwing it to the body of the scratch stock. install cutter. All that's left to do is install the cutter. It's held in place by two machine screws and a pair of knurled nuts, see Cross Section on page 26. The only problem is drilling the holes for the screws in the angled body can be tricky. So to provide support as I drilled the holes, I beveled the edge of a scrap "two-by" to 15° to match the angle of the body, see Figs. 5 and 5a.
< Pattern. To create a full-size pattern of the body, enlarge the pattern at left 200% on a photo copy machine. cutter opening body NOTE: FILE BACK EDGE OF OPENING FLUSH WITH BODY 'SOLE PLATE WASTE FINE TOOLS NOTE: CUTTER OPENING MATCHES WIDTH OF DADO CUT 3/i6"-WIDE ' SLOT, 4" LONG SOLE PLATE lay out • opening for cutter No. 41 ShopNotes 27 |
||||||||||||||||||||||||||||||||||||||||||||||||||||||||||||||||||||||||||||||||||||||||||||||||||||


