41 - Fold-Down Drafting Table, страница 29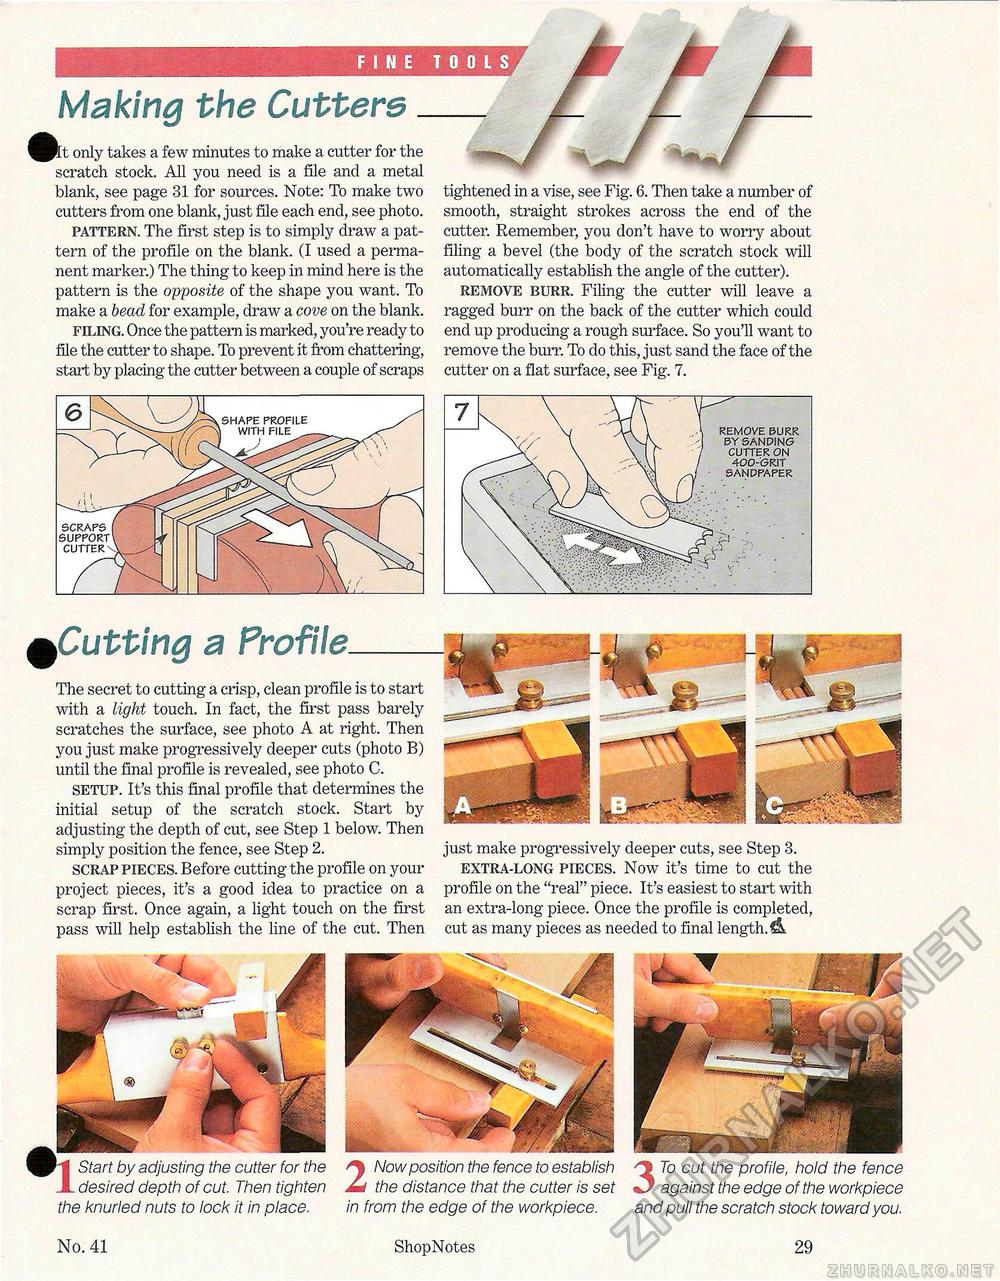
Making the Cutters ^^ t only takes a few minutes to make a cutter for the scratch stock. All you need is a file and a metal blank, see page 31 for sources. Note: To make two cutters from one blank, just file each end, see photo. pattern. The first step is to simply draw a pattern of the profile on the blank. (I used a permanent marker.) The thing to keep in mind here is the pattern is the opposite of the shape you want. To make a bead for example, draw a cove on the blank. filing. Once the pattern is marked, you're ready to file the cutter to shape. To prevent it from chattering, start by placing the cutter between a couple of scraps tightened in a vise, see Fig. 6. Then take a number of smooth, straight strokes across the end of the cutter. Remember, you don't have to worry about filing a bevel (the body of the scratch stock will automatically establish the angle of the cutter). remove burr. Filing the cutter will leave a ragged burr on the back of the cutter which could end up producing a rough surface. So you'll want to remove the burr. To do this, just sand the face of the cutter on a flat surface, see Fig. 7. SCRAPS SUPPORT CUTTER REMOVE BURR BY SANDING CUTTER ON 400-GRIT SANDPAPER £Cutting a ProfileThe secret to cutting a crisp, clean profile is to start with a light touch. In fact, the first pass barely scratches the surface, see photo A at right. Then you just make progressively deeper cuts (photo B) until the final profile is revealed, see photo C. setup. It's this final profile that determines the initial setup of the scratch stock. Start by adjusting the depth of cut, see Step 1 below. Then simply position the fence, see Step 2. scrap pieces. Before cutting the profile on your project pieces, it's a good idea to practice on a scrap first. Once again, a light touch on the first pass will help establish the line of the cut. Then just make progressively deeper cuts, see Step 3. extra-long pieces. Now it's time to cut the profile on the "real" piece. It's easiest to start with an extra-long piece. Once the profile is completed, cut as many pieces as needed to final length. & 2 Now position the fence to establish the distance that the cutter is set in from the edge of the workpiece. 3 To cut the profile, hold the fence against the edge of the workpiece and pull the scratch stock toward you. Start by adjusting the cutter for the desired depth of cut. Then tighten the knurled nuts to lock it in place. No. 41 ShopNotes 29 |


