41 - Fold-Down Drafting Table, страница 28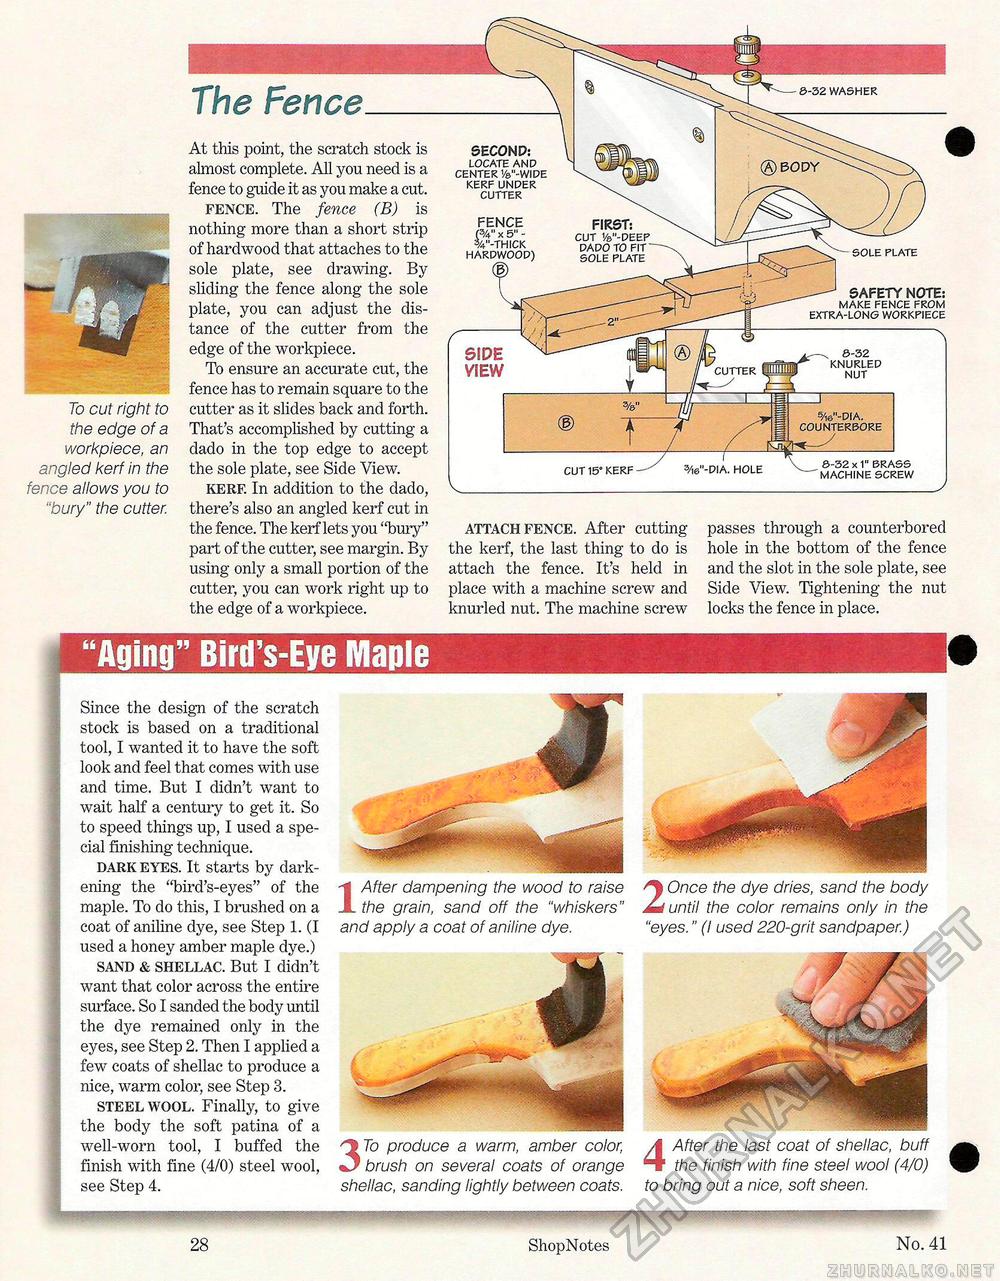
To cut right to the edge of a workpiece, an angled kerf in the fence allows you to "bury" the cutter. "Aging" Bird's-Eye MapleSince the design of the scratch stock is based on a traditional tool, I wanted it to have the soft look and feel that comes with use and time. But I didn't want to wait half a century to get it. So to speed things up, I used a special finishing technique. dark eyes. It starts by darkening the "bird's-eyes" of the maple. To do this, I brushed on a coat of aniline dye, see Step 1. (I used a honey amber maple dye.) sand & shellac. But I didn't want that color across the entire surface. So I sanded the body until the dye remained only in the eyes, see Step 2. Then I applied a few coats of shellac to produce a nice, warm color, see Step 3. steel wool. Finally, to give the body the soft patina of a well-worn tool, I buffed the finish with fine (4/0) steel wool, see Step 4. 1 After dampening the wood to raise the grain, sand off the "whiskers" and apply a coat of aniline dye. 3 To produce a warm, amber color, brush on several coats of orange shellac, sanding lightly between coats. 2 Once the dye dries, sand the body until the color remains only in the "eyes." (I used 220-grit sandpaper.) 4 After the last coat of shellac, buff the finish with fine steel wool (4/0) to bring out a nice, soft sheen. SIDE VIEW CUT 15° KERF 3/i6"-DIA. HOLE SAFETY NOTE: MAKE FENCE FROM EXTRA-LONG WORKPIECE 8-32 KNURLED CUTTER 5/is"-DIA. COUNTERBORE 8-32 x 1" BRASS MACHINE SCREW attach fence. After cutting the kerf, the last thing to do is attach the fence. It's held in place with a machine screw and knurled nut. The machine screw passes through a counterborecl hole in the bottom of the fence and the slot in the sole plate, see Side View. Tightening the nut locks the fence in place. The Fence At this point, the scratch stock is almost complete. All you need is a fence to guide it as you make a cut. fence. The fence (B) is nothing more than a short strip of hardwood that attaches to the sole plate, see drawing. By sliding the fence along the sole plate, you can adjust the distance of the cutter from the edge of the workpiece. To ensure an accurate cut, the fence has to remain square to the cutter as it slides back and forth. That's accomplished by cutting a dado in the top edge to accept the sole plate, see Side View. kerf. In addition to the dado, there's also an angled kerf cut in the fence. The kerf lets you "bury" part of the cutter, see margin. By using only a small portion of the cutter, you can work right up to the edge of a workpiece. 8-32 WASHER SECOND: LOCATE AND CENTER 1/s"-WIDE KERF UNDER CUTTER FIRST: CUT 1/a"-DEEP DADD TO FIT SOLE PLATE 28 ShopNotes No. 41 |


