43 - Build Your Own Dovetail Jig, страница 10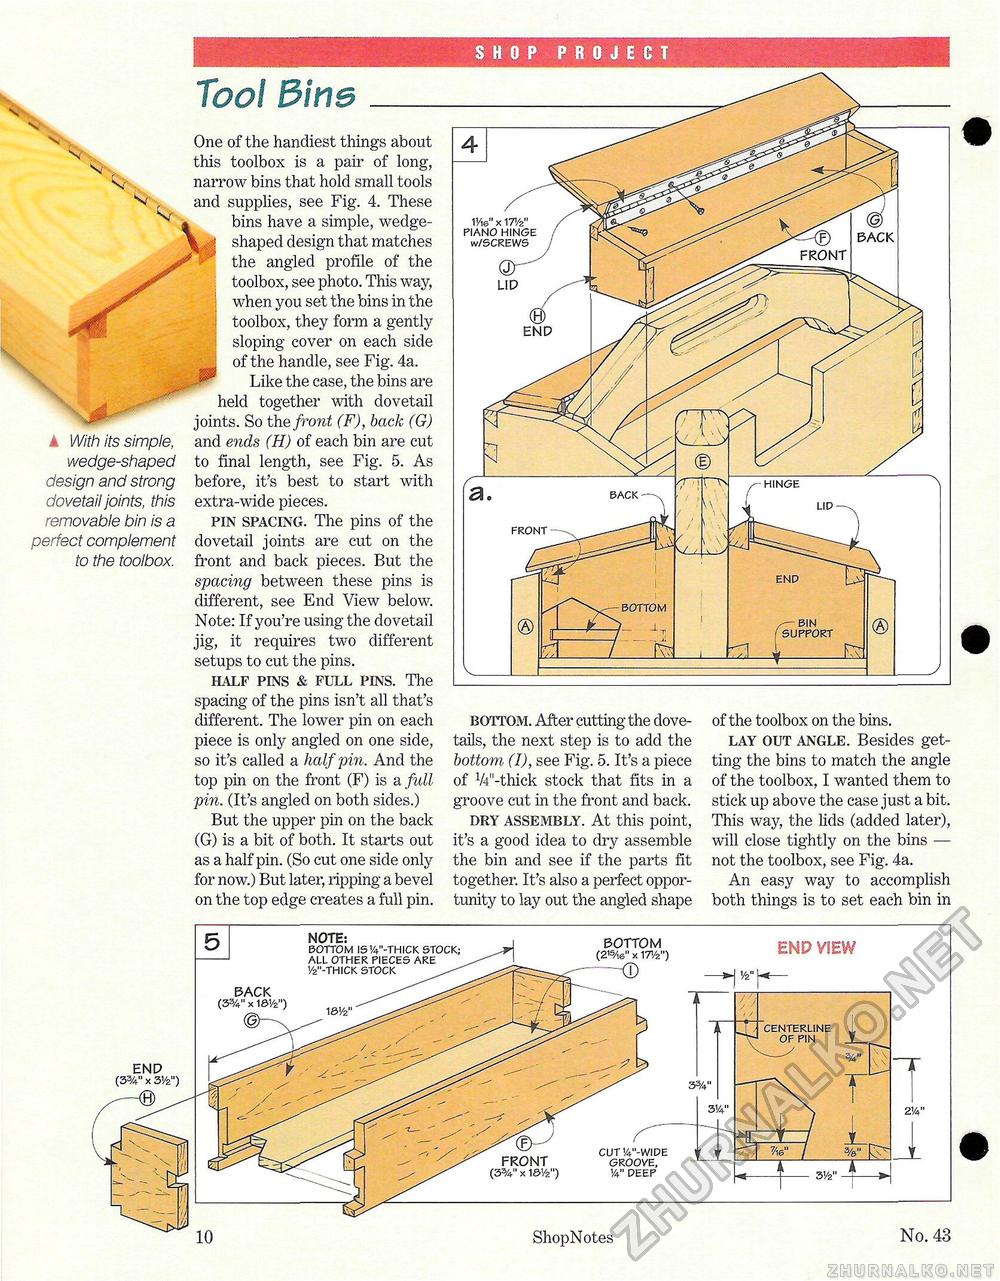
SHOP PROJECT ▲ With its simple, wedge-shaped design and strong dovetail joints, this removable bin is a perfect complement to the toolbox. TooI Bine_ One of the handiest things about this toolbox is a pair of long, narrow bins that hold small tools and supplies, see Fig. 4. These bins have a simple, wedge-shaped design that matches the angled profile of the toolbox, see photo. This way, when you set the bins in the toolbox, they form a gently sloping cover on each side of the handle, see Fig. 4a. Like the case, the bins are held together with dovetail joints. So the front (F), back (G) and ends (H) of each bin are cut to final length, see Fig. 5. As before, it's best to start with extra-wide pieces. pin spacing. The pins of the dovetail joints are cut on the front and back pieces. But the spacing between these pins is different, see End View below. Note: If you're using the dovetail jig, it requires two different setups to cut the pins. half pins & full pins. The spacing of the pins isn't all that's different. The lower pin on each piece is only angled on one side, so it's called a half pin. And the top pin on the front (F) is a full pin. (It's angled on both sides.) But the upper pin on the back (G) is a bit of both. It starts out as a half pin. (So cut one side only for now.) But later, ripping a bevel on the top edge creates a full pin. bottom. After cutting the dovetails, the next step is to add the bottom (I), see Fig. 5. It's a piece of V4"-thick stock that fits in a groove cut in the front and back. dry assembly. At this point, it's a good idea to dry assemble the bin and see if the parts fit together. It's also a perfect opportunity to lay out the angled shape of the toolbox on the bins. lay out angle. Besides getting the bins to match the angle of the toolbox, I wanted them to stick up above the case just a bit. This way, the lids (added later), will close tightly on the bins — not the toolbox, see Fig. 4a. An easy way to accomplish both things is to set each bin in end (33/4n x 31/2") ---(0) note: BOTTOM ISV4"-THICK STOCK; ALL OTHER PIECES ARE y2"-THICK STOCK bottom (215/ie" x 17V2") -0 back (33/4n x 1S1/2") BHD VIEW 3%" 314" CD-front (3%" x 1S1/2") CUT'/V'-WIDE U GROOVE, V4" PEEP '/2" 03 ShopNotes CENTERLINE OF PIN r y i_ 3'/2" 7 21/4" No. 43 11/ie" x 17V2" PIANO HINGE w/SCREWS lid end FRONT BACK |


