43 - Build Your Own Dovetail Jig, страница 11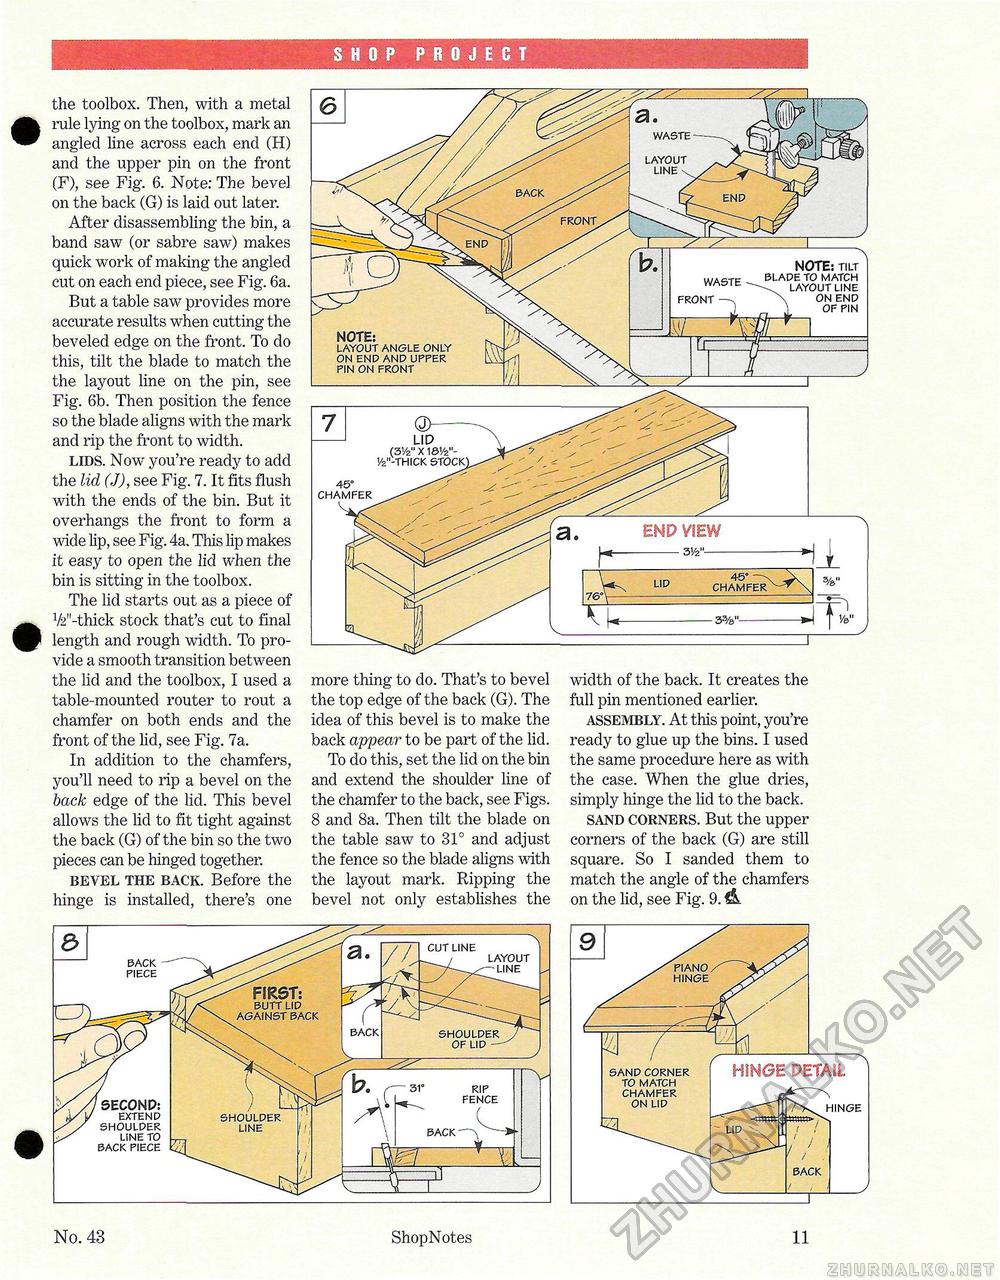
S HOP PROJECT the toolbox. Then, with a metal rule lying on the toolbox, mark an angled line across each end (H) and the upper pin on the front (F), see Fig. 6. Note: The bevel on the back (G) is laid out later. After disassembling the bin, a band saw (or sabre saw) makes quick work of making the angled cut on each end piece, see Fig. 6a. But a table saw provides more accurate results when cutting the beveled edge on the front. To do this, tilt the blade to match the the layout line on the pin, see Fig. 6b. Then position the fence so the blade aligns with the mark and rip the front to width. lids. Now you're ready to add the lid (J), see Fig. 7. It fits flush with the ends of the bin. But it overhangs the front to form a wide lip, see Fig. 4a. This lip makes it easy to open the lid when the bin is sitting in the toolbox. The lid starts out as a piece of V2"-thick stock that's cut to final length and rough width. To provide a smooth transition between the lid and the toolbox, I used a table-mounted router to rout a chamfer on both ends and the front of the lid, see Fig. 7a. In addition to the chamfers, you'll need to rip a bevel on the back edge of the licl. This bevel allows the lid to fit tight against the back (G) of the bin so the two pieces can be hinged together. bevel the back. Before the hinge is installed, there's one more thing to do. That's to bevel the top edge of the back (G). The idea of this bevel is to make the back appear to be part of the lid. To do this, set the lid on the bin and extend the shoulder line of the chamfer to the back, see Figs. 8 and 8a. Then tilt the blade on the table saw to 31° and adjust the fence so the blade aligns with the layout mark. Ripping the bevel not only establishes the width of the back. It creates the full pin mentioned earlier. assembly. At this point, you're ready to glue up the bins. I used the same procedure here as with the case. When the glue dries, simply hinge the lid to the back. sand corners. But the upper corners of the back (G) are still square. So I sanded them to match the angle of the chamfers on the lid, see Fig. 9. & SAND CORNER TO MATCH CHAMFER ON LID HINGE PETA1L IINGE LAYOUT — LINE BACK PIECE FIRST: BUTT LID AGAINST BACK BACK SHOULDER OF LID — ' SECOND: EXTEND SHOULDER LINE TO BACK PIECE SHOULDER LINE BACK — No. 43 ShopNotes 11 |


