43 - Build Your Own Dovetail Jig, страница 7
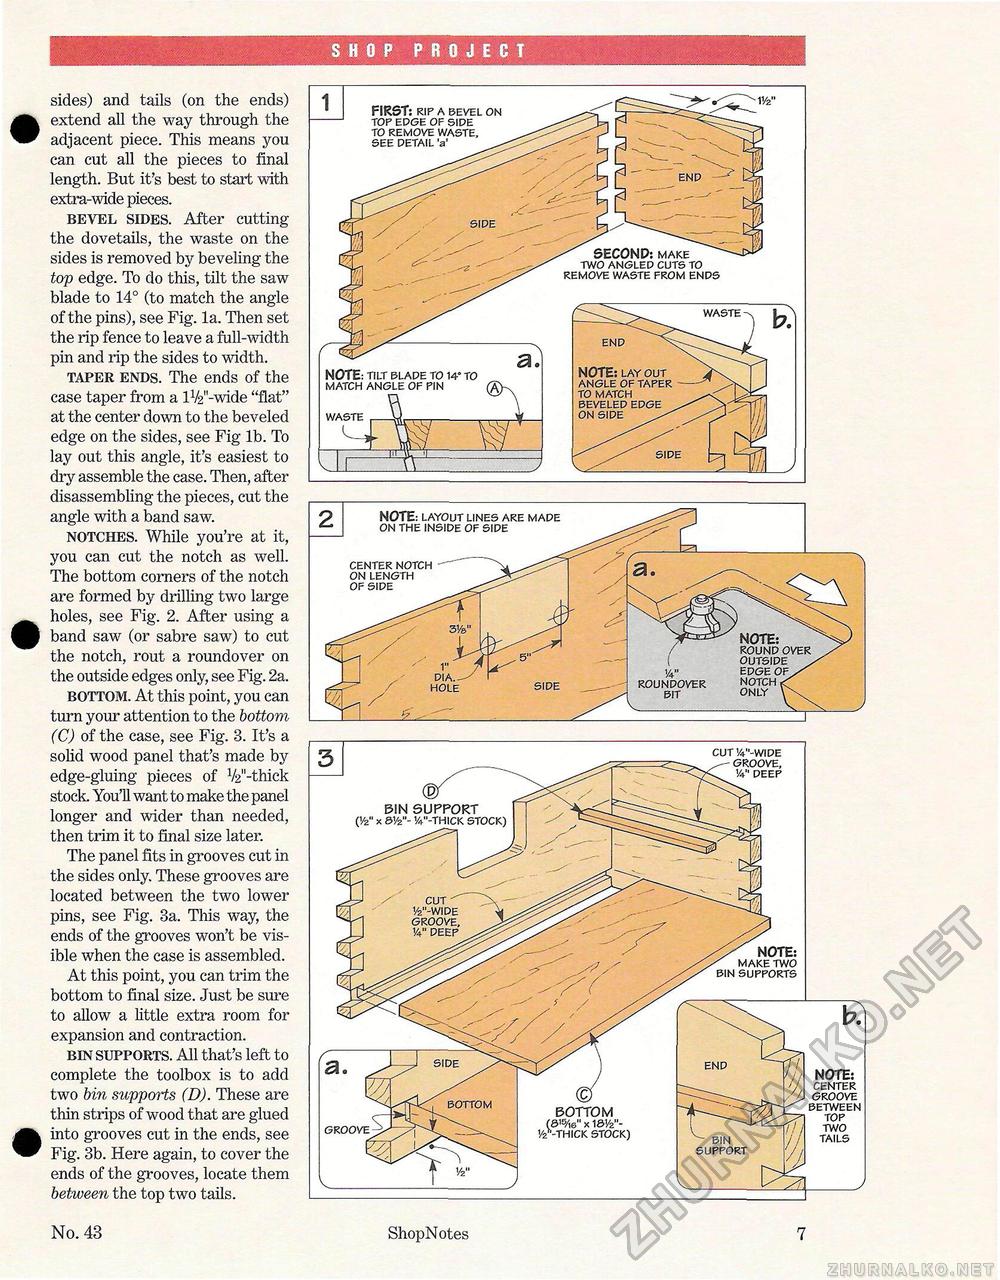
S HOP PROJECT sides) and tails (on the ends) extend all the way through the adjacent piece. This means you can cut all the pieces to final length. But it's best to start with extra-wide pieces. bevel sides. After cutting the dovetails, the waste on the sides is removed by beveling the top edge. To do this, tilt the saw blade to 14° (to match the angle of the pins), see Fig. la. Then set the rip fence to leave a full-width pin and rip the sides to width. taper ends. The ends of the case taper from a lV2"-wide "flat" at the center down to the beveled edge on the sides, see Fig lb. To lay out this angle, it's easiest to dry assemble the case. Then, after disassembling the pieces, cut the angle with a band saw. notches. While you're at it, you can cut the notch as well. The bottom corners of the notch are formed by drilling two large holes, see Fig. 2. After using a band saw (or sabre saw) to cut the notch, rout a roundover on the outside edges only, see Fig. 2a. bottom. At this point, you can turn your attention to the bottom (C) of the case, see Fig. 3. It's a solid wood panel that's made by edge-gluing pieces of V2n-thick stock. You'll want to make the panel longer and wider than needed, then trim it to final size later. The panel fits in grooves cut in the sides only. These grooves are located between the two lower pins, see Fig. 3a. This way, the ends of the grooves won't be visible when the case is assembled. At this point, you can trim the bottom to final size. Just be sure to allow a little extra room for expansion and contraction. bin supports. All that's left to complete the toolbox is to add two bin supports (D). These are thin strips of wood that are glued into grooves cut in the ends, see Fig. 3b. Here again, to cover the ends of the grooves, locate them between the top two tails. NOTE: LAY OUT ANGLE OF TO MATCH BEVELED EDGE ON SIDE NOTE: TILT BLADE TO 14° TO MATCH ANGLE OF PIN WASTE TWO ANGLED CUTS TO REMOVE WASTE FROM ENDS FIRST: RIP A BEVEL ON TOP EDGE OF SIDE TO REMOVE WASTE, SEE DETAIL 'a' NOTE: LAYOUT LINES ARE MADE ON THE INSIDE OF SIDE HOLE SIDE CENTER NOTCH ON LENGTH OF SIDE W ROUNDOVER BIT V___ NOTCH ONLY No. 43 ShopNotes 7 |


