47 - Build Your Own Mortising Machine , страница 22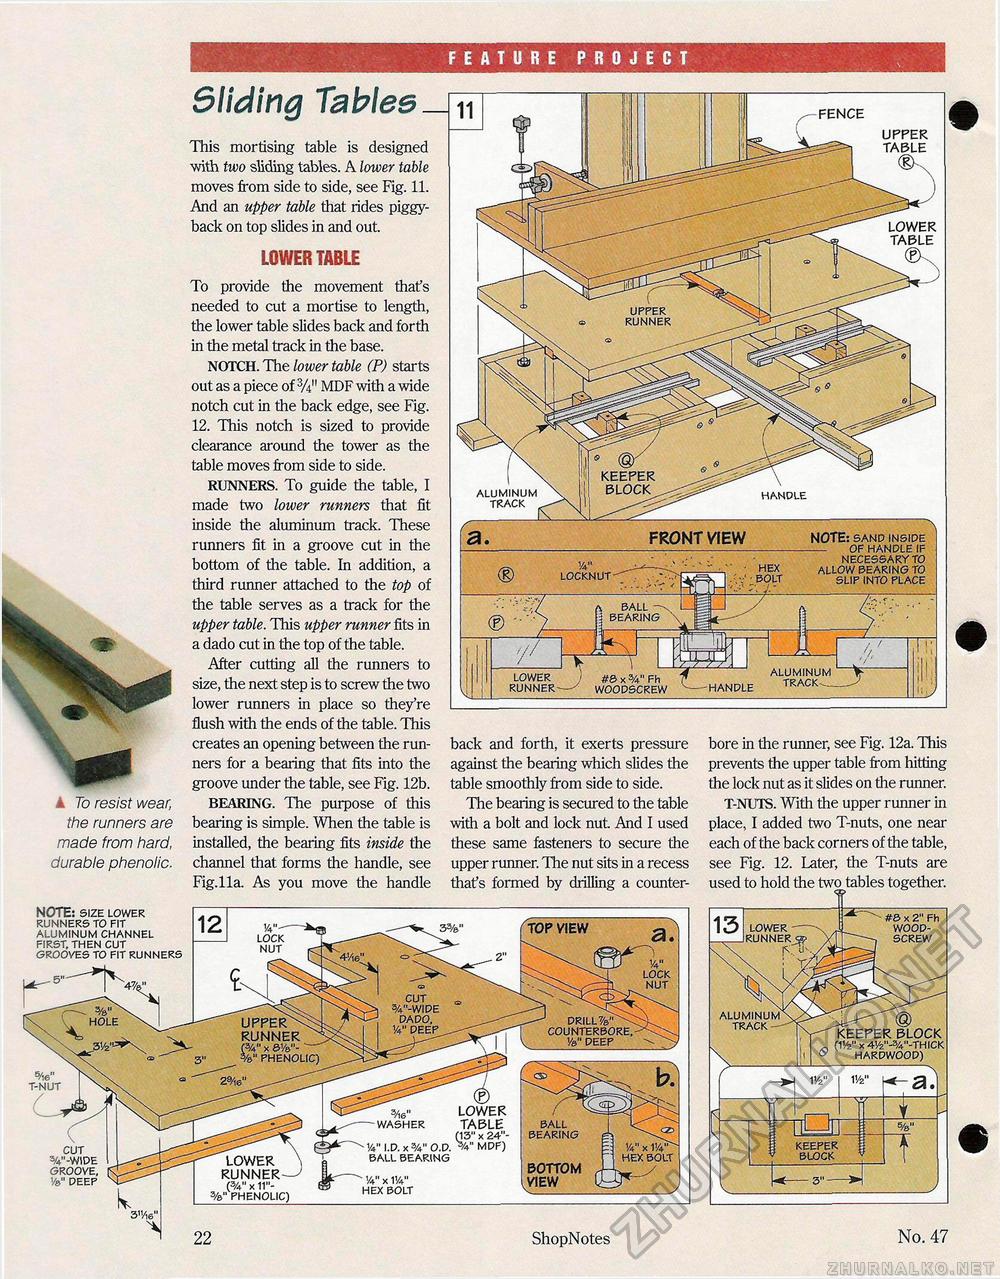
FEATURE PROJECT 5tiding Tablesupper table This mortising table is designed with two sliding tables. A lower table moves from side to side, see Fig. 11. And an upper table that rides piggyback on top slides in and out. LOWER TABLE To provide the movement that's needed to cut a mortise to length, the lower table slides back and forth in the metal track in the base. NOTCH. The lower table (P) starts out as a piece of 3A" MDF with a wide notch cut in the back edge, see Fig. 12. This notch is sized to provide clearance around the tower as the table moves from side to side. RUNNERS. To guide the table, I made two lower runners that fit inside the aluminum track. These runners fit in a groove cut in the bottom of the table. In addition, a third runner attached to the top of the table serves as a track for the upper table. This upper runner fits in a dado cut in the top of the table. After cutting all the runners to size, the next step is to screw the two lower runners in place so they're flush with the ends of the table. This creates an opening between the runners for a bearing that fits into the groove under the table, see Fig. 12b. BEARING. The purpose of this bearing is simple. When the table is installed, the bearing fits inside the channel that forms the handle, see Fig. 11a. As you move the handle lower table upper runner keeper block aluminum track handle FRONT VIEW NOTE: sand inside - of handle if necessary to allow bearing TO slip into place hex bolt locknut a ball ~ bearing aluminum handle track^_ lower runner #& x Fh woodscrew bore in the runner, see Fig. 12a. This prevents the upper table from hitting the lock nut as it slides on the runner. T-NUTS. With the upper runner in place, I added two T-nuts, one near each of the back corners of the table, see Fig. 12. Later, the T-nuts are used to hold the two tables together. back and forth, it exerts pressure against the bearing which slides the table smoothly from side to side. Hie bearing is secured to the table with a bolt and lock nut And I used these same fasteners to secure the upper runner. Hie nut sits in a recess that's formed by drilling a counter- k To resist wear, the runners are made from hard, durable phenolic. note: size lower runners to fit aluminum channel first, then cut grooves to fit runners #& x 2" Fh wood-screw TOP VIEW lower "— runner^p lock nut lock nut cut %"-wide dado, Va" deep aluminum track — drill counterbore, Va" deep hole upper runner ^ (3/4" x &Va"- — %" phenolic) keeper block (V/z" X 4Vz"-3/4"-thick hardwood) ^ 3/16» lower — washer table (13" x 24"-1/4" i.d. x o.d. V mdf) ball bearing ball bearing keeper block 14" x 1'/4 hex bolt cut %"-wide groove, Va" deep lower \ runner—7 (3/4" X 11"-%" phenolic) BOTTOM VIEW -1/4" x VA" hex bolt ShopNotes |


