47 - Build Your Own Mortising Machine , страница 20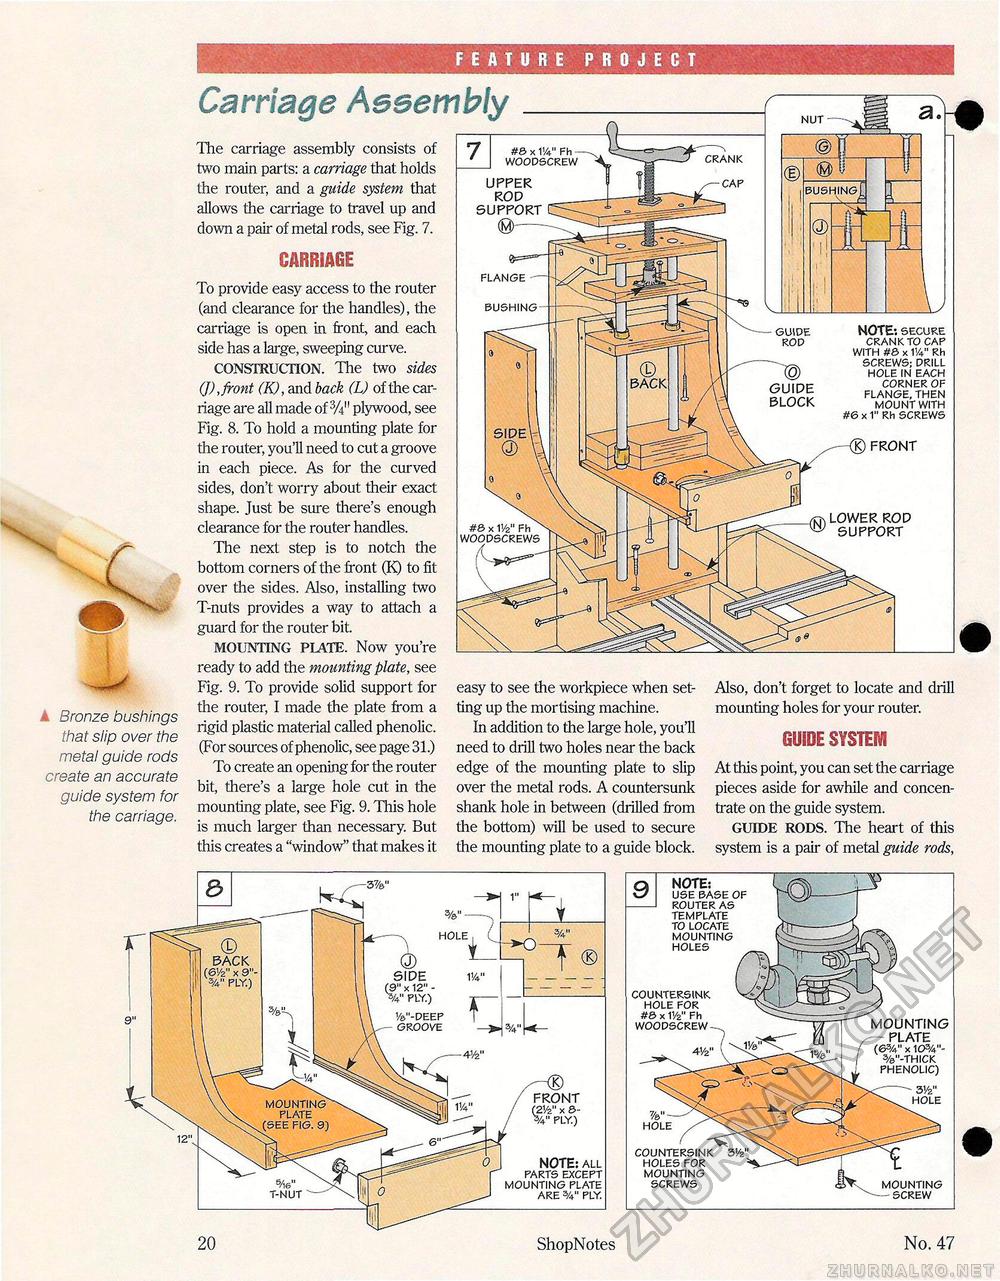
FEATURE PROJECT Bronze bushings that slip over the metal guide rods create an accurate guide system for the carriage. 20 ShopNotes No. 47 Carriage Assembly The carriage assembly consists of two main parts: a carriage that holds the router, and a guide system that allows the carriage to travel up and clown a pair of metal rods, see Fig. 7. CARRIAGE To provide easy access to the router (and clearance for the handles), the carriage is open in front, and each side has a large, sweeping curve. CONSTRUCTION. The two sides (J), front (K), and back (L) of the carriage are all made of3/*" plywood, see Fig. 8. To hold a mounting plate for the router, you'll need to cut a groove in each piece. As for the curved sides, don't worry about their exact shape. Just be sure there's enough clearance for the router handles. The next step is to notch the bottom corners of the front (K) to fit over the sides. Also, installing two T-nuts provides a way to attach a guard for the router bit. MOUNTING PLATE. Now you're ready to add the mounting plate, see Fig. 9. To provide solid support for the router, I made the plate from a rigid plastic material called phenolic. (For sources of phenolic, see page 31.) To create an opening for the router bit, there's a large hole cut in the mounting plate, see Fig. 9. This hole is much larger than necessary. But this creates a "window" that makes it easy to see the workpiece when setting up the mortising machine. In addition to the large hole, you'll need to drill two holes near the back edge of the mounting plate to slip over the metal rods. A countersunk shank hole in between (drilled from the bottom) will be used to secure the mounting plate to a guide block. 0U8DE SYSTEM At this point, you can set the carriage pieces aside for awhile and concentrate on the guide system. GUIDE RODS. The heart of this system is a pair of metal guide rods, #& x W Fh WOODSCREW upper rod support FLANGE Also, don't forget to locate and drill mounting holes for your router. BUSHING NOTE: secure CRANK TO CAP WITH #& x 1!4" Rh SCREWS; DRILL HOLE IN EACH CORNER OF FLANGE, THEN MOUNT WITH #6 x 1" Rh SCREWS CRANK GUIDE ROD guide block lower rod support mounting plate (63A" x 103/4"-%"-THICK PHENOLIC) 3Vz" HOLE MOUNTING SCREW NOTE: USE BASE OF ROUTER AS TEMPLATE TO LOCATE MOUNTING HOLES COUNTERSINK HOLE FOR #B x Wz Fh WOODSCREW HOLE COUNTERSINK HOLES FOR MOUNTING SCREWS |


