51 - Band Saw Upgrade, страница 9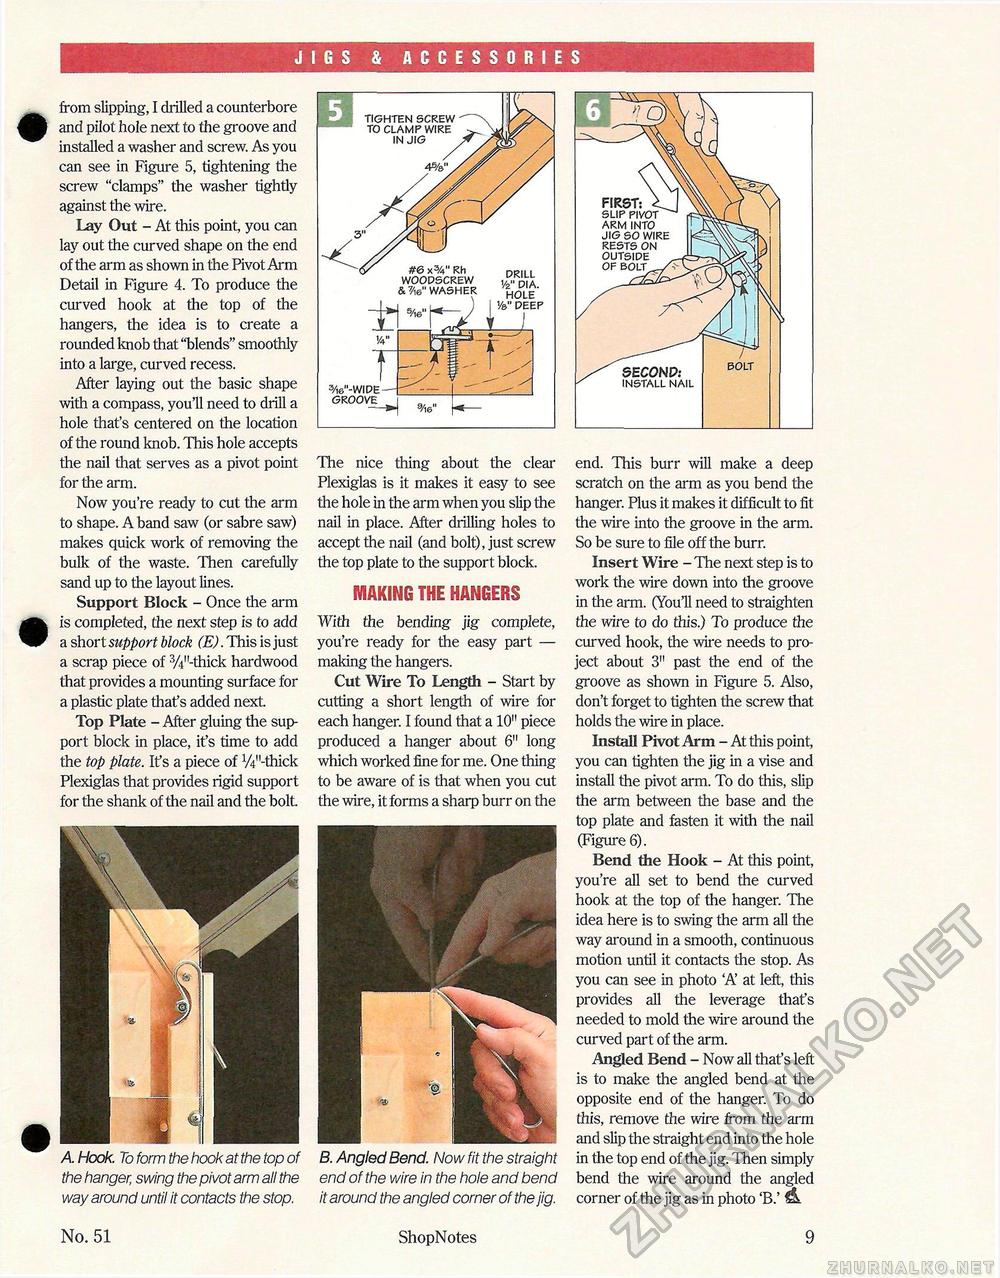
JIGS & ACCESSORIES from slipping, I drilled a counterbore and pilot hole next to the groove and installed a washer and screw. As you can see in Figure 5, tightening the screw "clamps" the washer tightly against the wire. Lay Out - At this point, you can lay out the curved shape on the end of the arm as shown in the Pivot Arm Detail in Figure 4. To produce the curved hook at the top of the hangers, the idea is to create a rounded knob that "blends" smoothly into a large, curved recess. After laying out the basic shape with a compass, you'll need to drill a hole that's centered on the location of the round knob. This hole accepts the nail that serves as a pivot point for the arm. Now you're ready to cut the arm to shape. A band saw (or sabre saw) makes quick work of removing the bulk of the waste. Then carefully sand up to the layout lines. Support Block - Once the arm is completed, the next step is to add a short support block (E). This is just a scrap piece of 3/4"-thick hardwood that provides a mounting surface for a plastic plate that's added next. Top Plate - After gluing the support block in place, it's time to add the top plate. It's a piece of VV'-thick Plexiglas that provides rigid support for the shank of the nail and the bolt A Hook. To form the hook at the top of the hanger, swing the pivot arm all the way around until it contacts the stop. The nice thing about the clear Plexiglas is it makes it easy to see the hole in the arm when you slip the nail in place. After drilling holes to accept the nail (and bolt), just screw the top plate to the support block. making the hangers With the bending jig complete, you're ready for the easy part — making the hangers. Cut Wire To Length - Start by cutting a short length of wire for each hanger. I found that a 10" piece produced a hanger about 6" long which worked fine for me. One thing to be aware of is that when you cut the wire, it forms a sharp burr on the B. Angled Bend. Now fit the straight end of the wire in the hole and bend it around the angled corner of the jig. end. This burr will make a deep scratch on the arm as you bend the hanger. Plus it makes it difficult to fit the wire into the groove in the arm. So be sure to file off the burr. Insert Wire - The next step is to work the wire down into the groove in the arm. (You'll need to straighten the wire to do this.) To produce the curved hook, the wire needs to project about 3" past the end of the groove as shown in Figure 5. Also, don't forget to tighten the screw that holds the wire in place. Install Pivot Arm - At this point, you can tighten the jig in a vise and install the pivot arm. To do this, slip the arm between the base and the top plate and fasten it with the nail (Figure 6). Bend the Hook - At this point, you're all set to bend the curved hook at the top of the hanger. The idea here is to swing the arm all the way around in a smooth, continuous motion until it contacts the stop. As you can see in photo A' at left, this provides all the leverage that's needed to mold the wire around the curved part of the arm. Angled Bend - Now all that's left is to make the angled bend at the opposite end of the hanger. To do this, remove the wire from the arm and slip the straight end into the hole in the top end of the jig. Then simply bend the wire around the angled corner of the jig as in photo 'B.' FIRST: slip pivot arm into jig so wire rests on outside of bolt SECOND: install nail bolt No. 51 ShopNotes 9 |


