51 - Band Saw Upgrade, страница 6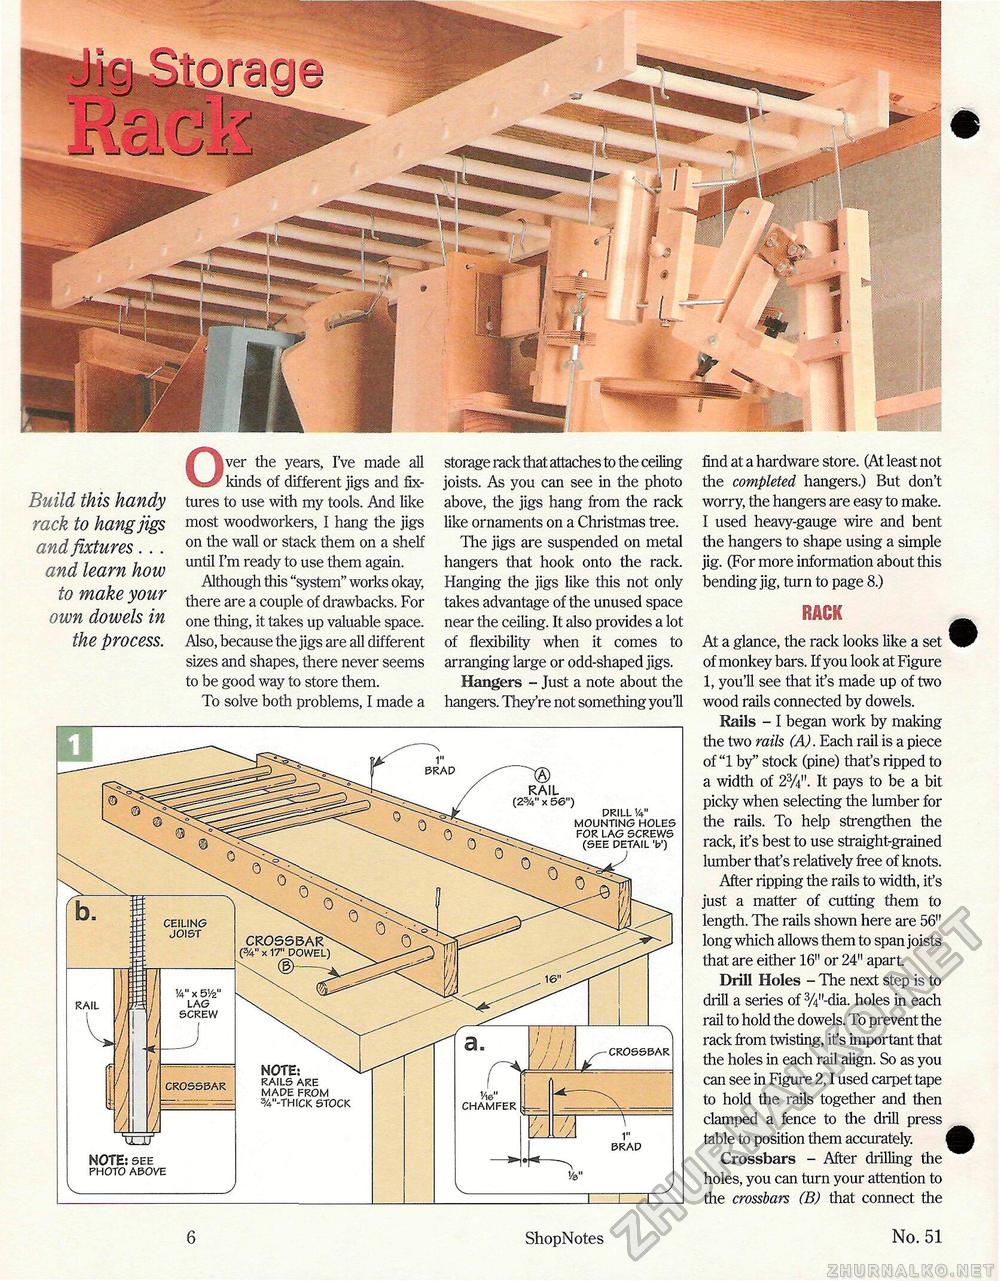
Build this handy rack to hang jigs and fixtures. . . and learn how to make your own dowels in the process. Over the years, I've made all kinds of different jigs and fixtures to use with my tools. And like most woodworkers, I hang the jigs on the wall or stack them on a shelf until I'm ready to use them again. Although this "system" works okay, there are a couple of drawbacks. For one thing, it takes up valuable space. Also, because the jigs are all different sizes and shapes, there never seems to be good way to store them. To solve both problems, I made a storage rack that attaches to the ceiling joists. As you can see in the photo above, the jigs hang from the rack like ornaments on a Christmas tree. The jigs are suspended on metal hangers that hook onto the rack. Hanging the jigs like this not only takes advantage of the unused space near the ceiling. It also provides a lot of flexibility when it comes to arranging large or odd-shaped jigs. Hangers - Just a note about the hangers. They're not something youH find at a hardware store. (At least not the completed hangers.) But don't worry, the hangers are easy to make. I used heavy-gauge wire and bent the hangers to shape using a simple jig. (For more information about this bending jig, turn to page 8.) rack At a glance, the rack looks like a set of monkey bars. If you look at Figure 1, you'll see that ifs made up of two wood rails connected by dowels. Rails - I began work by making the two rails (A). Each rail is a piece of "1 by" stock (pine) that's ripped to a width of 23/4". It pays to be a bit picky when selecting the lumber for the rails. To help strengthen the rack, it's best to use straight-grained lumber that's relatively free of knots. After ripping the rails to width, ifs just a matter of cutting them to length. The rails shown here are 56" long which allows them to span joists that are either 16" or 24" apart. Drill Holes - The next step is to drill a series of 3/4,Ldia. holes in each rail to hold the dowels. To prevent the rack from twisting, it's important that the holes in each rail align. So as you can see in Figure 2,1 used carpet tape to hold the rails together and then clamped a fence to the drill press table to position them accurately. * Crossbars - After drilling the holes, you can turn your attention to the crossbars (B) that connect the (3/4" x 17" crossbar RAIL (23/4" x 56") prill v4" mounting holes for lag screws detail v) 1" brad \ ceiling joist 1/4" x 5Vz" lag screw trrr NOTE: see photo above NOTE: rails are made from 3/4"'thick stock chamfer crossbar 6 ShopNotes No. 51 |


