51 - Band Saw Upgrade, страница 8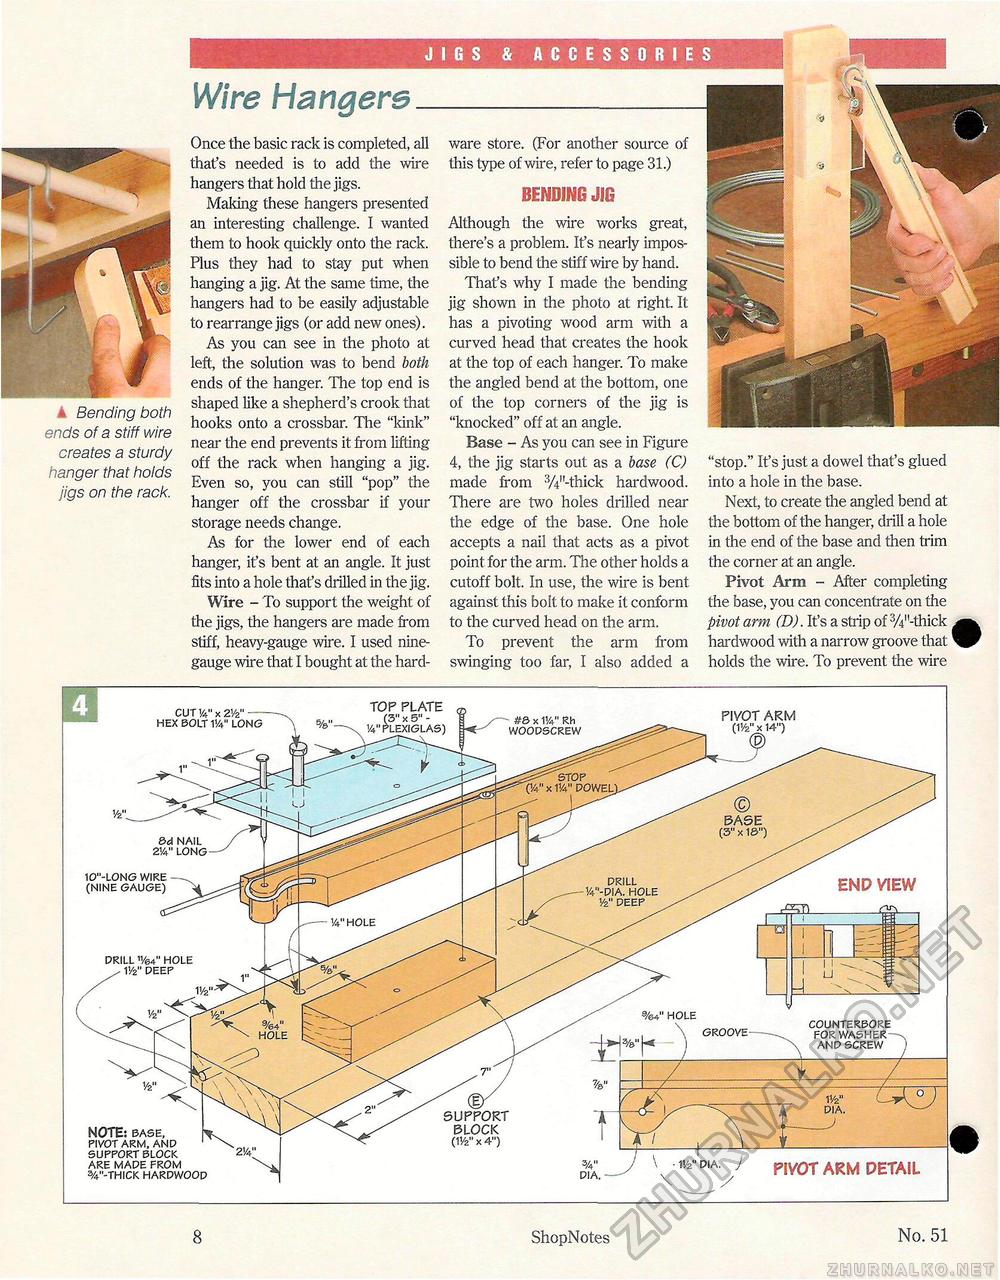
ACCESSORIES Wire Hangers Bending both ends of a stiff wire creates a sturdy hanger that holds jigs on the rack. Once the basic rack is completed, all that's needed is to add the wire hangers that hold the jigs. Making these hangers presented an interesting challenge. I wanted them to hook quickly onto the rack. Plus they had to stay put when hanging a jig. At the same time, the hangers had to be easily adjustable to rearrange jigs (or add new ones). As you can see in the photo at left, the solution was to bend both ends of the hanger. The top end is shaped like a shepherd's crook that hooks onto a crossbar. The "kink" near the end prevents it from lifting off the rack when hanging a jig. Even so, you can still "pop" the hanger off the crossbar if your storage needs change. As for the lower end of each hanger, it's bent at an angle. It just fits into a hole that's drilled in the jig. Wire - To support the weight of the jigs, the hangers are made from stiff, heavy-gauge wire. I used nine-gauge wire that I bought at the hard ware store. (For another source of this type of wire, refer to page 31.) bending JIG Although the wire works great, there's a problem. It's nearly impossible to bend the stiff wire by hand. That's why I made the bending jig shown in the photo at right. It has a pivoting wood arm with a curved head that creates the hook at the top of each hanger. To make the angled bend at the bottom, one of the top corners of the jig is "knocked" off at an angle. Base - As you can see in Figure 4, the jig starts out as a base (C) made from W-thick hardwood. There are two holes drilled near the edge of the base. One hole accepts a nail that acts as a pivot point for the arm. The other holds a cutoff bolt In use, the wire is bent against this bolt to make it conform to the curved head on the arm. To prevent the arm from swinging too far, I also added a "stop." It's just a dowel that's glued into a hole in the base. Next, to create the angled bend at the bottom of the hanger, drill a hole in the end of the base and then trim the corner at an angle. Pivot Arm - After completing the base, you can concentrate on the pivot arm (D). It's a strip of 3/4M-thick hardwood with a narrow groove that holds the wire. To prevent the wire 8 ShopNotes No. 51 |


