57 - A Shop-Built Pin Router, страница 19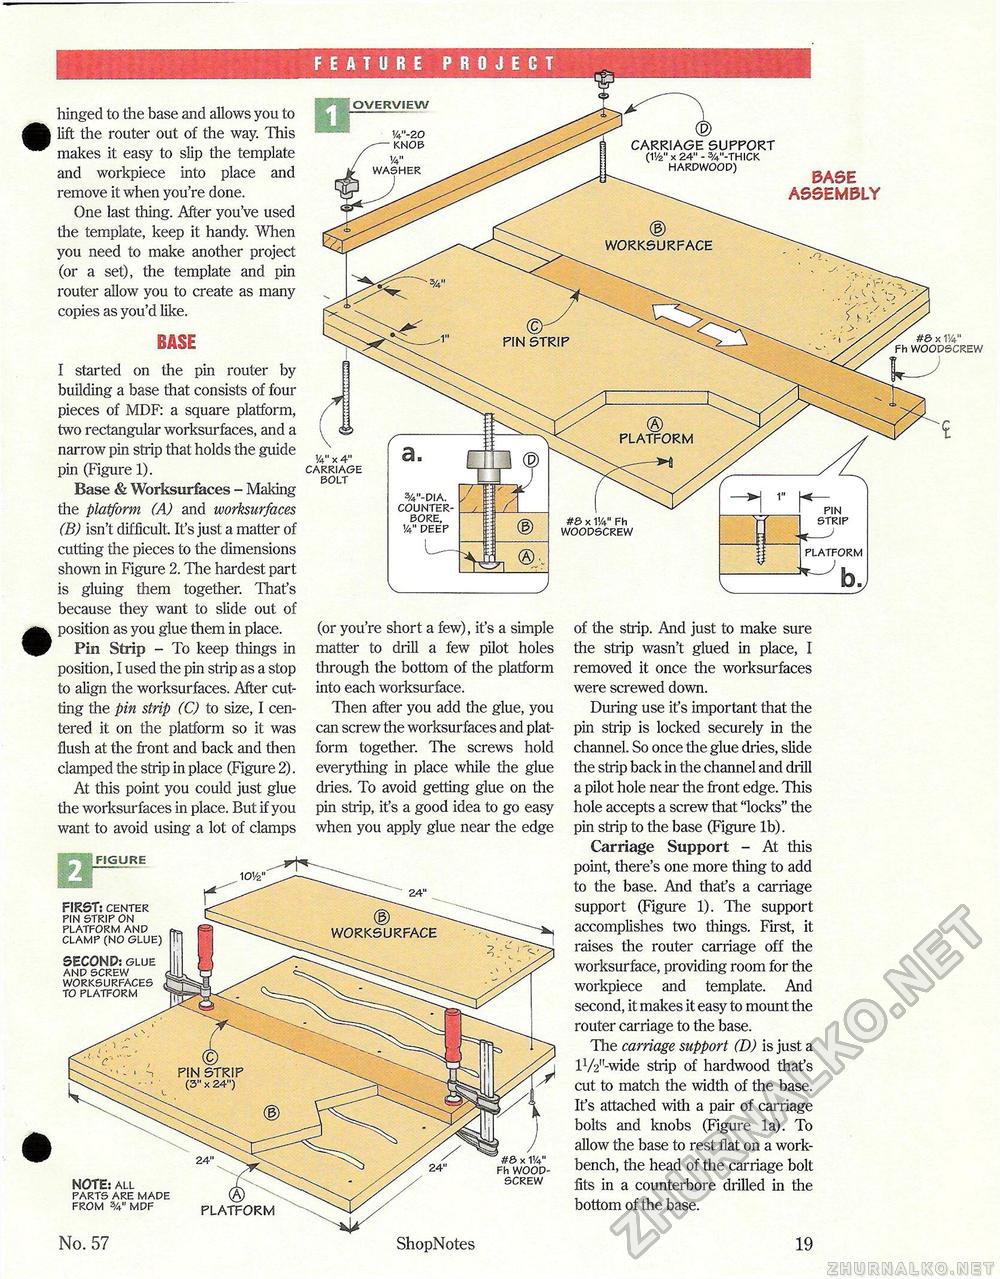
FEATURE PROJECT hinged to the base and allows you to lift the router out of the way. This makes it easy to slip the template and workpiece into place and remove it when you're done. One last thing. After you've used the template, keep it handy. When you need to make another project (or a set), the template and pin router allow you to create as many copies as you'd like. BitSEI started on the pin router by building a base that consists of four pieces of MDF: a square platform, two rectangular worksurfaces, and a narrow pin strip that holds the guide pin (Figure 1). Base & Worksurfaces - Making the platform (A) and worksurfaces (B) isn't difficult. It's just a matter of cutting the pieces to the dimensions shown in Figure 2. The hardest part is gluing them together. That's because they want to slide out of position as you glue them in place. Pin Strip - To keep things in position, I used the pin strip as a stop to align the worksurfaces. After cutting the pin strip (C) to size, I centered it on the platform so it was flush at the front and back and then clamped the strip in place (Figure 2). At this point you could just glue the worksurfaces in place. But if you want to avoid using a lot of clamps &ASE ASSEMBLY #& X 11/4" fh woodscrew (or you're short a few), it's a simple matter to drill a few pilot holes through the bottom of the platform into each worksurface. Then after you add the glue, you can screw the worksurfaces and platform together. The screws hold everything in place while the glue dries. To avoid getting glue on the pin strip, it's a good idea to go easy when you apply glue near the edge of the strip. And just to make sure the strip wasn't glued in place, I removed it once the worksurfaces were screwed down. During use ifs important that the pin strip is locked securely in the channel. So once the glue dries, slide the strip back in the channel and drill a pilot hole near the front edge. This hole accepts a screw that "locks" the pin strip to the base (Figure lb). Carriage Support - At this point, there's one more thing to add to the base. And thafs a carriage support (Figure 1). The support accomplishes two things. First, it raises the router carriage off the worksurface, providing room for the workpiece and template. And second, it makes it easy to mount the router carriage to the base. The carriage support (D) is just a lVV'-wide strip of hardwood that's cut to match the width of the base. It's attached with a pair of carriage bolts and knobs (Figure la). To allow the base to rest flat on a workbench, the head of the carriage bolt fits in a counterbore drilled in the bottom of the base. 19 NOTE: all parts are made from 3/4" mdf No. 57 PLATFORM ShopNotes #& X 11/4" Fh wood-screw FIGURE FIRST: center pin strip on platform and clamp (no glue) SECOND: glue and screw worksurfaces to platform |


