62 - Box Joint Jig, страница 11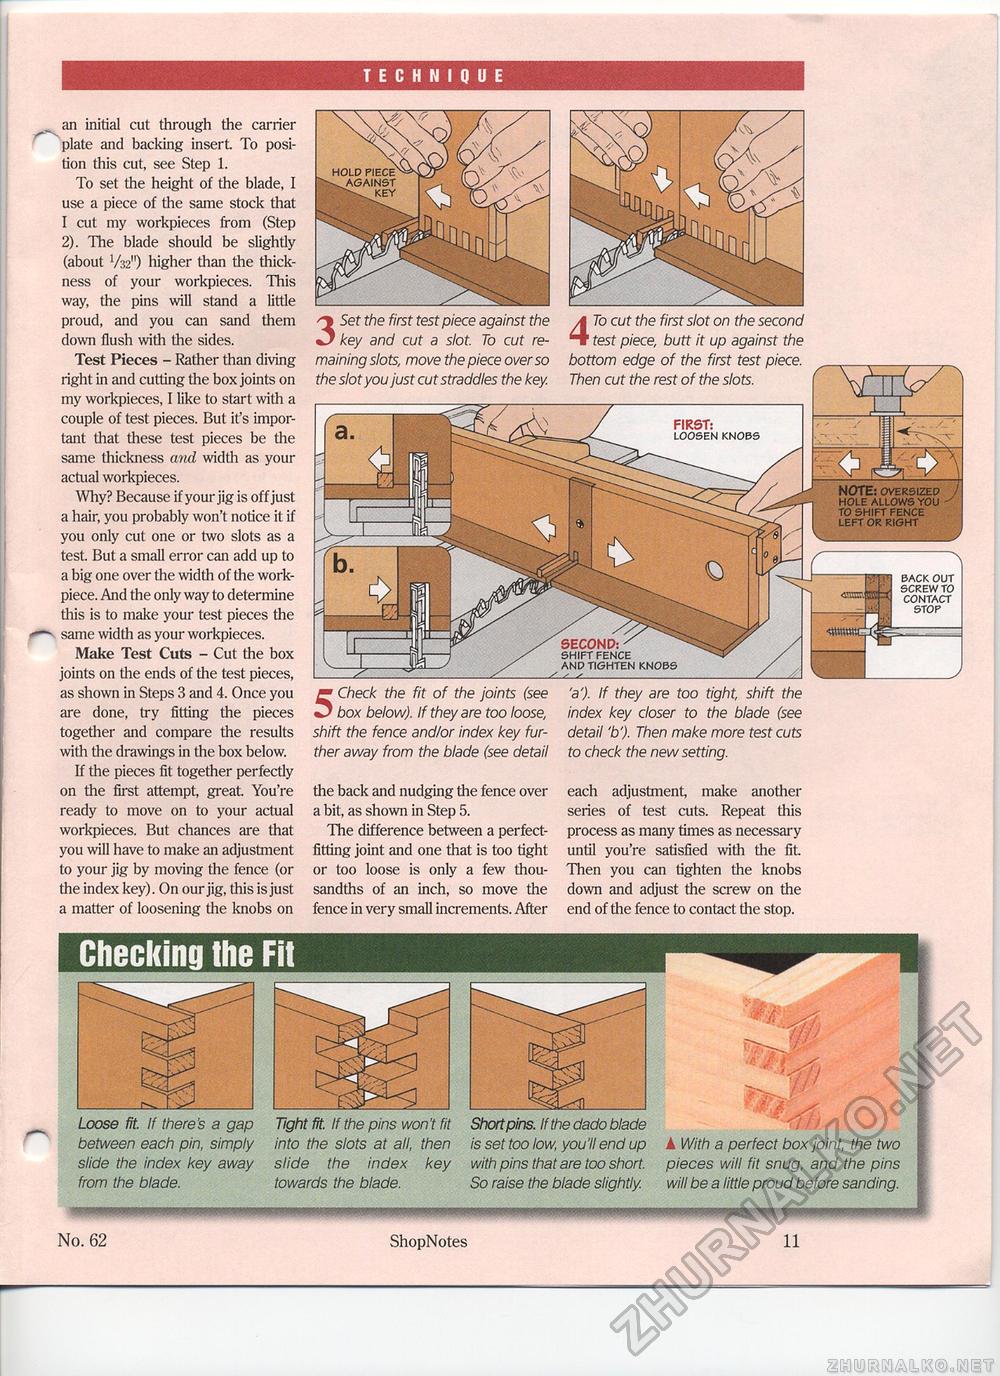
TECHNIQUE an initial cut through the carrier plate and backing insert To position this cut, see Step 1. To set the height of the blade, I use a piece of the same stock that I cut my workpieces from (Step 2). The blade should be slightly (about V32") higher than the thickness of your workpieces. This way, the pins will stand a little proud, and you can sand them down flush with the sides. Test Pieces - Rather than diving right in and cutting the box joints on my workpieces, I like to start with a couple of test pieces. But it's important that these test pieces be the same thickness and width as your actual workpieces. Why? Because if your jig is off just a hair, you probably won't notice it if you only cut one or two slots as a test. But a small error can add up to a big one over the width of the work-piece. And the only way to determine this is to make your test pieces the * same width as your workpieces. Make Test Cuts - Cut the box joints on the ends of the test pieces, as shown in Steps 3 and 4. Once you are done, try fitting the pieces together and compare the results with the drawings in the box below. If the pieces fit together perfectly on the first attempt, great. You're ready to move on to your actual workpieces. But chances are that you will have to make an adjustment to your jig by moving the fence (or the index key). On our jig, this is just a matter of loosening the knobs on 5 Check the fit of the joints (see box below). If they are too loose, shift the fence and/or index key further away from the blade (see detail the back and nudging the fence over a bit, as shown in Step 5. The difference between a perfect-fitting joint and one that is too tight or too loose is only a few thousandths of an inch, so move the fence in very small increments. After 'a'). If they are too tight, shift the index key closer to the blade (see detail 'b ). Then make more test cuts to check the new setting. each adjustment, make another series of test cuts. Repeat this process as many times as necessary until you're satisfied with the fit Then you can tighten the knobs down and adjust the screw on the end of the fence to contact the stop. HOLD PIECE ^ AGAINST KEY NOTE: oversized hole allows you to shift fence left or right J ) / FIRST: L.__LOOSEN KNOBS SECOND: ' SHIFT FENCE AND TIGHTEN KNOBS BACK OUT SCREW TO CONTACT STOP 3 Set the first test piece against the key and cut a slot. To cut remaining slots, move the piece over so the slot you just cut straddles the key. 4 To cut the first slot on the second test piece, butt it up against the bottom edge of the first test piece. Then cut the rest of the slots. Checking the Fit Loose fit. If there's a gap between each pin, simply slide the index key away from the blade. Tight fit. If the pins won't fit into the slots at all, then slide the index key towards the blade. Short pins. If the dado blade is set too low, you'll end up with pins that are too short. So raise the blade slightly. A With a perfect box joint, the two pieces will fit snug, and the pins will be a little proud before sanding. No. 62 ShopNotes 11 |


