62 - Box Joint Jig, страница 13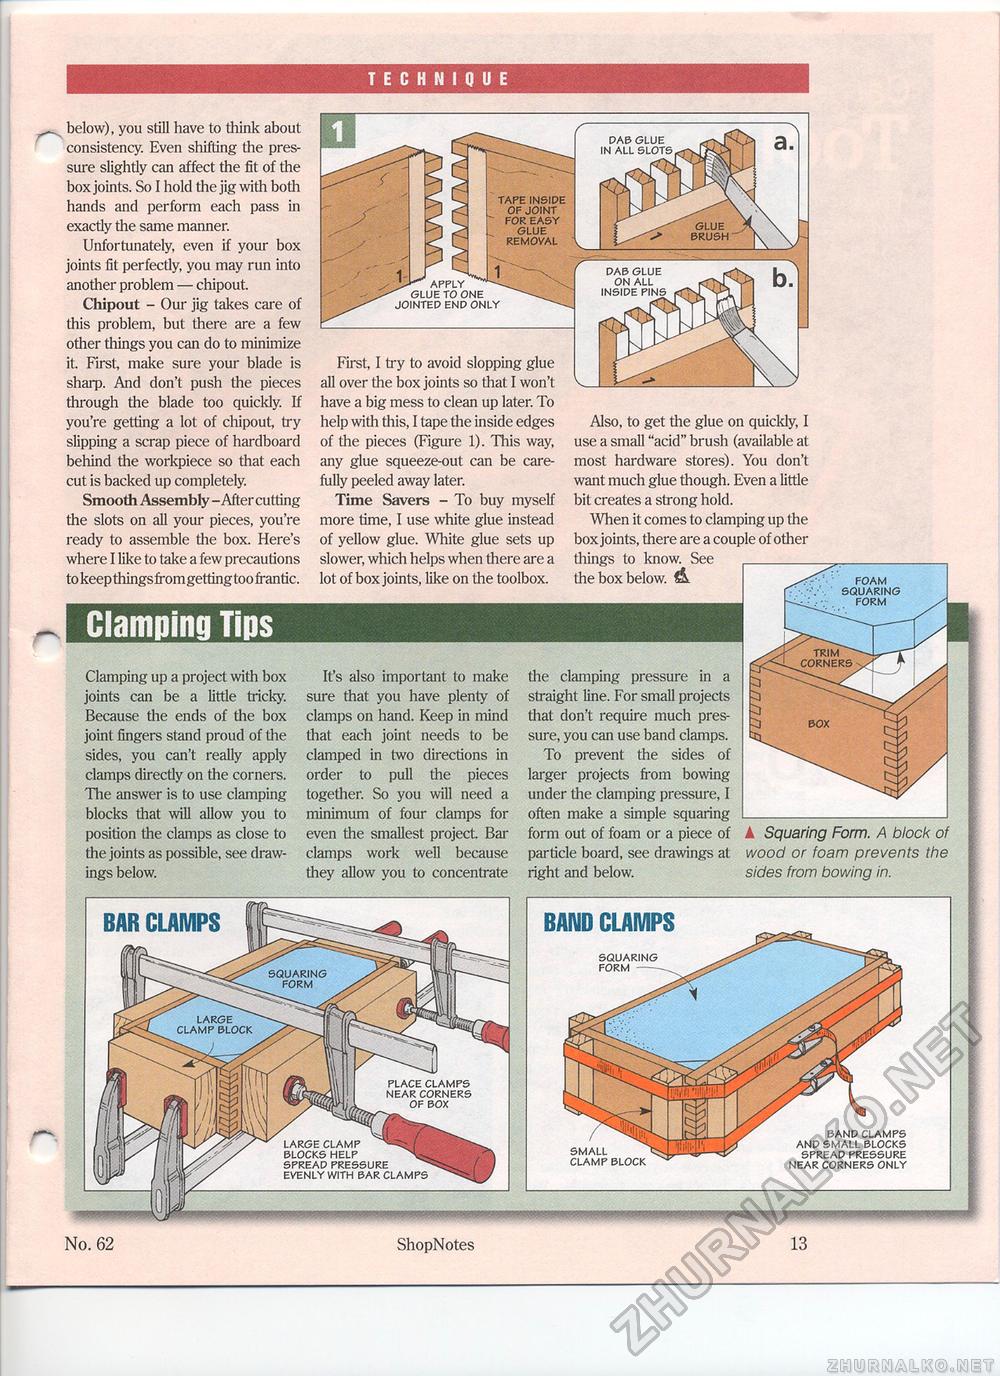
TECHNIQUE Clamping Tips below), you still have to think about consistency. Even shifting the pressure slightly can affect the fit of the box joints. So I hold the jig with both hands and perform each pass in exactly the same manner. Unfortunately, even if your box joints fit perfectly, you may run into another problem — chipout. Chipout - Our jig takes care of this problem, but there are a few other things you can do to minimize it. First, make sure your blade is sharp. And don't push the pieces through the blade too quickly. If you're getting a lot of chipout, try slipping a scrap piece of hardboard behind the workpiece so that each cut is backed up completely. Smooth Assembly - After cutting the slots on all your pieces, you're ready to assemble the box. Here's where I like to take a few precautions to keep thingsfromgettingtoo frantic. DAB GLUE IN ALL SLOTS tape inside of joint for easy glue removal glue brush DAB GLUE ON ALL INSIDE PINS ■ APPLY GLUE TO ONE JOINTED END ONLY First, I try to avoid slopping glue all over the box joints so that I won't have a big mess to clean up later. To help with this, I tape the inside edges of the pieces (Figure 1). This way, any glue squeeze-out can be carefully peeled away later. Time Savers - To buy myself more time, I use white glue instead of yellow glue. White glue sets up slower, which helps when there are a lot of box joints, like on the toolbox. Also, to get the glue on quickly, I use a small "acid" brush (available at most hardware stores). You don't want much glue though. Even a little bit creates a strong hold. When it comes to clamping up the box joints, there are a couple of other things to know. See _ the box below. & FOAM SQUARING FORM trim corners Clamping up a project with box joints can be a little tricky. Because the ends of the box joint fingers stand proud of the sides, you can't really apply clamps directly on the corners. The answer is to use clamping blocks that will allow you to position the clamps as close to the joints as possible, see drawings below. It's also important to make sure that you have plenty of clamps on hand. Keep in mind that each joint needs to be clamped in two directions in order to pull the pieces together. So you will need a minimum of four clamps for even the smallest project Bar clamps work well because they allow you to concentrate the clamping pressure in a straight line. For small projects that don't require much pressure, you can use band clamps. To prevent the sides of larger projects from bowing under the clamping pressure, I often make a simple squaring form out of foam or a piece of particle board, see drawings at right and below. ▲ Squaring Form. A block of wood or foam prevents the sides from bowing in. BAND CLAMPS BAR CLAMPS SQUARING FORM -- SQUARING FORM LARGE CLAMP BLOCK PLACE CLAMPS NEAR CORNERS OF BOX BAND CLAMPS AND SMALL BLOCKS SPREAD PRESSURE NEAR CORNERS ONLY LARGE CLAMP ^"S^M BLOCKS HELP ^^ SPREAD PRESSURE EVENLY WITH BAR CLAMPS SMALL CLAMP BLOCK ShopNotes |


