62 - Box Joint Jig, страница 19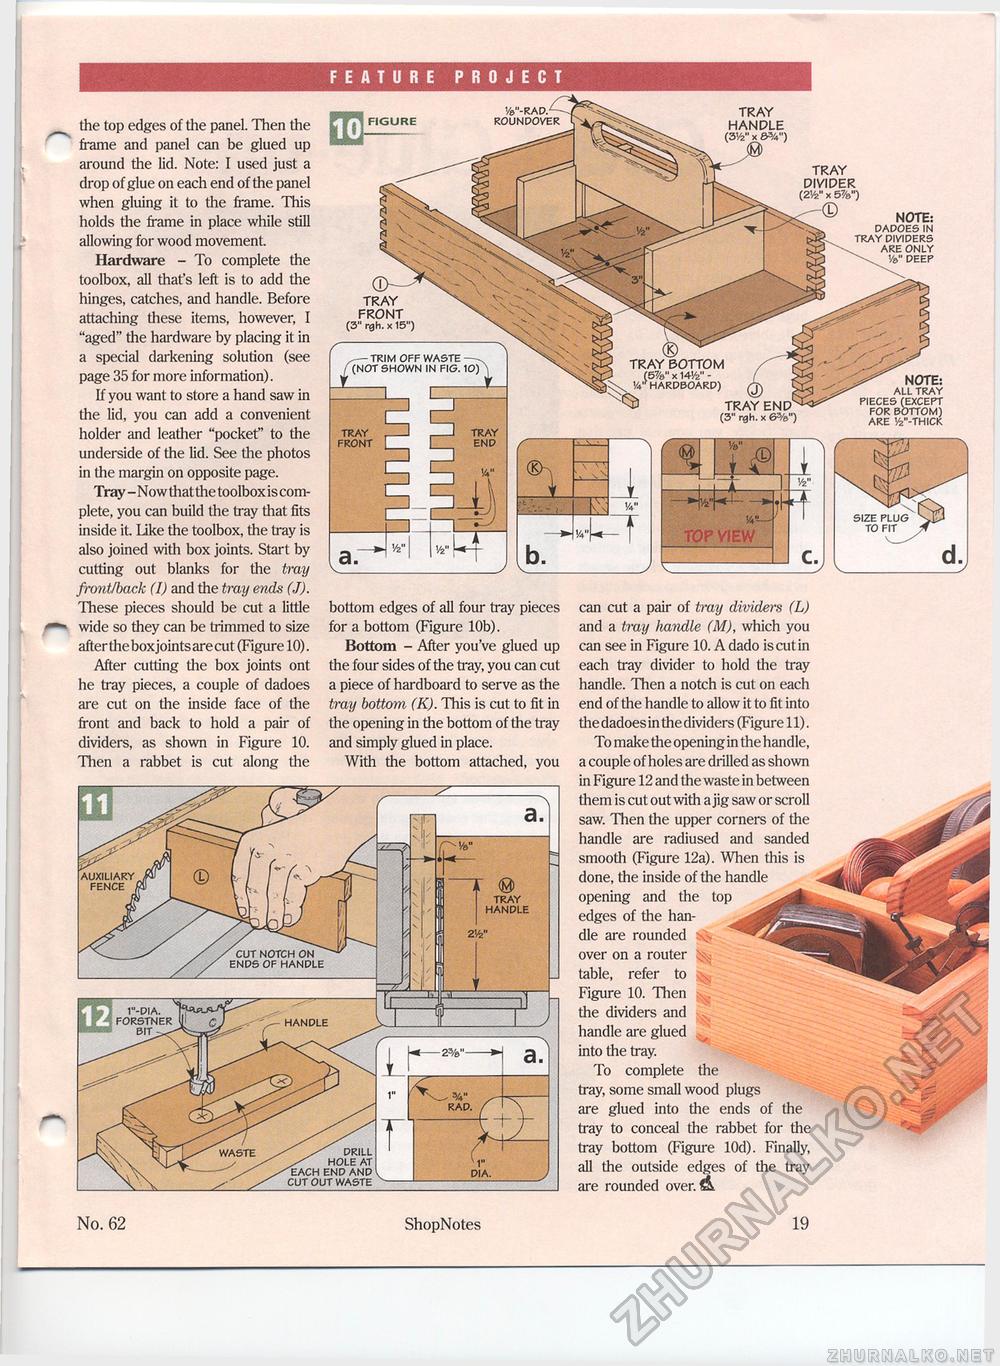
the top edges of the panel. Then the frame and panel can be glued up around the lid. Note: I used just a drop of glue on each end of the panel when gluing it to the frame. This holds the frame in place while still allowing for wood movement Hardware - To complete the toolbox, all that's left is to add the hinges, catches, and handle. Before attaching these items, however, I "aged" the hardware by placing it in a special darkening solution (see page 35 for more information). If you want to store a hand saw in the lid, you can add a convenient holder and leather "pocket" to the underside of the lid. See the photos in the margin on opposite page. Tray -Now thatthe toolboxis complete, you can build the tray that fits inside it Like the toolbox, the tray is also joined with box joints. Start by cutting out blanks for the tray front/back (I) and the tray ends (J). These pieces should be cut a little wide so they can be trimmed to size aftertheboxjointsarecut (Figure 10). After cutting the box joints ont he tray pieces, a couple of dadoes are cut on the inside face of the front and back to hold a pair of dividers, as shown in Figure 10. Then a rabbet is cut along the bottom edges of all four tray pieces for a bottom (Figure 10b). Bottom - After you've glued up the four sides of the tray, you can cut a piece of hardboard to serve as the tray bottom (K). This is cut to fit in the opening in the bottom of the tray and simply glued in place. With the bottom attached, you No. 62 ShopNotes 19 y8"-RAD. - -ROUNDOVER TRAY HANDLE (3Vi" x &V) TRAY DIVIDER (2V2" X 5%") NOTE: DADOES IN TRAY DIVIDERS ARE ONLY \ '/»" DEEP TRAY FRONT (3" rgh. x 15") ,— TRIM OFF WASTE —, (NOT SHOWN IN FIG. 10) 2 TRAY BOTTOM 3 (5%" x 14Vi>" -'A''HARDBOARD) ^ NOTE: ALL TRAY PIECES (EXCEPT FOR BOTTOM) ARE y2"-THICK TRAY END (3" rgh. x 6%") TRAY END TRAY FRONT SIZE PLUG TO FIT RAD. 1"-DIA. FORSTNER BIT DRILL HOLE AT END AND WASTE WASTE <9> TRAY HANDLE can cut a pair of tray dividers (L) and a tray handle (M), which you can see in Figure 10. A dado is cut in each tray divider to hold the tray handle. Then a notch is cut on each end of the handle to allow it to fit into the dadoes in the dividers (Figure 11). To make the opening in the handle, a couple of holes are drilled as shown in Figure 12 and the waste in between them is cut out with a jig saw or scroll saw. Then the upper corners of the handle are radiused and sanded smooth (Figure 12a). When this is done, the inside of the handle opening and the top edges of the handle are rounded over on a router table, refer to Figure 10. Then the dividers and handle are glued into the tray. To complete the tray, some small wood plugs are glued into the ends of the tray to conceal the rabbet for the tray bottom (Figure lOd). Finally, all the outside edges of the tray are rounded over. d |


