62 - Box Joint Jig, страница 27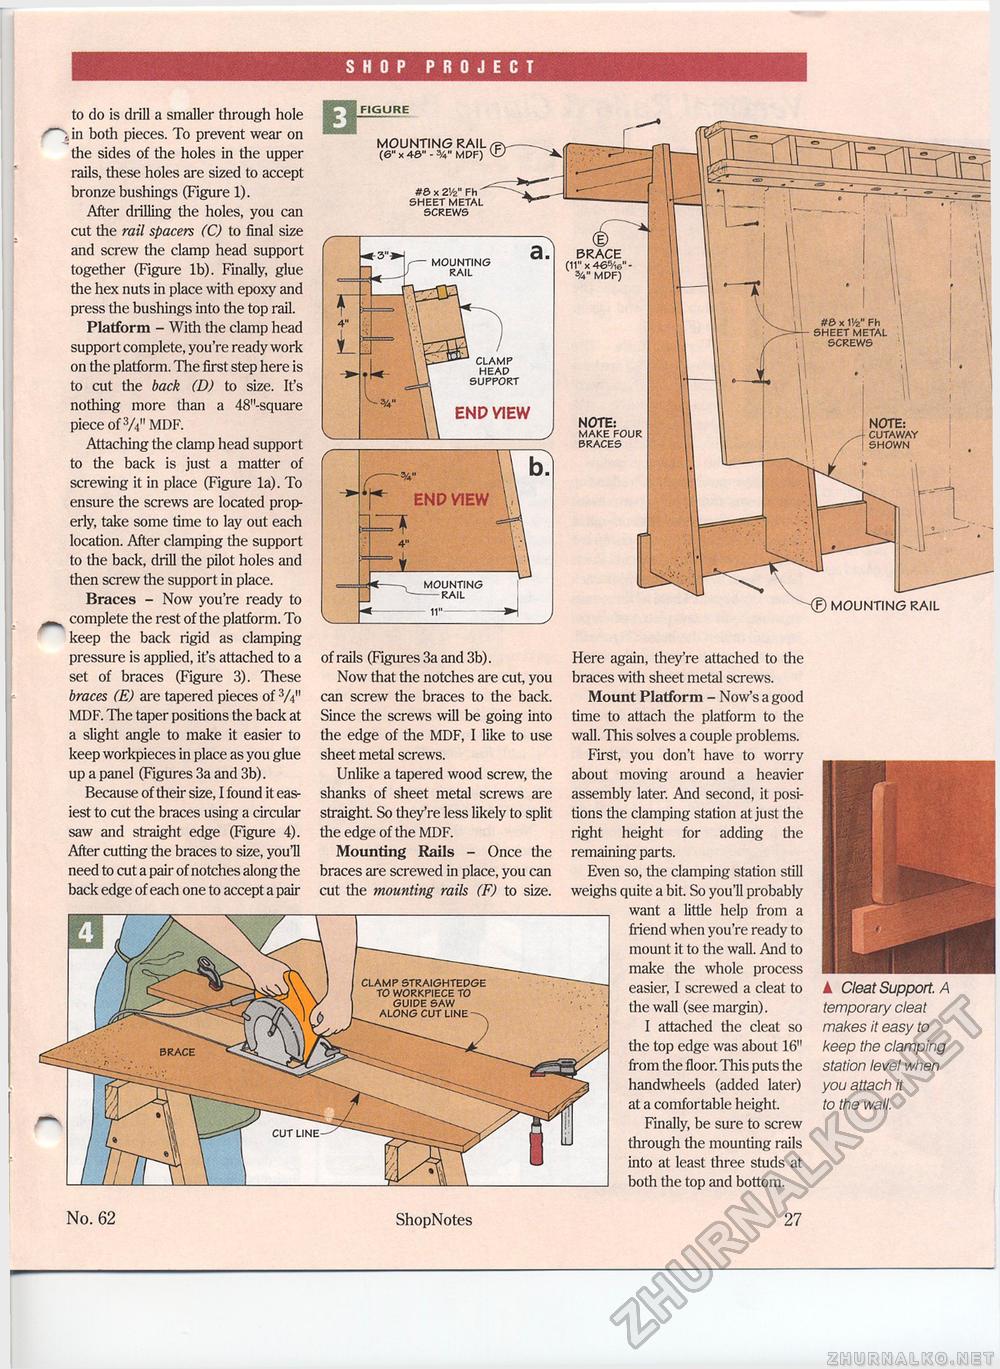
SHOP PROJECT to do is drill a smaller through hole in both pieces. To prevent wear on the sides of the holes in the upper rails, these holes are sized to accept bronze bushings (Figure 1). After drilling the holes, you can cut the rail spacers (C) to final size and screw the clamp head support together (Figure lb). Finally, glue the hex nuts in place with epoxy and press the bushings into the top rail. Platform - With the clamp head support complete, you're ready work on the platform. The first step here is to cut the back (D) to size. It's nothing more than a 48"-square piece of3/4" MDF. Attaching the clamp head support to the back is just a matter of screwing it in place (Figure la). To ensure the screws are located properly, take some time to lay out each location. After clamping the support to the back, drill the pilot holes and then screw the support in place. Braces - Now you're ready to complete the rest of the platform. To keep the back rigid as clamping pressure is applied, it's attached to a set of braces (Figure 3). These braces (E) are tapered pieces of W MDF. The taper positions the back at a slight angle to make it easier to keep workpieces in place as you glue up a panel (Figures 3a and 3b). Because of their size, I found it easiest to cut the braces using a circular saw and straight edge (Figure 4). After cutting the braces to size, you'll need to cut a pair of notches along the back edge of each one to accept a pair MOUNTING RAIL (6" x 4S" - %" MDF) #& x 2V2" Fh ' SHEET METAL SCREWS MOUNTING RAIL #& x tV2" Fh SHEET METAL SCREWS CLAMP HEAD SUPPORT NOTE: MAKE FOUR BRACES NOTE: CUTAWAY SHOWN MOUNTING -RAIL -(E) MOUNTING RAIL of rails (Figures 3a and 3b). Now that the notches are cut, you can screw the braces to the back. Since the screws will be going into the edge of the MDF, I like to use sheet metal screws. Unlike a tapered wood screw, the shanks of sheet metal screws are straight. So they're less likely to split the edge of the MDF. Mounting Rails - Once the braces are screwed in place, you can cut the mounting rails (F) to size. Here again, they're attached to the braces with sheet metal screws. Mount Platform - Now's a good time to attach the platform to the wall. This solves a couple problems. First, you don't have to worry about moving around a heavier assembly later. And second, it positions the clamping station at just the right height for adding the remaining parts. Even so, the clamping station still weighs quite a bit. So you'll probably _ want a little help from a friend when you're ready to mount it to the wall. And to make the whole process easier, I screwed a cleat to the wall (see margin). I attached the cleat so .X the top edge was about 16" from the floor. This puts the handwheels (added later) f at a comfortable height. Finally, be sure to screw through the mounting rails into at least three studs at _ both the top and bottom. CLAMP STRAIGHTEDGE TO WORKPIECE TO GUIDE SAW ALONG CUT LINE^-. ▲ Cleat Support. A temporary cleat makes it easy to keep the clamping station level when you attach it to the wall. No. 62 ShopNotes 27 |


