62 - Box Joint Jig, страница 30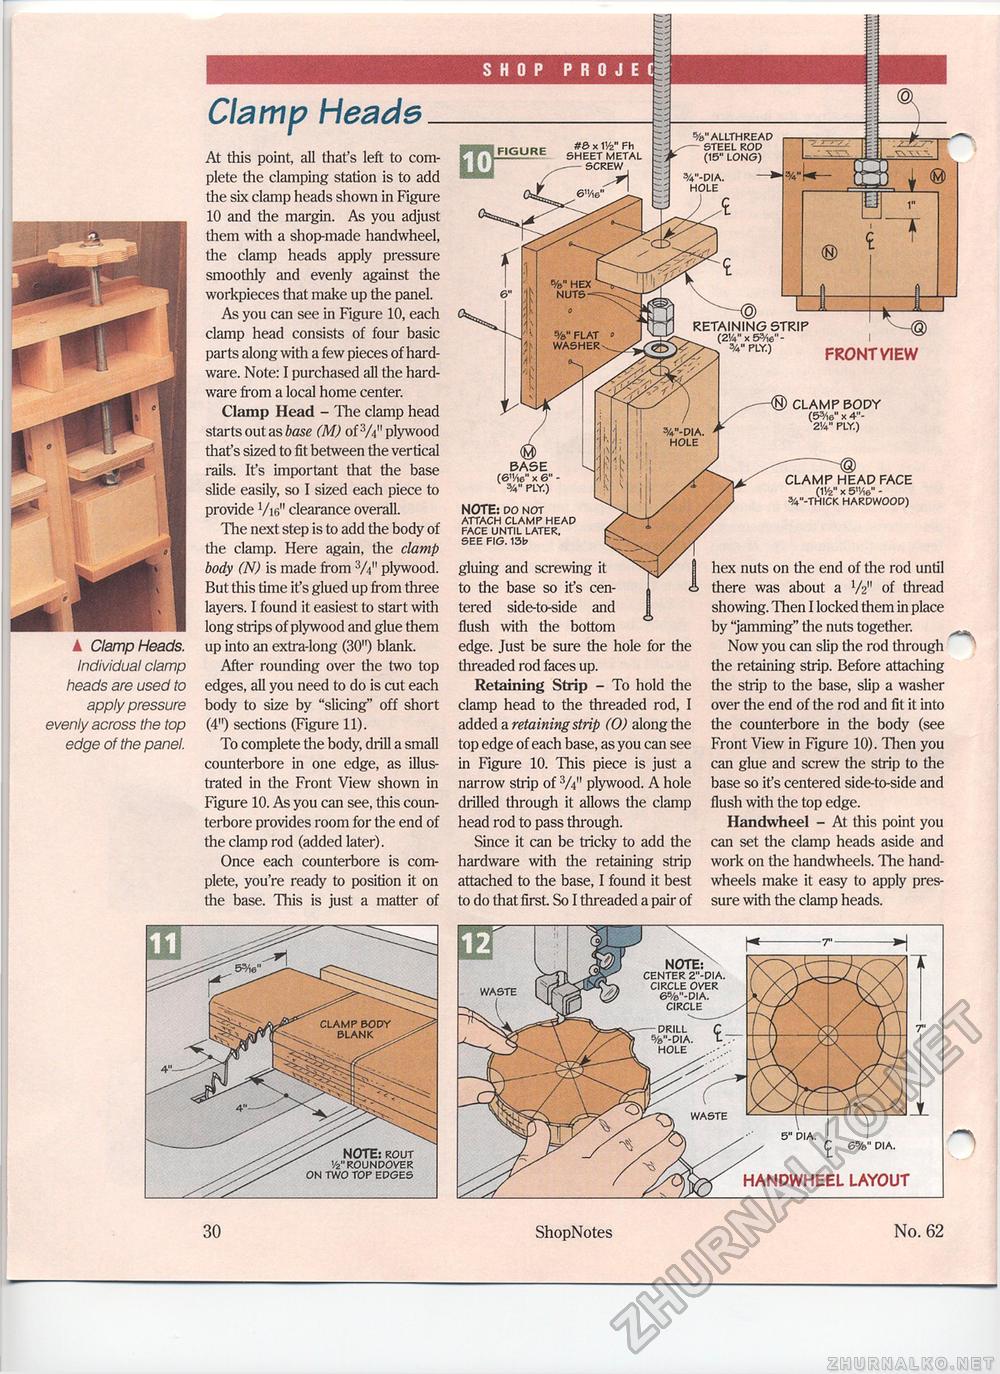
SHOP PROJECT ▲ Clamp Heads. Individual clamp heads are used to apply pressure evenly across the top edge of the panel. Clamp Heade At this point, all that's left to complete the clamping station is to add the six clamp heads shown in Figure 10 and the margin. As you adjust them with a shop-made handwheel, the clamp heads apply pressure smoothly and evenly against the workpieces that make up the panel. As you can see in Figure 10, each clamp head consists of four basic parts along with a few pieces of hardware. Note: I purchased all the hardware from a local home center. Clamp Head - The clamp head starts out as base (M) of 3/i" plywood that's sized to fit between the vertical rails. It's important that the base slide easily, so I sized each piece to provide Vi6" clearance overall. The next step is to add the body of the clamp. Here again, the clamp body (N) is made from 3/t" plywood. But this time it's glued up from three layers. I found it easiest to start with long strips of plywood and glue them up into an extra-long (30") blank. After rounding over the two top edges, all you need to do is cut each body to size by "slicing" off short (4") sections (Figure 11). To complete the body, drill a small counterbore in one edge, as illustrated in the Front View shown in Figure 10. As you can see, this counterbore provides room for the end of the clamp rod (added later). Once each counterbore is complete, you're ready to position it on the base. This is just a matter of vallthread j/-— steel rod 5 *■ (15" long) RETAINING STRIP (zva" x ©v,®"- ply.) FRONT VIEW <0> BASE (6"/i6" x 6" -ply.) NOTE: do not attach clamp head face until later. see fig. 13b gluing and screwing it to the base so ifs centered side-to-side and flush with the bottom edge. Just be sure the hole for the threaded rod faces up. Retaining Strip - To hold the clamp head to the threaded rod, I added a retaining strip (O) along the top edge of each base, as you can see in Figure 10. This piece is just a narrow strip of 3A" plywood. A hole drilled through it allows the clamp head rod to pass through. Since it can be tricky to add the hardware with the retaining strip attached to the base, I found it best to do that first So I threaded a pair of ® CLAMP BODY (53/ie" x 4"-2'/4" ply.) CLAMP HEAD FACE (W' x 5"/i6" -%"-thick hardwood) hex nuts on the end of the rod until there was about a V2" of thread showing. Then I locked them in place by "jamming" the nuts together. Now you can slip the rod through the retaining strip. Before attaching the strip to the base, slip a washer over the end of the rod and fit it into the counterbore in the body (see Front View in Figure 10). Then you can glue and screw the strip to the base so it's centered side-to-side and flush with the top edge. Handwheel - At this point you can set the clamp heads aside and work on the handwheels. The hand-wheels make it easy to apply pressure with the clamp heads. 30 ShopNotes No. 62 |


