62 - Box Joint Jig, страница 31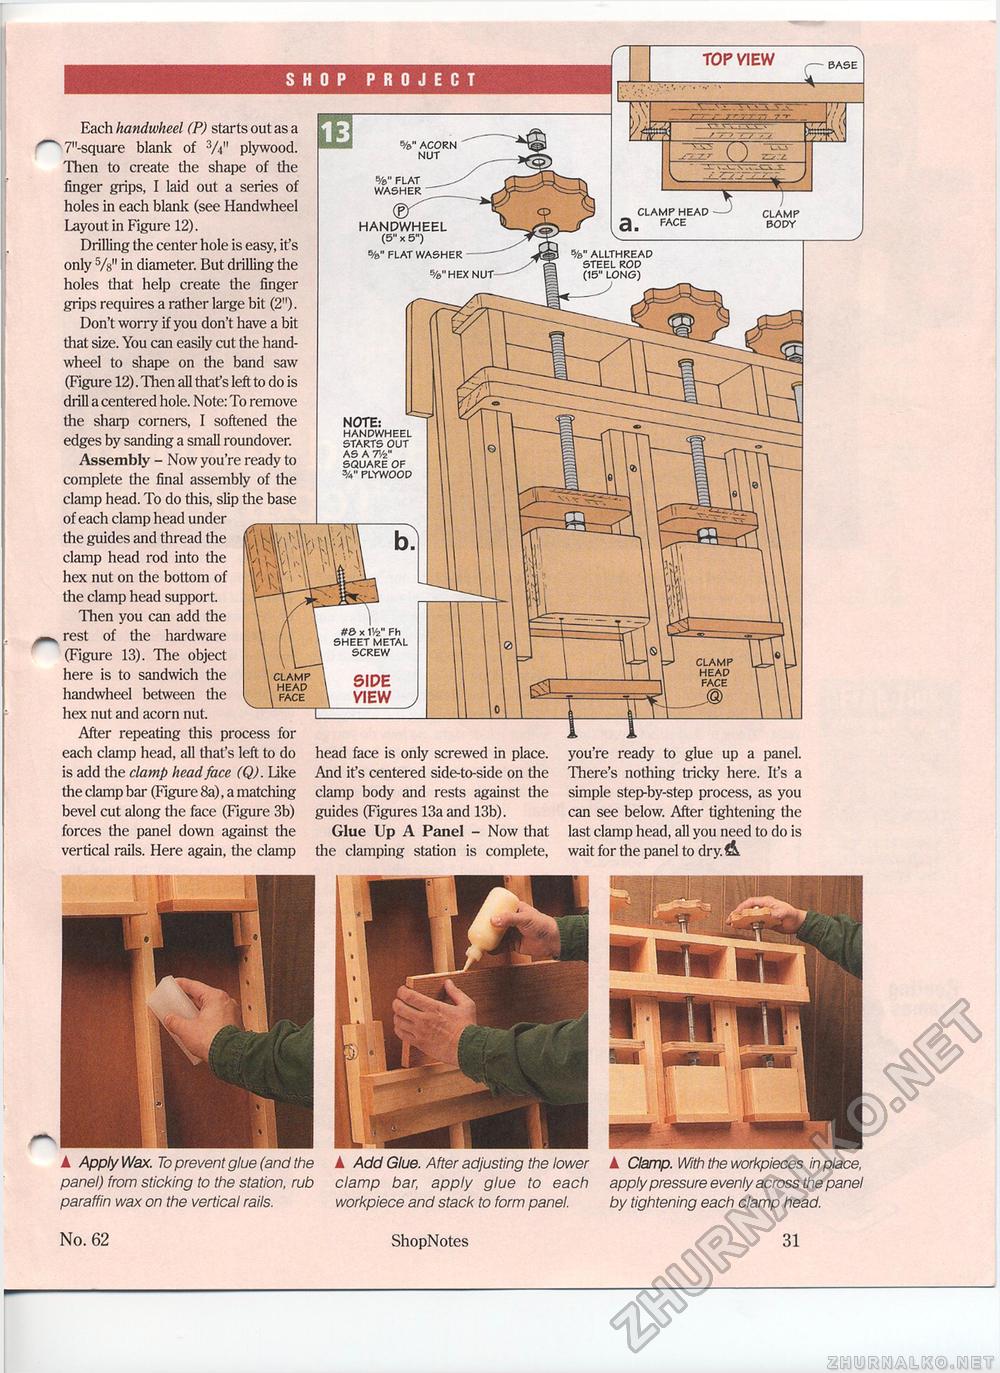
Each handwheel (P) starts out as a 7"-square blank of 3A" plywood. Then to create the shape of the finger grips, I laid out a series of holes in each blank (see Handwheel Layout in Figure 12). Drilling the center hole is easy, ifs only 5/s" in diameter. But drilling the holes that help create the finger grips requires a rather large bit (2"). Don't worry if you don't have a bit that size. You can easily cut the hand-wheel to shape on the band saw (Figure 12). Then all that"s left to do is drill a centered hole. Note: To remove the sharp corners, I softened the edges by sanding a small roundover. Assembly - Now you're ready to complete the final assembly of the clamp head. To do this, slip the base of each clamp head under the guides and thread the clamp head rod into the hex nut on the bottom of the clamp head support. Then you can add the rest of the hardware (Figure 13). The object here is to sandwich the handwheel between the hex nut and acorn nut. After repeating this process for each clamp head, all that's left to do is add the clamp head face (Q). like the clamp bar (Figure 8a), a matching bevel cut along the face (Figure 3b) forces the panel down against the vertical rails. Here again, the clamp TOP VIEW ,—- BASE head face is only screwed in place. And it's centered side-to-side on the clamp body and rests against the guides (Figures 13a and 13b). Glue Up A Panel - Now that the clamping station is complete, you're ready to glue up a panel. There's nothing tricky here. It's a simple step-by-step process, as you can see below. After tightening the last clamp head, all you need to do is wait for the panel to dry. A CLAMP HEAD —' a. FACE / CLAMP BODY NOTE: HANDWHEEL STARTS OUT AS A SQUARE OF PLYWOOD %"ACORN NUT s/e" FLAT WASHER HANDWHEEL (5" x 5") %" FLAT WASHER %"HEX ALLTHREAD STEEL ROD (15" LONG) A Add Glue. After adjusting the lower clamp bar, apply glue to each workpiece and stack to form panel. A Clamp. With the workpieces in place, apply pressure evenly across the panel by tightening each clamp head. A Apply Wax. To prevent glue (and the panel) from sticking to the station, rub paraffin wax on the vertical rails. No. 62 ShopNotes 31 |


