62 - Box Joint Jig, страница 7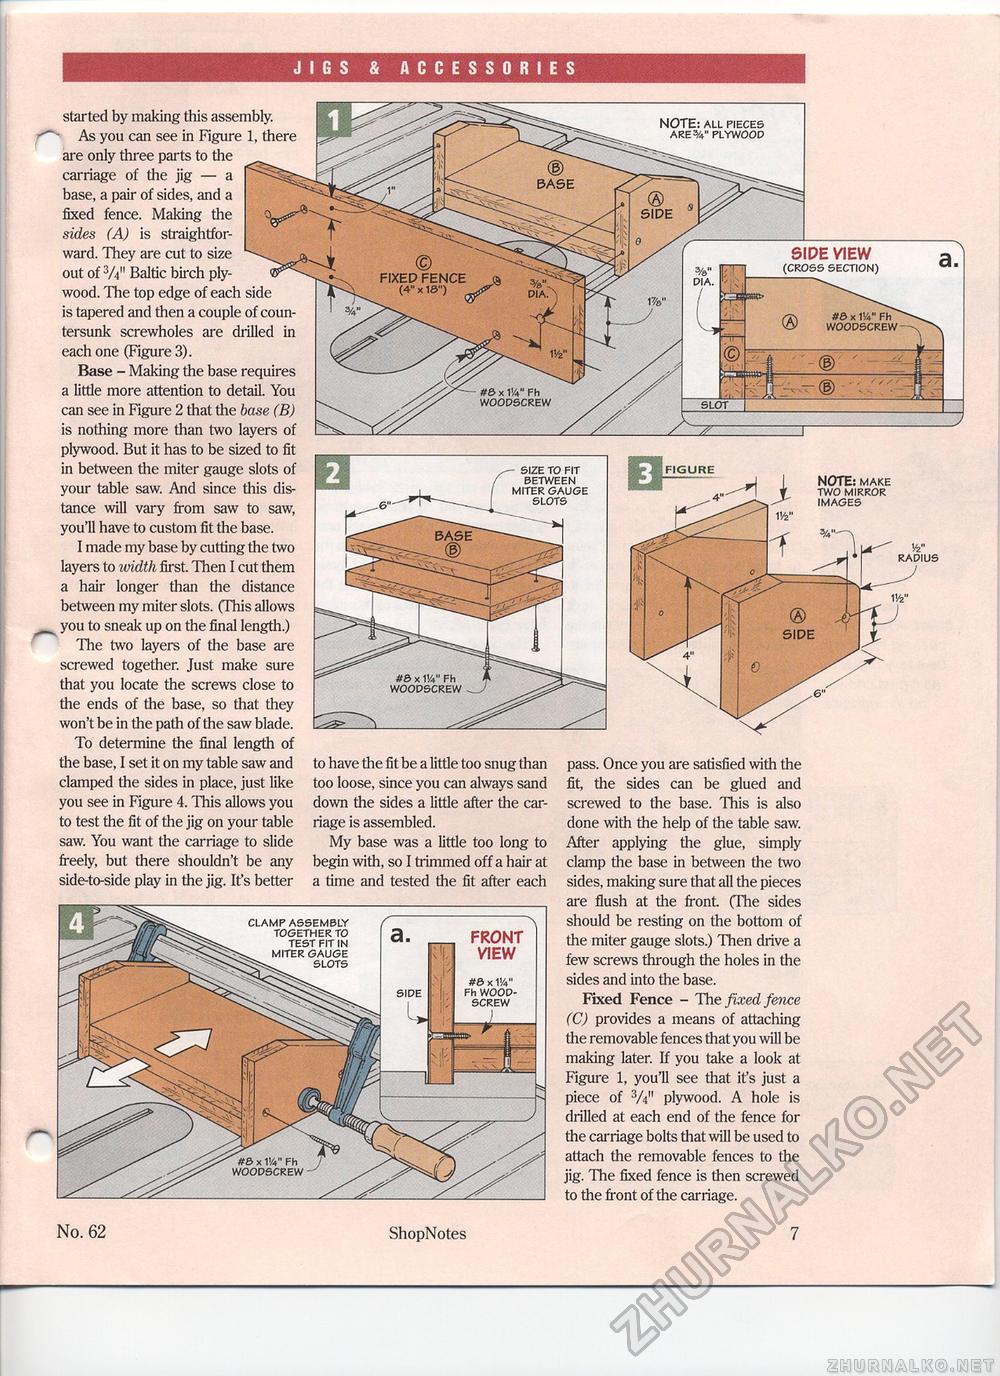
JIGS & ACCESSORIES started by making this assembly. As you can see in Figure 1, there are only three parts to the carriage of the jig — a ^^^^ base, a pair of sides, and a fixed fence. Making the sides (A) is straightforward. They are cut to size out of 3/V Baltic birch ply-wood. The top edge of each side is tapered and then a couple of countersunk screwholes are drilled in each one (Figure 3). Base - Making the base requires a little more attention to detail. You can see in Figure 2 that the base (B) is nothing more than two layers of plywood. But it has to be sized to fit in between the miter gauge slots of your table saw. And since this distance will vary from saw to saw, you'll have to custom fit the base. I made my base by cutting the two layers to width first. Then I cut them a hair longer than the distance between my miter slots. (This allows you to sneak up on the final length.) The two layers of the base are screwed together. Just make sure that you locate the screws close to the ends of the base, so that they won't be in the path of the saw blade. To determine the final length of the base, I set it on my table saw and clamped the sides in place, just like you see in Figure 4. This allows you to test the fit of the jig on your table saw. You want the carriage to slide freely, but there shouldn't be any side-to-side play in the jig. It's better NOTE: ALL PIECES ARE 3/4" PLYWOOD SIPE VIEW (CROSS SECTION) FIXEP FENCE (4" x 13") #8 x 114" Fh WOODSCREW #6 x 114" Fh WOODSCREW SLOT - SIZE TO FIT BETWEEN MITER GAUGE SLOTS NOTE: MAKE TWO MIRROR IMAGES w RADIUS #3 x 114" Fh WOODSCREW to have the fit be a little too snug than too loose, since you can always sand down the sides a little after the carriage is assembled. My base was a little too long to begin with, so I trimmed off a hair at a time and tested the fit after each pass. Once you are satisfied with the fit, the sides can be glued and screwed to the base. This is also done with the help of the table saw. After applying the glue, simply clamp the base in between the two sides, making sure that all the pieces are flush at the front. (The sides should be resting on the bottom of the miter gauge slots.) Then drive a few screws through the holes in the sides and into the base. Fixed Fence - The fixed fence (C) provides a means of attaching the removable fences that you will be making later. If you take a look at Figure 1, you'll see that it's just a piece of 3/V' plywood. A hole is drilled at each end of the fence for the carriage bolts that will be used to attach the removable fences to the jig. The fixed fence is then screwed to the front of the carriage. CLAMP ASSEMBLY TOGETHER TO TEST FIT IN . MITER GAUGE SLOTS FRONT VIEW #e> x 114" Fh WOOD-SCREW #& x Hi" Fh WOODSCREW No. 62 ShopNotes 7 |


