69 - Bench Top Storage System, страница 11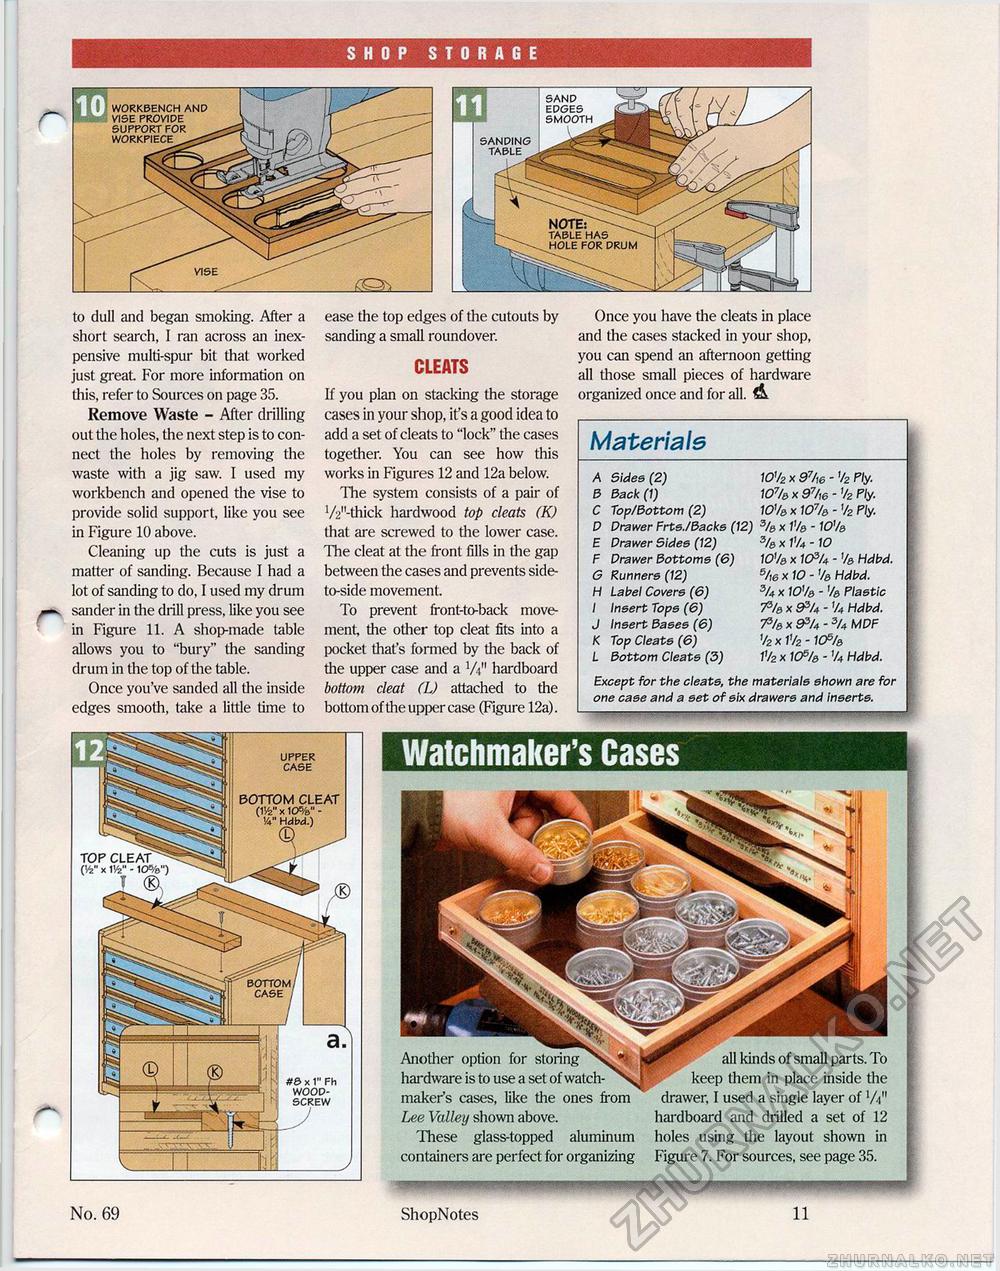
SHOP STORAGE to dull and began smoking. After a short search, I ran across an inexpensive multi-spur bit that worked just great For more information on this, refer to Sources on page 35. Remove Waste - After drilling out the holes, the next step is to connect the holes by removing the waste with a jig saw. I used my workbench and opened the vise to provide solid support, like you see in Figure 10 above. Cleaning up the cuts is just a matter of sanding. Because I had a lot of sanding to do, I used my drum sander in the drill press, like you see in Figure 11. A shop-made table allows you to "bury" the sanding drum in the top of the table. Once you've sanded all the inside edges smooth, take a little time to ease the top edges of the cutouts by sanding a small roundover. CLEATS If you plan on stacking the storage cases in your shop, it's a good idea to add a set of cleats to "lock" the cases together. You can see how this works in Figures 12 and 12a below. The system consists of a pair of 1/2,,-thick hardwood top cleats (K) that are screwed to the lower case. The cleat at the front fills in the gap between the cases and prevents side-to-side movement. To prevent front-to-back movement, the other top cleat fits into a pocket that's formed by the back of the upper case and a W hardboard bottom cleat (L) attached to the bottom of the upper case (Figure 12a). Once you have the cleats in place and the cases stacked in your shop, you can spend an afternoon getting all those small pieces of hardware organized once and for all. & Materials A Sides (2) B Back (1) C Top/Bottom (2) D Drawer Frts./Backs (12) E Drawer Sides (12) F Drawer Bottoms (6) G Runners (12) H Label Covers (6) I Insert Tops (6) J Insert Bases (6) K Top Cleats (6) L Bottom Cleats (3) 10'/z x 97/,e - '/2 Ply- 107/ax97/,6-'/2Ply. 10Va x 107/e - '/2 Ply. %x1'/e-10% 3/a x 1% -10 10% x 1&U - ]/a Hdbd. s/w x 10 - % Hdbd. 3/4 x 10% - % Plastic Tla x &U - 'U Hdbd. -Ph x 9SU - 3A MDF '/2x J'/2 -1 CP/a 1'/z x ICfi/a - '/4 Hdbd. Except for the cleats, the materials shown are for one case and a set of six drawers and inserts. No. 69 ShopNotes 11 WORKBENCH AND VISE PROVIDE SUPPORT FOR WORKPIECE SAND EDGES SMOOTH SANDING TABLE UPPER CASE BOTTOM CLEAT (W x 10%" -<A" Hdbd.) TOP CLEAT " ('/2" x IV2" - 10%") I BOTTOM CASE I x 1" Fh WOOD-SCREW Watchmaker's Cases Another option for storing hardware is to use a set of watchmaker's cases, like the ones from Lee Valley shown above. These glass-topped aluminum containers are perfect for organizing all kinds of small parts. To keep them in place inside the drawer, I used a single layer of '/t" hardboard and drilled a set of 12 holes using the layout shown in Figure 7. For sources, see page 35. |


