69 - Bench Top Storage System, страница 8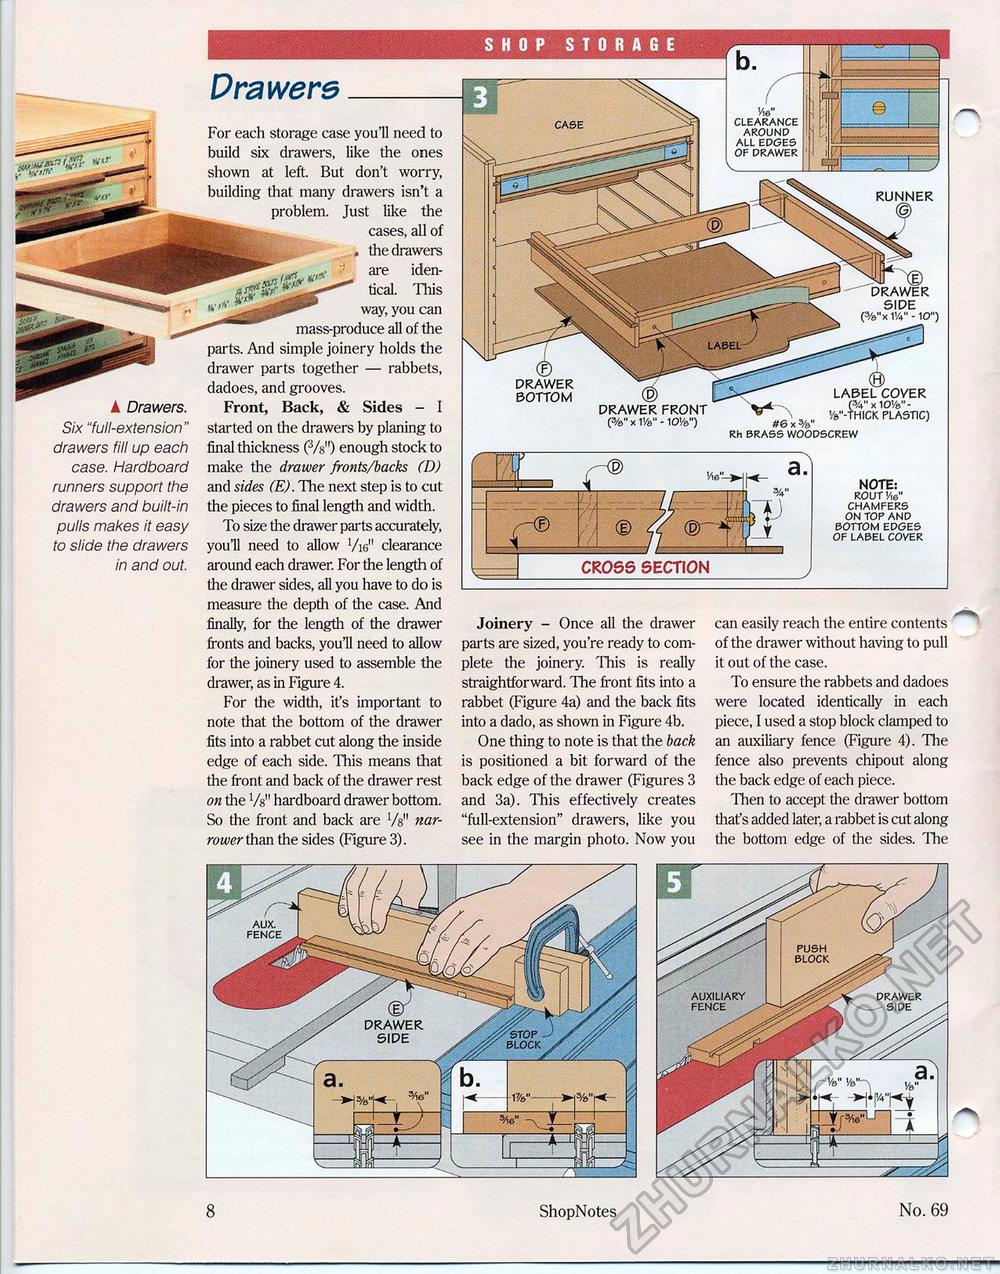
Drawers Vie" CLEARANCE AROUND ALL EDGES OF DRAWER For each storage case you'll need to build six drawers, like the ones shown at left. But don't worry, building that many drawers isn't a problem. Just like the fete cases, all of , the drawers V ' ^ iden" deal. This ••■ HMD ' ^-ssSjgpP"*""" way, you can mass-produce all of the parts. And simple joinery holds the drawer parts together — rabbets, dadoes, and grooves. A Drawers. Front, Back, & Sides - I Six "full-extension" started on the drawers by planing to drawers fill up each final thickness (Vs") enough stock to case. Hardboard make the drawer fronts/backs CD) runners support the and sides (E). The next step is to cut drawers and built-in the pieces to final length and width. pulls makes it easy To size die drawer parts accurately, to slide the drawers you'll need to allow Vi6n clearance in and out. around each drawer. For the length of the drawer sides, all you have to do is RUNNER DRAWER 5IDE (%"x 1!4" - 10") LABEL DRAWER BOTTOM DRAWER FRONT (%"x1'/8"-10Ve") NOTE: ROUT Vie" CHAMFERS ON TOP AND BOTTOM EDGES OF LABEL COVER -......'- CROSS SECTION measure the depth of the case. And finally, for the length of the drawer fronts and backs, you'll need to allow for the joinery used to assemble the drawer, as in Figure 4. For the width, it's important to note that the bottom of the drawer fits into a rabbet cut along the inside edge of each side. This means that the front and back of the drawer rest on the Vs" hardboard drawer bottom. So the front and back are l/&" narrower than the sides (Figure 3). Joinery - Once all the drawer parts are sized, you're ready to complete the joinery. This is really straightforward. The front fits into a rabbet (Figure 4a) and the back fits into a dado, as shown in Figure 4b. One thing to note is that the back is positioned a bit forward of the back edge of the drawer (Figures 3 and 3a). This effectively creates "full-extension" drawers, like you see in the margin photo. Now you can easily reach the entire contents of the drawer without having to pull it out of the case. To ensure the rabbets and dadoes were located identically in each piece, I used a stop block clamped to an auxiliary fence (Figure 4). The fence also prevents chipout along the back edge of each piece. Then to accept the drawer bottom thaf s added later, a rabbet is cut along the bottom edge of the sides. The 8 ShopNotes No. 69 fence DRAWER |


