69 - Bench Top Storage System, страница 9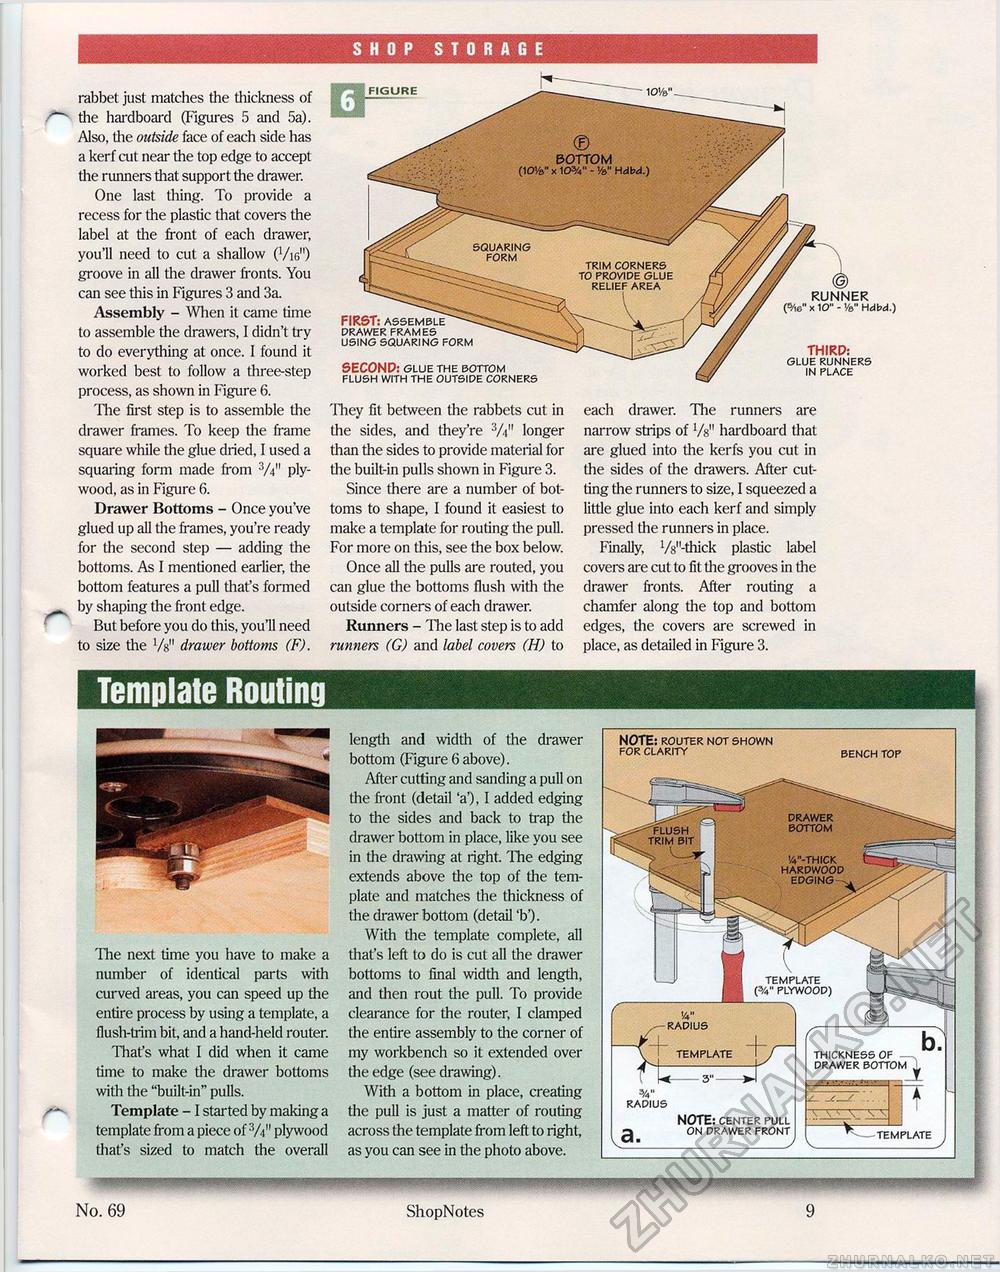
SHOP STORAGE rabbet just matches the thickness of the hardboard (Figures 5 and 5a). Also, the outside face of each side has a kerf cut near the top edge to accept die runners that support the drawer. One last thing. To provide a recess for the plastic that covers the label at the front of each drawer, you'll need to cut a shallow (Vi6n) groove in all the drawer fronts. You can see this in Figures 3 and 3a. Assembly - When it came time to assemble the drawers, I didn't try to do everything at once. I found it worked best to follow a three-step process, as shown in Figure 6. The first step is to assemble the drawer frames. To keep the frame square while the glue dried, I used a squaring form made from 3A" plywood, as in Figure 6. Drawer Bottoms - Once you've glued up all the frames, you're ready for the second step — adding the bottoms. As I mentioned earlier, the bottom features a pull that's formed by shaping the front edge. But before you do this, you'll need to size the Vs" drawer bottoms (F). They fit between the rabbets cut in the sides, and they're 3/-i" longer than the sides to provide material for the built-in pulls shown in Figure 3. Since there are a number of bottoms to shape, I found it easiest to make a template for routing the pull. For more on this, see the box below. Once all the pulls are routed, you can glue the bottoms flush with the outside corners of each drawer. Runners - The last step is to add runners (G) and label covers (H) to each drawer. The runners are narrow strips of Vs" hardboard that are glued into the kerfs you cut in the sides of the drawers. After cutting the runners to size, I squeezed a little glue into each kerf and simply pressed the runners in place. Finally, W-thick plastic label covers are cut to fit die grooves in the drawer fronts. After routing a chamfer along the top and bottom edges, die covers are screwed in place, as detailed in Figure 3. :■ FIGURE FIRST: assemble drawer frames using squaring form SECOND: glue the bottom flush with the outside corners RUNNER (5/ie" x 10" - Ve" Hdbd.) THIRD: glue runners in place drawer bottom flush trim bit iv'-thick hardwood edging - template (%" plywood) Template Routing■z__ template thickness of —. drawer bottom The next time you have to make a number of identical parts with curved areas, you can speed up the entire process by using a template, a flush-trim bit, and a hand-held router. That's what I did when it came time to make the drawer bottoms with the "built-in" pulls. Template -1 started by making a template from a piece of V4" plywood that's sized to match the overall length and width of the drawer bottom (Figure 6 above). After cutting and sanding a pull on die front (detail 'a'), I added edging to the sides and back to trap die drawer bottom in place, like you see in the drawing at right. The edging extends above the top of the template and matches the thickness of the drawer bottom (detail 'b'). With the template complete, all that's left to do is cut all the drawer bottoms to final width and length, and then rout the pull. To provide clearance for the router, I clamped the entire assembly to the corner of my workbench so it extended over the edge (see drawing). With a bottom in place, creating the pull is just a matter of routing across the template from left to right, as you can see in the photo above. NOTE: router not shown for clarity bench top radius template 3" — radius NOTE: center pull on drawer front _y No. 69 ShopNotes 9 |


