79 - Slant Front Tool Cart, страница 31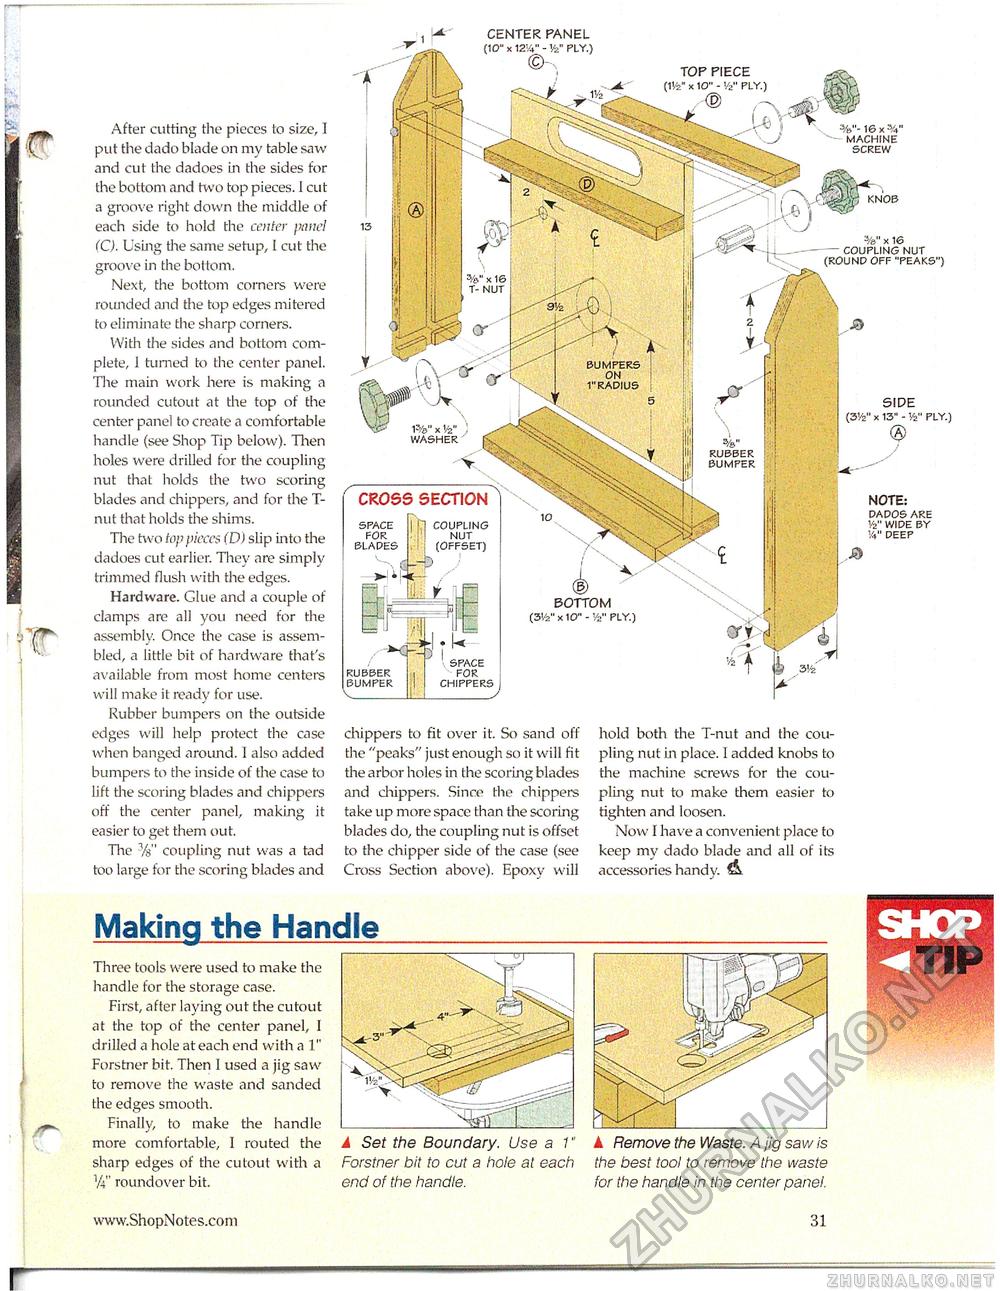
After cutting the pieces to size, I put the dado blade on my table saw and cut the dadoes in the sides for the bottom and two top pieces. I cut a groove right down the middle of each side to hold the center panel (C). Using the same setup, I cut the groove in the bottom. Next, the bottom corners were rounded and the top edges mitered to eliminate file sharp corners. With the sides and bottom complete, 1 turned to the center panel. The main work here is making a rounded cutout at the top of the center panel to create a comfortable handle (see Shop Tip below). Then holes were drilled for the coupling nut that holds the two scoring blades and chippers, and for the T-nut that holds the shims. The two top pieces (D) slip into tine dadoes cut earlier. They are simply trimmed flush with the edges. Hardware. Glue and a couple of clamps are all you need for the assembly. Once the case is assembled, a little bit of hardware that's available from most home centers will make it ready for use. Rubber bumpers on the outside edges will help protect the case when banged around. 1 also added bumpers to the inside of the case to lift the scoring blades and chippers off the center panel, making it easier to get them out. The coupling nut was a tad too large for the scoring blades and chippers to fit over it. So sand off the "peaks" just enough so it will fit the arbor holes in the scoring blades and chippers. Since the chippers take up more space than the scoring blades do, the coupling nut is offset to the chipper side of the case (see Cross Section above). Epoxy will hold both the T-nut and the coupling nut in place. I added knobs to the machine screws for the coupling nut to make them easier to tighten and loosen. Now 1 have a convenient place to keep my dado blade and all of its accessories handv. Making the Handle Three tools were used to make the handle for the storage case. First, after laying out the cutout at the top of the center panel, I drilled a hole at each end with a 1" Forstner bit. Then 1 used a jig saw to remove the waste and sanded the edges smooth. Finally, to make the handle more comfortable, I routed the sharp edges of the cutout with a W roundover bit. A Set the Boundary. Use a 1" Forstner bit to cut a hole at each end of the handle. A Remove the Waste. A jig saw is the best tool to remove the waste for the handle in the center panel. CROSS SECTION SPACE j'l COUPLING FOR ! NUT BLADES i (OFFSET) BOTTOM (3'/5>" x 10" - M>" PLY.) RUBBER BUMPER V._ 3 FACE FOR CHIPPERS 16 x%" MACHINE SCREW SIDE (3V2" x 13" - Yz" PLY.) NOTE: DADOS ARE V2" WIDE BY W DEEP WASHER RUBBER BUMPER %" X 16 COUPLING NUT (ROUND OFF "PEAKS") CENTER PANEL - Vz" PLY.) 31 |


