79 - Slant Front Tool Cart, страница 34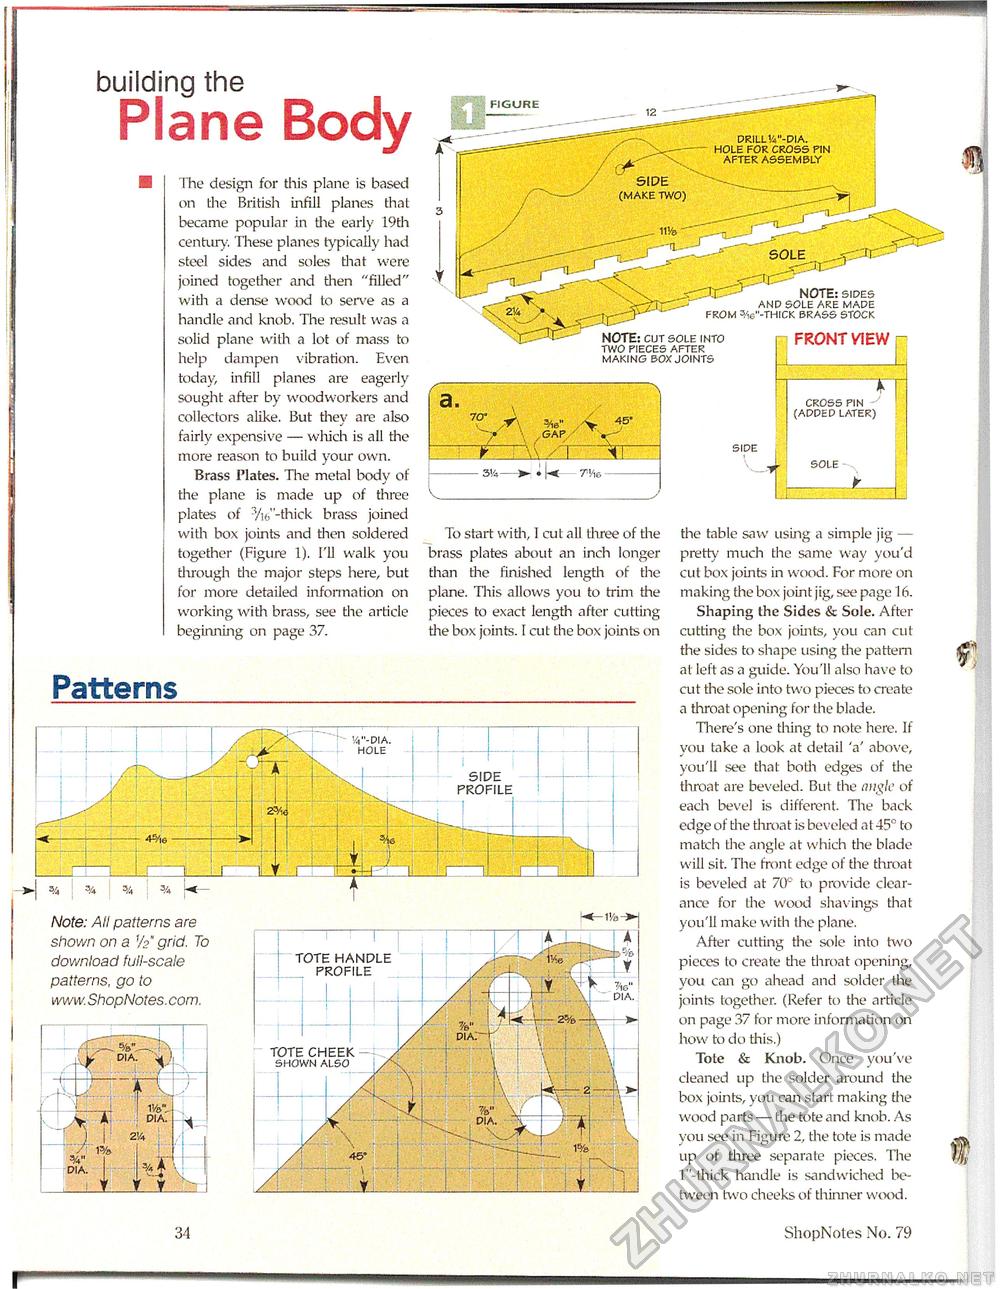
■ 3'A--V . -TV,6 > cross pin (appep later) sole FIGURE NOTE: cut sole into two pieces after making box joints FRONT VIEW NOTE: sides anp sole are mape from 3w-thick brass stock building the Plane Body the table saw using a simple jig — pretty much the same way you'd cut box joints in wood. For more on making the box joint jig, see page 16. Shaping the Sides & Sole. After cutting the box joints, you can CLit the sides to shape using the pattern at left as a guide. You '11 also have to cut the sole into two pieces to create a throat opening for the blade. There's one thing to note here. If voli take a look at detail 'a' above, you'll see that both edges of the throat are beveled. But the angle of each bevel is different. The back edge of the throat is beveled at 45° to match the angle at which the blade will sit. The front edge of the throat is beveled at 70° to provide clearance for the wood shavings that you'll make with tine plane. After cutting the sole into two pieces to create the throat opening, you can go ahead and solder the joints together. (Refer to the article on page 37 for more information on how to do tliis.) Tote & Knob. Once you've cleaned up the solder around the box joints, you can start making the wood parts — the tote and knob. As you see in Figure 2, the tote is made up of three separate pieces. The l"-thick handle is sandwiched between two cheeks of thinner wood. The design for this plane is based on the British infill planes that became popular in the early 19th centLiry. These planes typically had steel sides and soles that were joined together and then "filled" with a dense wood to serve as a handle and knob. The result was a solid plane with a lot of mass to help dampen vibration. Even today, infill planes are eagerly sought after by woodworkers and collectors alike. But they are also fairly expensive — which is all the more reason to build your own. Brass Plates. The metal body of the plane is made up of three plates of 3/i6"-thick brass joined with box joints and then soldered together (Figure 1). I'll walk you through the major steps here, but for more detailed infonnation on working with brass, see the article beginning on page 37. To start with, 1 cut all three of the brass plates about an inch longer than the finished length of the plane. Tliis allows you to trim the pieces to exact length after cutting the box joints. I cut the box joints on Patterns Note: All patterns are shown on a Vs" grid. To download full-scale patterns, go to www.ShopNotes.com. TOTE HANDLE PROFILE TOTE CHEEK shown also 34 ShopNotes No. 79 |


