79 - Slant Front Tool Cart, страница 35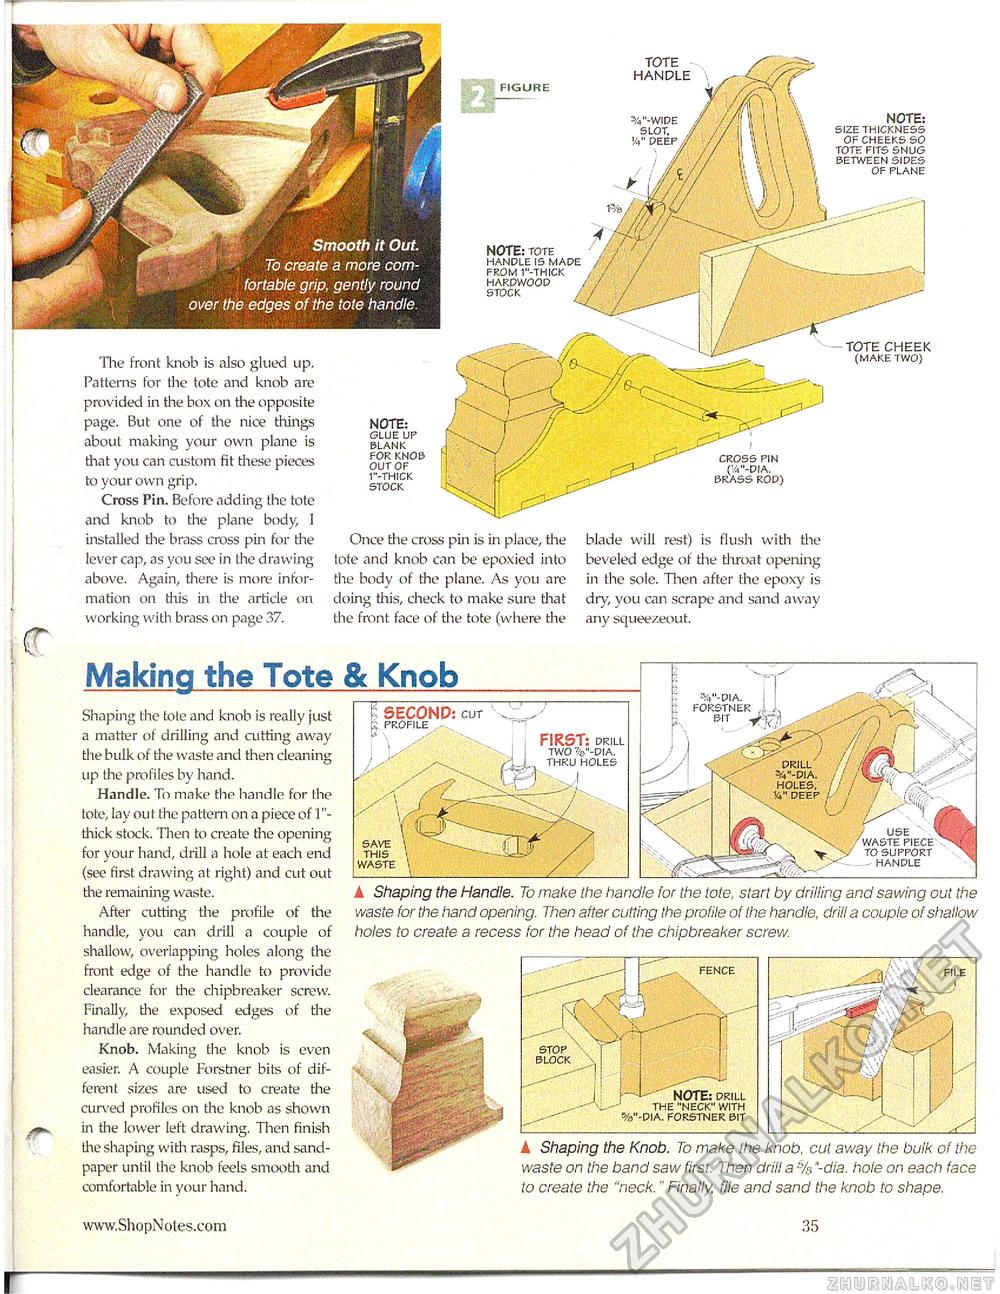
TOTE HANDLE FIGURE NOTE: size thickness of cheeks so tote fits snug between sides of plane w-wide slot, ff 'a" deep / NOTE: tote handle is made from 1"-thick hardwood stock TOTE CHEEK (make two) The front knob is also glued Lip. Patterns for the tote and knob are provided in the box on the opposite page. But one of the nice things about making your own plane is that you can custom fit these pieces to your own grip. Cross Pin. Before adding the tote and knob to the plane body, I installed the brass cross pin for the lever cap, as you see in the drawing above. Again, there is more information on this in the article on working with brass on page 37. NOTE: glue uf blank for knob out of 1"-thick stock Once the cross pin is in place, the tote and knob can be epoxied into the body of the plane. As you are doing this, check to make sure that the front face of the tote (where the blade will rest) is flush with the beveled edge of the tliroat opening in the sole. Then after the epoxy is dry, you can scrape and sand away any squeezeout. Making the Tote & Knob Shaping the tote and knob is really iust I SECOND: r ° ' profile . a matter of drilling and cutting away the bulk of the waste and then cleaning up the profiles by hand. Handle. To make the handle for the tote, lay out the pattern on a piece of 1"-thick stock. Then to create the opening for your hand, drill a hole at each end (see first drawing at right) and ait out die remaining waste. A Shaping the Handle. To make the handle for the tote, start by drilling and sawing out the After cutting the profile of the waste for the hand opening. Then after cutting the profile of the handle, drill a couple of shallow handle, you can drill a couple of holes to create a recess for the head of the chipbreaker screw. shallow, overlapping holes along the ___________ front edge of the handle to provide .--■""' -T " fence file clearance for the chipbreaker screw. Finally, the exposed edges of the handle are rounded over. Knob. Making the knob is even easier. A couple Forstner bits of different sizes are used to create the curved profiles on the knob as shown in the lower left drawing. Then finish the shaping with rasps, files, and sandpaper until the knob feels smooth and comfortable in your hand. 3v-dia. forstner j bit V'l FIRS s: drill two v-dia. thru holes drill holes. !4" deep / use waste piece w to support --------- handle save this waste stop block NOTE: drill the "neck" with •dia. forstner bit A Shaping the Knob. To make the knob, cut away the bulk of the waste on the band saw first. Then drill a % "-dia. hole on each face to create the "neck." Finally, file and sand the knob to shape. r |


