79 - Slant Front Tool Cart, страница 36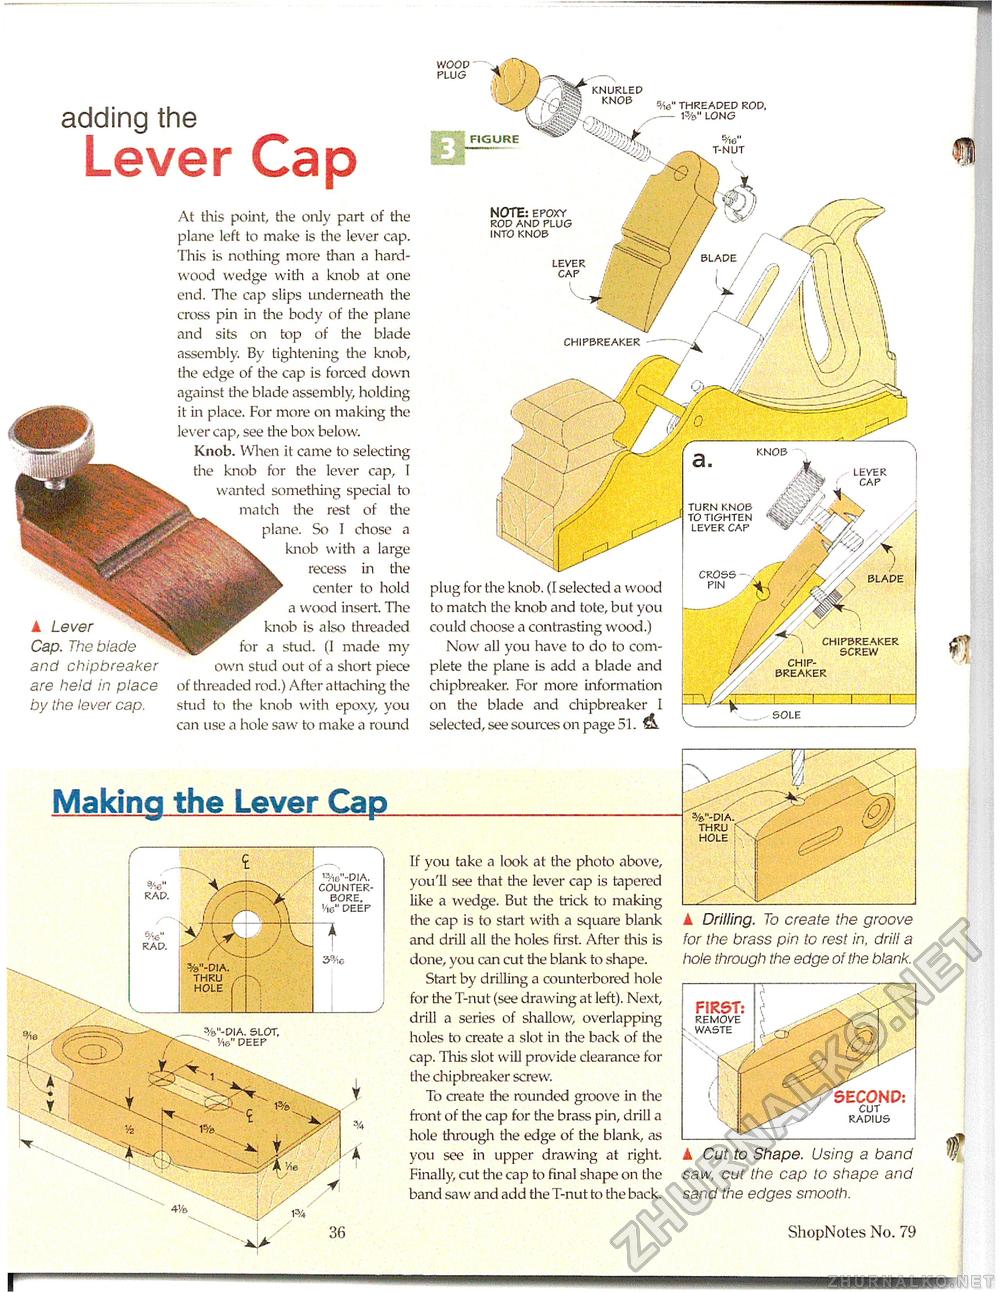
adding the Lever Cap Making the Lever Cap If you take a look at the photo above, you'll see that the lever cap is tapered like a wedge. But the trick to making the cap is to start with a square blank and drill all the holes first. After this is done, you can cut the blank to shape. Start by drilling a counterbored hole for the T-nut (see drawing at left). Next, drill a series of shallow, overlapping holes to create a slot in I lie back of the cap. This slot will provide clearance for the chipbreaker screw. To create the rounded groove in the front of the cap for the brass pin, drill a hole through the edge of the blank, as you see in upper drawing at right. Finally, cut the cap to final shape on the band saw and add the T-nut to the back. A Drilling. To create the groove for the brass pin to rest in. drill a hole through the edge of the blank. A Cut to Shape. Using a band saw, cut the cap to shape and sand the edges smooth. ShopNotes No. 79 A Lever Cap. The blade and chipbreaker are held in place by the lever cap. At tliis point, the only part of the plane left to make is the lever cap. Tliis is nothing more than a hardwood wedge with a knob at one end. The cap slips underneath the cross pin in the body of the plane and sits on top of the blade assembly. By tightening the knob, the edge of the cap is forced down against the blade assembly, holding it in place. For more on making the lever cap, see the box below. Knob. When it came to selecting the knob for the lever cap, I wanted something special to match the rest of the plane. So I chose a knob with a large recess in the center to hold a wood insert. The knob is also threaded for a stud. (I made my own stud out of a short piece of threaded rod.) After attaching the stud to the knob with epoxy, you can use a hole saw to make a round plug for the knob, i to match tire knob could choose a contrasting wood.) Now all you have to do to complete the plane is add a blade and chipbreaker. For more information on the blade and chipbreaker I selected, see sources on page 51. A chipbreaker screw chip-breaker f i r.....i SOLE knurled knob %3" threaded rod. w long t-nut WOOD PLUG FIGURE NOTE: epoxy rod and plug into knob chipbreaker blade %"-dia. slot, Me" deep 13/ib"-DIA. counter- bore. Vie" deep Vis" rad. SECOND: cut radius FIRST: remove waste r |


