82 - The Complete Miter Saw Workstation, страница 18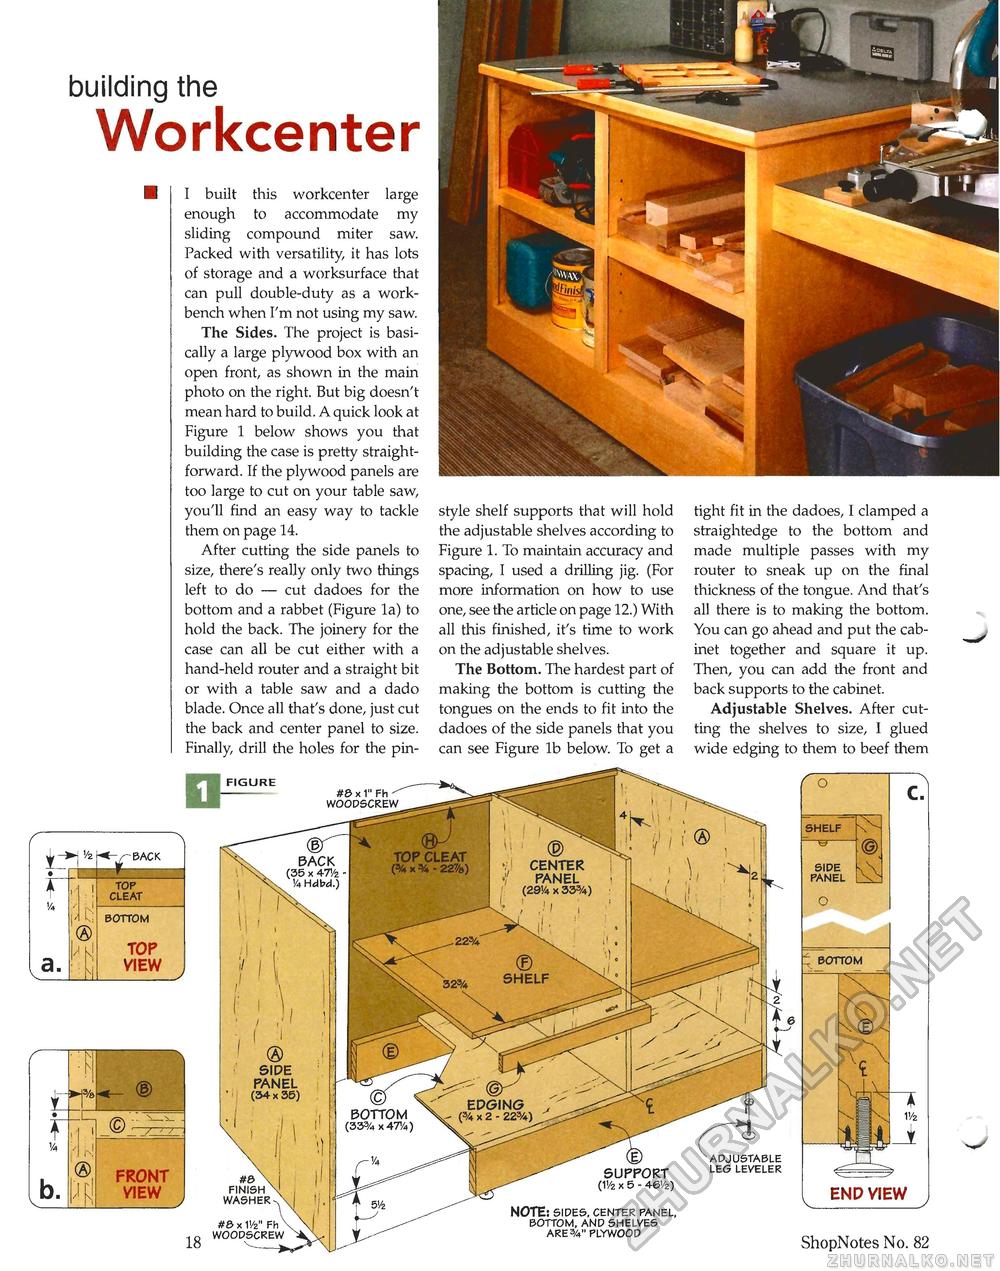
building the Workcenter
BOTTOM END VIEW 18 ShopNotes No. 82 I built this workcenter large enough to accommodate my sliding compound miter saw. Packed with versatility, it has lots of storage and a worksurface that can pull double-duty as a workbench when I'm not using my saw. The Sides. The project is basically a large plywood box with an open front, as shown in the main photo on the right. But big doesn't mean hard to build. A quick look at Figure 1 below shows you that building the case is pretty straightforward. If the plywood panels are too large to cut on your table saw, you'll find an easy way to tackle them on page 14. After cutting the side panels to size, there's really only two things left to do — cut dadoes for the bottom and a rabbet (Figure la) to hold the back. The joinery for the case can all be cut either with a hand-held router and a straight bit or with a table saw and a dado blade. Once all that's done, just cut the back and center panel to size. Finally, drill the holes for the pin- style shelf supports that will hold the adjustable shelves according to Figure 1. To maintain accuracy and spacing, I used a drilling jig. (For more information on how to use one, see the article on page 12.) With all this finished, it's time to work on the adjustable shelves. The Bottom. The hardest part of making the bottom is cutting the tongues on the ends to fit into the dadoes of the side panels that you can see Figure lb below. To get a tight fit in the dadoes, I clamped a straightedge to the bottom and made multiple passes with my router to sneak up on the final thickness of the tongue. And that's all there is to making the bottom. You can go ahead and put the cabinet together and square it up. Then, you can add the front and back supports to the cabinet. Adjustable Shelves. After cutting the shelves to size, I glued wide edging to them to beef them BOTTOM TOP VIEW FRONT VIEW BACK TOP CLEAT EDGING x 2 - 22%) figure #&x1" Fh WOODSCREW cgrl BACK (35 x 4T/2 -" tHdbd.) / J! f I ® SIDE PANEL (34 x 35) #& FINISH WASHER- #& x IV21' Fh \ WOODSCREW TOP CLEAT (3/4 X 3/4 - 22%) '! PANEL (29!4 x 333/4) BOTTOM (333/4 X ATM SUPPORT (1V2 x 5 - 46V2) NOTE: SIDES, CENTER PANEL, BOTTOM, AND SHELVES ARE 3/4" PLYWOOD ADJUSTABLE LEG LEVELER |


