82 - The Complete Miter Saw Workstation, страница 19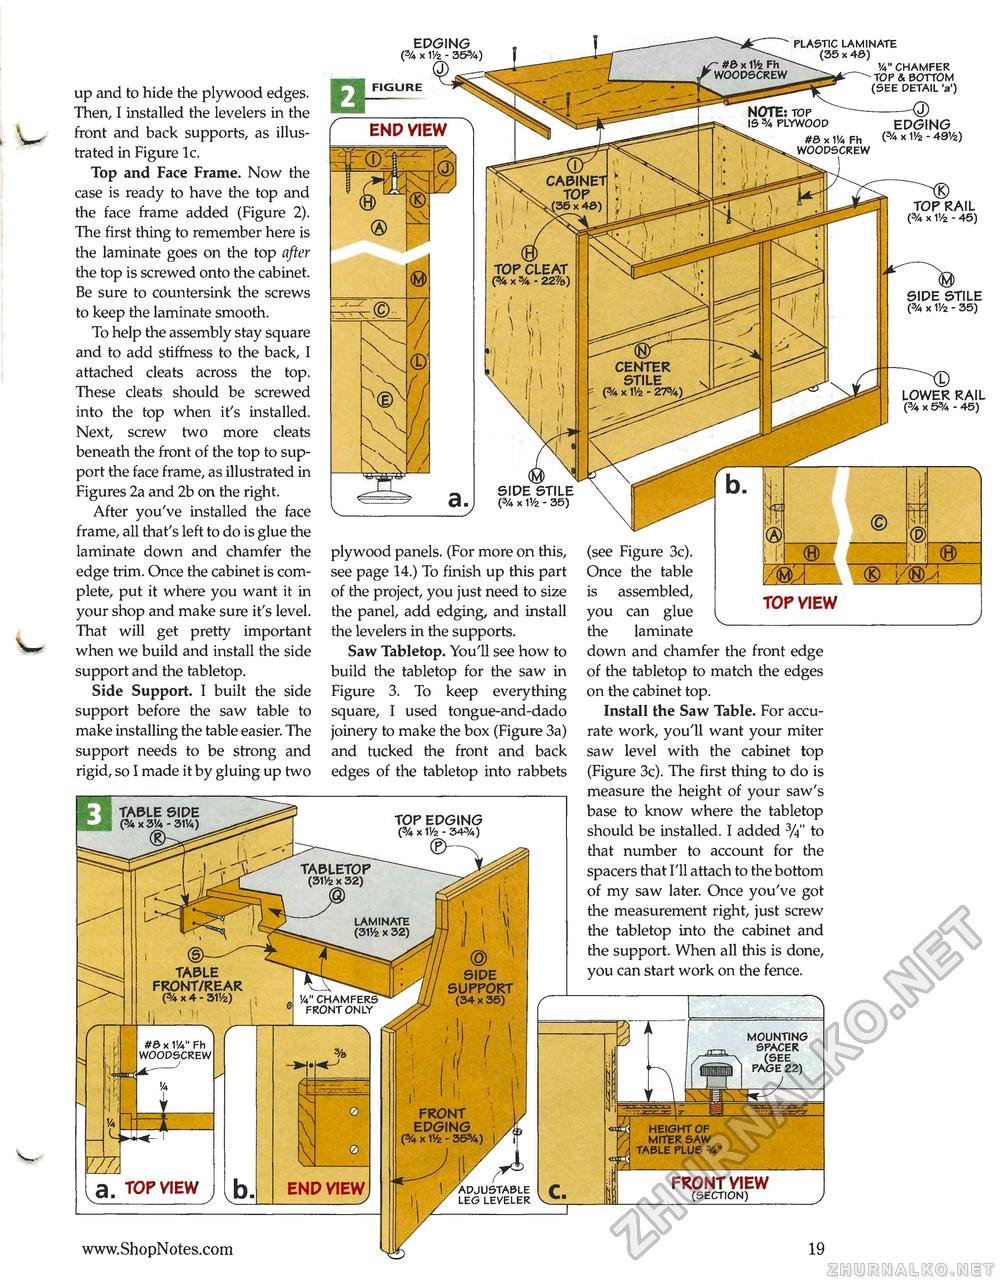
EDGING (% X Y/z - 35%) " PLASTIC LAMINATE (35 x 40) 7. va" CHAMFER WOODSCREW TOP & BOTTOM k (SEE DETAIL 'a') NOTE: TOP —- IS % PLYWOOD EDGING I #6 X 1'/4 Fh (%x1'/2-49V2) ' i , ]V WOODSCREW up and to hide the plywood edges. Then, I installed the levelers in the front and back supports, as illustrated in Figure lc. Top and Face Frame. Now the case is ready to have the top and the face frame added (Figure 2). The first thing to remember here is the laminate goes on the top after the top is screwed onto the cabinet. Be sure to countersink the screws to keep the laminate smooth. To help the assembly stay square and to add stiffness to the back, I attached cleats across the top. These cleats should be screwed into the top when it's installed. Next, screw two more cleats beneath the front of the top to support the face frame, as illustrated in Figures 2a and 2b on the right. After you've installed the face frame, all that's left to do is glue the laminate down and chamfer the edge trim. Once the cabinet is complete, put it where you want it in your shop and make sure it's level. That will get pretty important when we build and install the side support and the tabletop. Side Support. I built the side support before the saw table to make installing the table easier. The support needs to be strong and rigid, so I made it by gluing up two END VIEW CABINET TOP (35 x 4&) TOP CLEAT (% X % - 22%) SIDE STILE (% x IV2 - 35) LOWER RAIL (% x 5% - 45) plywood panels. (For more on this, see page 14.) To finish up this part of the project, you just need to size the panel, add edging, and install the levelers in the supports. Saw Tabletop. You'll see how to build the tabletop for the saw in Figure 3. To keep everything square, I used tongue-and-dado joinery to make the box (Figure 3a) and tucked the front and back edges of the tabletop into rabbets (see Figure 3c). . (fi) Once the table PSyj~ is assembled, you can glue 1 the laminate down and chamfer the front edge of the tabletop to match the edges on the cabinet top. Install the Saw Table. For accurate work, you'll want your miter saw level with the cabinet top (Figure 3c). The first thing to do is measure the height of your saw's base to know where the tabletop should be installed. I added 3/}" to that number to account for the spacers that I'll attach to the bottom of my saw later. Once you've got the measurement right, just screw the tabletop into the cabinet and the support. When all this is done, you can start work on the fence. TABLE SIDE (% X 3'/4 - 31V4) TOP EDGING (% X Y/z - 34%) TABLETOP (31Vz x 32) LAMINATE (31'/z x 32) TABLE FRONT/REAR (%x4-31!6) SIDE SUPPORT (34 x 35) Va" chamfers front only MOUNTING SPACER (SEE PAGE 22) #© x 114" Fh woodscrew FRONT EDGING (% x - 35%) HEIGHT OF MITER SAW TABLE PLUS %' FRONT VIEW (section) ADJUSTABLE | LEG LEVELER V 19 |


