82 - The Complete Miter Saw Workstation, страница 21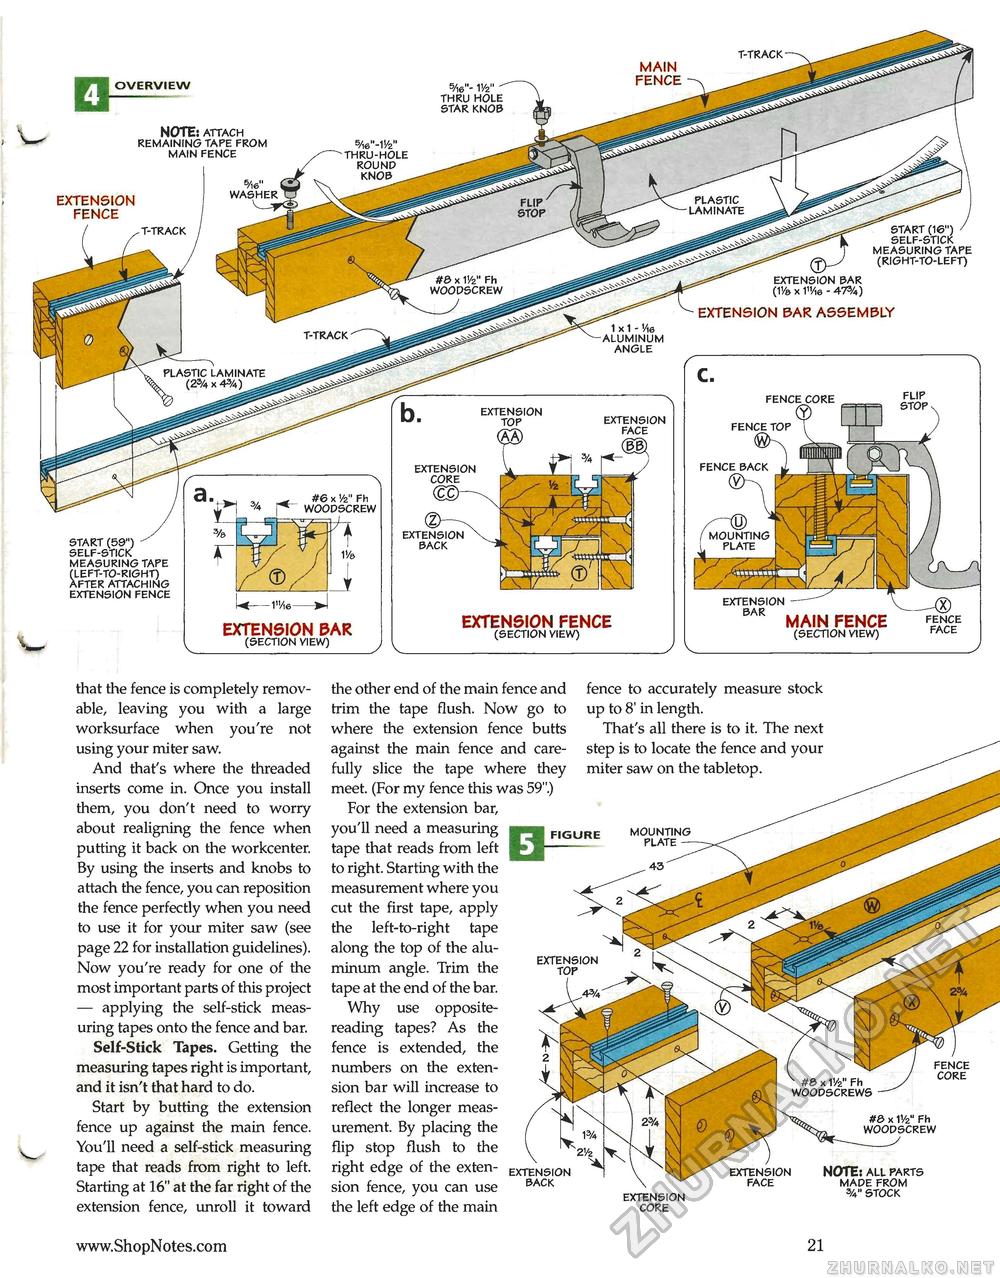
that the fence is completely removable, leaving you with a large worksurface when you're not using your miter saw. And that's where the threaded inserts come in. Once you install them, you don't need to worry about realigning the fence when putting it back on the workcenter. By using the inserts and knobs to attach the fence, you can reposition the fence perfectly when you need to use it for your miter saw (see page 22 for installation guidelines). Now you're ready for one of the most important parts of this project — applying the self-stick measuring tapes onto the fence and bar. Self-Stick Tapes. Getting the measuring tapes right is important, and it isn't that hard to do. Start by butting the extension fence up against the main fence. You'll need a self-stick measuring tape that reads from right to left. Starting at 16" at the far right of the extension fence, unroll it toward B/l6" WASHER PLASTIC LAMINATE FLIP' STOP T-TRACK #& x V/z" Fh WOODSCREW T-TRACK PLASTIC LAMINATE (2% x 4%)- T-TRACK- overview NOTE: ATTACH REMAINING TAPE FROM MAIN FENCE sAe"- W THRU HOLE STAR KNOB MAIN FENCE EXTENSION FENCE 5/,6"" 1V2" "THRU-HOLE ROUND KNOB START (16") SELF-STICK MEASURING TAPE (RIGHT-TO-LEFT) EXTENSION BAR (11/a x 11,/i6 - 47%) EXTENSION BAR ASSEMBLY 1 X1 - Via -ALUMINUM ANGLE START (59") SELF-STICK MEASURING TAPE (LEFT-TO-RIGHT) AFTER ATTACHING EXTENSION FENCE #6 x V2" Fh WOODSCREW 1"/l6- EXTENSION BAR (SECTION VIEW) EXTENSION TOP EXTENSION FACE EXTENSION CORE EXTENSION FENCE (SECTION VIEW) FENCE BACK MOUNTING PLATE EXTENSION FENCE FACE MAIN FENCE (SECTION VIEW) the other end of the main fence and trim the tape flush. Now go to where the extension fence butts against the main fence and carefully slice the tape where they meet. (For my fence this was 59".) For the extension bar, you'll need a measuring tape that reads from left to right. Starting with the measurement where you cut the first tape, apply the left-to-right tape along the top of the aluminum angle. Trim the tape at the end of the bar. Why use opposite-reading tapes? As the fence is extended, the numbers on the extension bar will increase to reflect the longer measurement. By placing the flip stop flush to the right edge of the extension fence, you can use the left edge of the main fence to accurately measure stock up to 8' in length. That's all there is to it. The next step is to locate the fence and your miter saw on the tabletop. MOUNTING PLATE figure EXTENSION TOP FENCE CORE #e> x iy2" Fh WOODSCREW EXTENSION FACE EXTENSION CORE EXTENSION BACK NOTE: ALL PARTS MADE FROM %"STOCK 21 |


