82 - The Complete Miter Saw Workstation, страница 22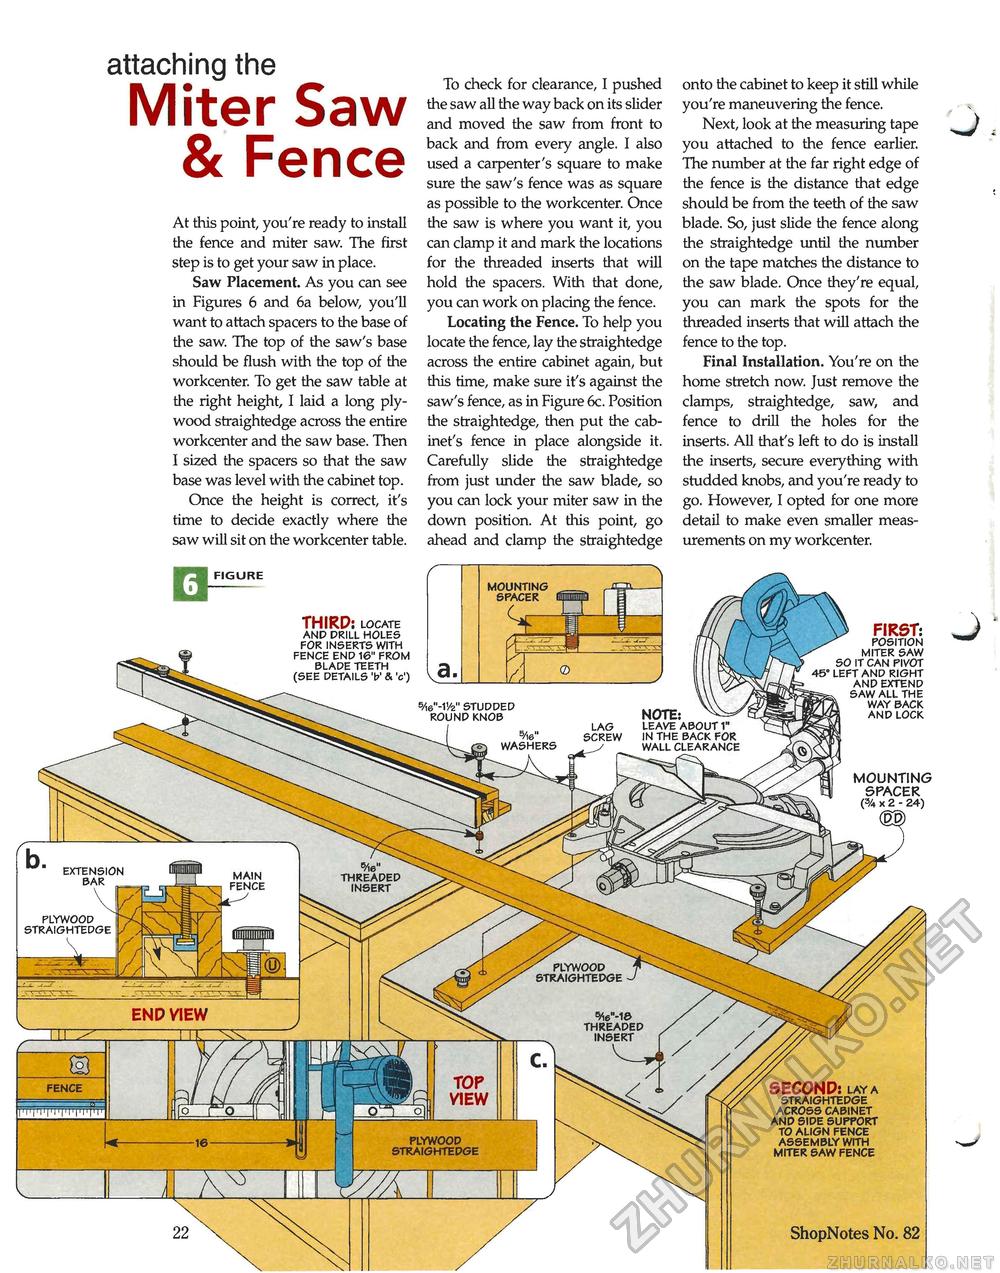
attaching the Miter Saw & Fence At this point, you're ready to install the fence and miter saw. The first step is to get your saw in place. Saw Placement. As you can see in Figures 6 and 6a below, you'll want to attach spacers to the base of the saw. The top of the saw's base should be flush with the top of the workcenter. To get the saw table at the right height, I laid a long plywood straightedge across the entire workcenter and the saw base. Then I sized the spacers so that the saw base was level with the cabinet top. Once the height is correct, it's time to decide exactly where the saw will sit on the workcenter table. To check for clearance, I pushed the saw all the way back on its slider and moved the saw from front to back and from every angle. I also used a carpenter's square to make sure the saw's fence was as square as possible to the workcenter. Once the saw is where you want it, you can clamp it and mark the locations for the threaded inserts that will hold the spacers. With that done, you can work on placing the fence. Locating the Fence. To help you locate the fence, lay the straightedge across the entire cabinet again, but this time, make sure it's against the saw's fence, as in Figure 6c. Position the straightedge, then put the cabinet's fence in place alongside it. Carefully slide the straightedge from just under the saw blade, so you can lock your miter saw in the down position. At this point, go ahead and clamp the straightedge onto the cabinet to keep it still while you're maneuvering the fence. Next, look at the measuring tape you attached to the fence earlier. The number at the far right edge of the fence is the distance that edge should be from the teeth of the saw blade. So, just slide the fence along the straightedge until the number on the tape matches the distance to the saw blade. Once they're equal, you can mark the spots for the threaded inserts that will attach the fence to the top. Final Installation. You're on the home stretch now. Just remove the clamps, straightedge, saw, and fence to drill the holes for the inserts. All that's left to do is install the inserts, secure everything with studded knobs, and you're ready to go. However, I opted for one more detail to make even smaller measurements on my workcenter. W-W STUDDED ROUND KNOB NOTE: ^^ LEAVE ABOUT 1" IN THE BACK FOR WALL CLEARANCE WASHERS EXTENSION BAR PLYWOOD STRAIGHTEDGE plywood straightedge W-1© threaded insert TOP VIEW plywood straightedge qhgure 22 ShopNotes No. 82 THIRD: locate AND DRILL HOLES FOR INSERTS WITH FENCE END 16" FROM BLADE TEETH (SEE DETAILS V & 'c') FIRST: POSITION MITER SAW SO IT CAN PIVOT 45° LEFT AND RIGHT AND EXTEND SAW ALL THE WAY BACK AND LOCK MOUNTING SPACER (% x 2 - 24) (DD) mounting spacer END VIEW SECOND: lay a straightedge across cabinet and side support to align fence assembly with miter saw fence threaded insert _Q fence |


